As I had mentioned yesterday a lot of people seem to think that these presets of mine are expected to produce film like results with one click. Although you can get excellent results from these presets with a single click, you will not properly emulate any film without some additional work. Hopefully this will guide you a bit further into using my presets for emulating the look of a film.
1: Know Lightroom's Limitations
Okay this is right out the barn door, know what Lightroom can and cannot do. You can not emulate grain in any way, shape or form currently. Outside of shooting at a high ISO to get noise, you will have to add grain in Photoshop, Paint Shop Pro, or GIMP. I have tried to simulate the look of grain with noise reduction turned off and sharpening cranked up...it does not work. If you need grain add it in your pixel editor.
Lightroom can manipulate any RGB image, however, it will not be able to utilize all its power on a rasterized image. If you need to edit a non-RAW picture, make sure that it is at it's highest quality. At least a 16-bit uncompressed TIFF or PSD. If it is a scan, get the highest color bit-depth and the highest resolution feasible, the more information Lightroom has to work with, the better. Whenever possible use RAW. I develop these presets assuming that they will be utilized for RAW processing. Apply them before you hop into Photoshop with an image.
Lightroom uses a unique colorspace based of Prophoto RGB. Know this when exporting. There will be color compression. Always proof your exported images. If you are doing pixel manipulations in Photoshop, I feel you should export as a PSD at highest bit-depth in the Pro-Photo colorspace. Or, you can export the file as a DNG with all your edits saved, and open that DNG in Photoshop ACR. (hint: if you use ACR alot you can save the develop settings embedded in the DNG in ACR and utilize any preset in ACR that way. Kind of making ACR versions of any preset. I will be getting to that eventually.)
The more you know about Lightroom, the better you will be able to use my, or anyone else's presets. Read tutorials, grab a book. As NBC says "The More You Know...."
2: Watch those skin tones!
In color slide presets, often you will get horrid skin tone, especially on Caucasian skin. If they appear too red or orange, go to the color mixer and lower the Orange channel saturation until the skin tone looks correct. If you only drop the saturation until the skin looks good, it will improve the photo and alter the color response being simulated only slightly. Beware, doing this with a lot of fall colors in frame, as they will be effected. The less change required the better. If it still does not look right, hit orange luminance next, and last red saturation. Try to avoid messing with red as much as possible, especially since it is a primary color and changes will effect the simulation quite a bit.
3: Dig for artifacts.
Primarily when working with black and white presets, keep an eye out for strange halation effects and odd toning in your subject, essentially "breaking" the image. If you notice either, lower or raise the offending color channel and see if it will alleviate the problem (refer back to the original color image). If that does not fix the problem, adjust the sharpening first (you can always sharpen in Photoshop), and then look at your contrast. Sometimes excessive contrast will cause images to "break".
4: Know what the film should look like.
If you shoot or have shot the film you know what to expect, making it easier to duplicate the look. Presets are made to give you a good starting point, and I develop these to simulate color reaction and tone curve as accurately as possible. However, film reacts differently in the real world, so know what you are looking for. If you never shot a particular film you can always google the film you wish to emulate and search flickr for images made with said film. Compare your conversion to these and make adjustments as needed. This is the best way to simulate film, if you know what you are trying to achieve, its easier to get there...the preset just started you in the direction. Keep in mind, exposure has MASSIVE effect on film, and different exposure will react differently. Two different frames of Tri-X will look different, even of the same subject, as exposure changes. Lightroom can not ever simulate the nuance of chemical reactions.
5: White balance keeps your whites whiter and brights brighter!
Use your selective white balance creatively! The white balance will change everything in an image. Experiment and find what you like, use it to warm and cool color. White balance can completely alter the toning of a monochrome image. Push it around to get what you need. If you are trying to copy the look of another photo, white balance is your best first step.
6: Split toning can cast your colors.
If your sample photo you are emulating has a slight color cast, figure out what shade it is and run down to the split toning in your develop tab and pop that color into both the highlight and shadow tones. Then set each tone to a level of saturation, I usually hit the highlight around 10 and the shadow around 20, then play with the balance until you get what you like. You can also create a duotone monochromatic image like this.
Some of my preset will have the split tone used to get a cast with the first click. Adjust the toning to suit your needs.
7: Watch your contrast and black clipping.
Any image you preset can be improved by adjusting the contrast and black clipping. Each image is different, and needs a unique approach. Even an Auto preset can get it way off. For what its worth, alter any of the Basic sliders until you get what you want. Or develop the image as it is imported until you get an exposure you like, then apply a Curve preset, applying only the color tones and curve.
8: The devil is in the details.
Don't forget to look at the clarity, sharpening and noise reduction for an image. If a picture does not look right, often increasing clarity, adjusting sharpening and cutting noise reduction (especially luminance) can give it a quick make over.
That is it for now, so go and play around. Presets do not make the image, you do. Also, do not feel compelled to have to duplicate a film's look. Often a single preset click can improve an image and you think it looks great...if that's the case leave it as is. You can always say it was inspired by Kodachrome 25 (such as picture above).
Read the readme.txt files included in zip files. I often have hints specifically for that preset. Often the hints are generic and good for any preset, other times the hints apply only to the particular preset.
My presets are to help you out when you want a film look from digital. I can not encourage you enough to go out and shoot film. It causes you to look at photography differently. I carry two film bodies every day, a Minolta 7000 and a Yashica Manual SLR. I shoot them as often as I do my Canon EOS digitals. If you have to go get a five dollar point and shoot film camera, get it and a good quality film and head out for a day. A fixed focus 28 mm point and shoots loaded with Portra VC can take great pictures on a slim budget, and force yoy to only consider your composition.
Hope this helps a bit, more hints in the future.
Until next time,
Michael
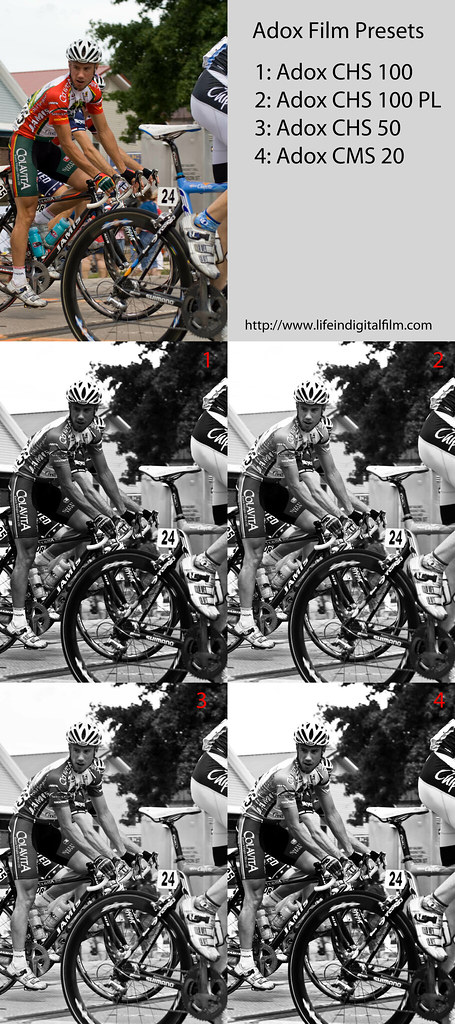
Note: All sample photos I post with releases ARE 1-click applications. I do no further editing. Just click the preset, export to jpg and post to flickr.I felt I needed to clarify that, I did not want people thinking that my samples were further processed, they are there to show the presets action.