20090329

Tutorial: Presets, In Depth - Part 2: Creating Presets (and designing them to play together nicely)

Alright, sorry for the delay, but making money takes precedence over the blog, and I am sure my clients see it the same way. But anyways, let’s continue our exploration of Lightroom and ACR presets.

Today we will discuss the methods by which you can create presets for Lightroom 2 and ACR. I am sure many of you already know how to do so, but I am sure some of you don’t. We will cover a basic creation process in both Lightroom and ACR, but first I would like to take a detour and discuss preset “stacking” for a few minutes. Once we understand the stacking of presets, we can make presets that play well together allowing for multiple effects to be combined.

One common complaint about presets is that you can only use one at a time. This is not entirely true, but in general seems to be the norm. Presets (in both LR and ACR) adjust the different sliders in the develop module to create the desired effect for the image created on export. If you apply one preset, then another, most usually you will end up with just the second preset applied. This is due to the fact that you only get one slider for each tool, this isn’t Photoshop and there are no layers. You only have one set of tools, and the last preset applied will always override and previous presets or manual settings. This is the reasoning behind the belief you can only use one preset at a time.

That is not to say that you cannot use well designed presets in unison with one another. When you create a preset in Lightroom, the default dialog setting will save every setting applied to the preset. This creates a preset that will over-ride every single slider in the develop module. Your brand new preset will not work with other presets, it will replace them. This is fine for an import preset you will apply to every photo you import, but is not good for general creative presetting.

When creating you image, make note of what tools you use to generate your effect. I have a text file I print out to make hard copy notes about what I alter in the process of making my presets, when filled out it shows me what sliders I adjusted and those I did not. This allows me to save my presets with only the tools needed for the desired effect. If you do not touch the Basic Tone settings, make a note of that. When it comes time to make the preset, we will exclude the Basic Tone settings from the preset. If your preset only adjusts the Tone Curve, when saving the preset, make sure that only the Tone Curve is selected to be saved in the preset. By creating presets that only adjust what is needed for the effect; you will be able to combine multiple presets to achieve your desired effects. If your preset does not require any given slider to be manipulated, you should not allow your preset to alter those tools when applied.

I will recreate my preset design form as a prettied up PDF file, and release it here on LIDF for anyone else interested in being as anal as I am about my preset design. I wasn’t always this way, as many of my early presets alter every single slider; even if they are not needed…it was bad design and it embarrasses me. I am slowly updating the older preset to fix this oversight, eventually it will be done. IF you are just starting, don’t make my mistakes.

Now that I have that covered/off-my-chest, let us move on with creating a preset. Choose yourself a photo, and go ahead and make a few adjustments. As you make adjustments, make not of what setting you are altering, as these notes will be used to ensure the stacking-compatibility discussed above. I chose a random image from a wedding I shot recently.
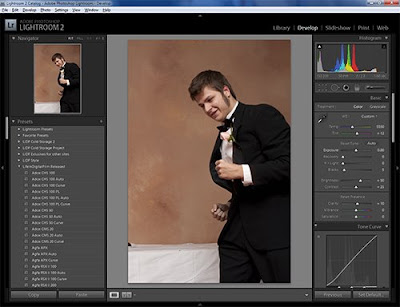

For this tutorial, I am going to make a preset that adjusts the Vibrance, Saturation, Clarity, Tone Curve, Split Toning and applies a strong vignette. Honestly, this preset sucks, it gives the picture a really bad look. However it is suitable for what we are going to do here. Here is a view of my develop module sidebar, showing only what is changed.


I make it a habit to start out my development process with all the tools closed. Only opening the tools I need as needed. As you can see, I did not even mess with HSL or Detail tools, so they are still closed. Once done with the image adjustments, I make my notes on which Items were adjusted in the Develop Module. We are ready to save this preset.

Now head over to the Left Sidebar and go to the Presets Tab. Click on the plus (+) icon on the Presets tab.
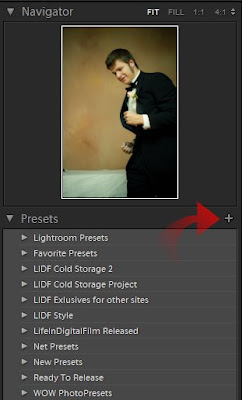
Once you click the plus icon, it will open the New Develop Preset dialog.
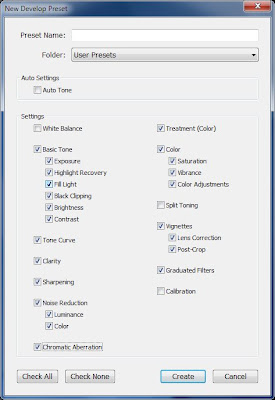

This image shows the dialog box with the normal default settings. You dialog will show the same options used in the last preset saved on your machine. If you click save now, your preset will be saved adjusting every slider in the develop module, not what we want. So, start un-checking the boxes of the tools you do not require. Here is my dialog, adjusted for my preset.
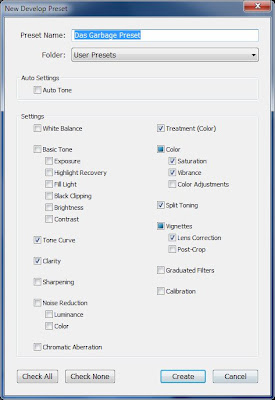

This dialog shows only the tools needed for the presetted effect selected. The Color and Vignette checks became boxes, as I only saved some of the sub-options there in (Vibrance and Saturation in Color; Lens Correction in Vignette). The Color check box’s Color Adjustment selection is used when you make changes to the HSL settings; I felt I should mention that, as it is not overtly clear.

Also, at the top of the preset dialog is a box of options, called Auto Settings:
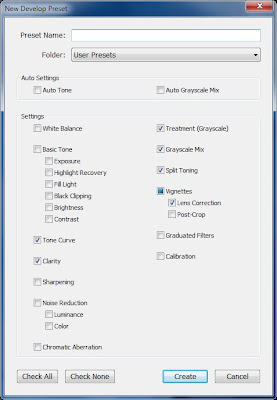

Color images will show only Auto Tone, monochrome images will show Auto Tone and Auto Grayscale Mix. Auto Tone, when selected, caused the preset to automatically adjust the Basic Tone sliders to what Lightroom deem to be the most appropriate settings. Auto Grayscale Mix will allow Lightroom to automatically adjust the Grayscale mixer, to what it deems to be a proper grayscale mix. These tools can be handy, but can create unpredictable results in application. I never use the Auto Grayscale, but I frequently use the Auto Tone option, especially in my film emulation Auto Presets.

Now click the Create button, and your preset will appear in the Preset Folder defined at the top of the dialog.
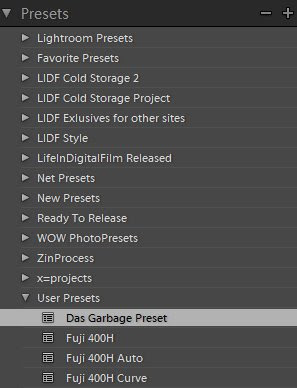

You have made your preset, we will discuss exporting your presets for others to use later in Part 4 of this series.

So, that covers Lightroom. So we will just jump to ACR, and just cover the process to save your preset. We will assume that you already have the image adjusted.
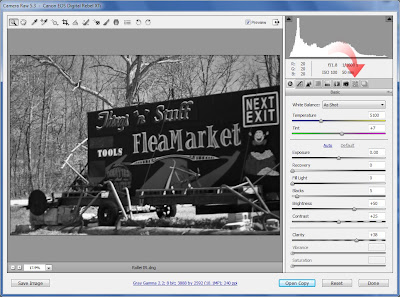
I again have the same image adjustments made to the same image.
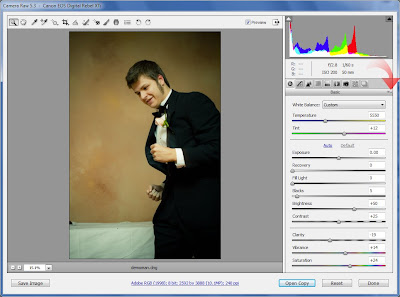

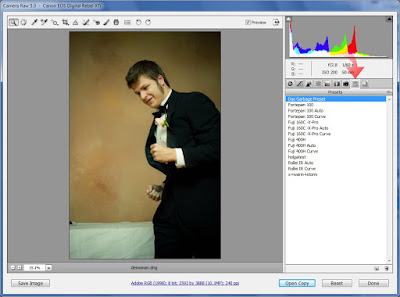
Click on the option icon, depicted by the arrow in the above image to open the File Settings Menu
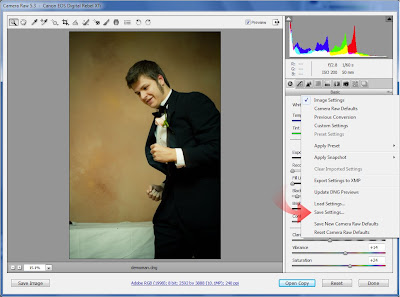

Click on Save Settings... This will open the save setting dialog.
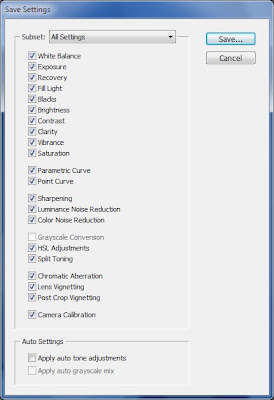

This dialog looks a lot like the New Preset dialog in Lightroom. Again, it selects every adjust made available to you. Follow the preset design rules, and only select the options that you need for the preset. Here is mine again.
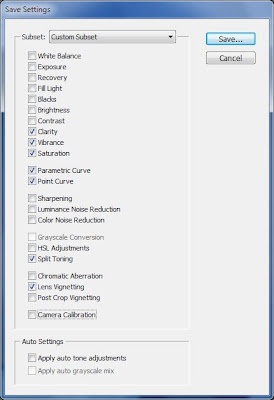

Once everything is properly configured, click Save… This saves your preset, bringing up the save dialog.
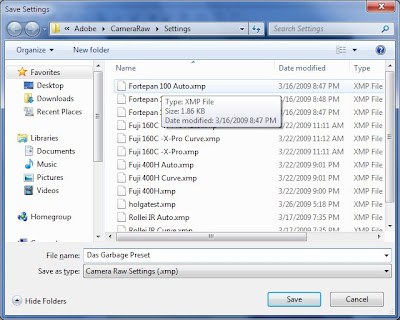

Give it a name, and click Save. You preset is now in ACR’s preset menu, as noted in the following image:

You are done.

I should have a few good posts in a row over the next few days, so check in again soon.
Part 3 will be coming soon. Covering updating and combining presets.

Until then,

Michael

20090325

Status Update

Just letting everyone know, I am still working on the preset tutorial series and I have a few presets in the oven. Just a little busy on other projects currently, even took a few days off my day job to get caught up. In the middle of 3 projects for different clients, one involving a lot of slide scanning. Playing catch up on these today and maybe tomorrow. If all my tasks get done today I will have the next article in the series up Friday, and a new preset Saturday.

Just wanted to let everyone know I haven't forgot, just a bit busy.

Thanks,

Michael

20090323

LR/ACR Preset: Fuji 400H

LR/ACR Preset: Fuji 400H

Sorry if you were expecting a Monday Update. Felt that it really was not needed this week. Will resume next Monday. Today I felt like releasing a new preset, kind of an atonement for the delay a week ago with the hard drive failure. Tomorrow the next portion of the Presets tutorial will be up.

So today I bring you a straight emulation of Fuji 400H. Fuji's middle range speed "pro" film, it features a more subdued color palette, placing it in line with the Kodak Portra 400 NC, making it great for candid portraits. The emulation does tend to run a little dark, so it is best on bright images. I hope you find the emulation enjoyable.


Well until tomorrow,

Michael

20090322

LR/ACR PReset: Fuji 160C X-Pro

LR/ACR Preset: Fuji 160C Cross Processed

Recently a friend of mine was over at my house, discussing film emulation. As he was getting ready to leave, he asked me if I had any E-6 I needed processed, as he does his own and his chemistry is getting a tad old. I said I didn't have any E-6, but if he was getting rid of the chemistry soon anyways, as he no longer shoots film, he could run some c-41 print film through the slide process. He had never done it before, but he went ahead and took four rolls of C-41 film from me to process.

Well a few days ago, he got the film back to me. Fuji 160C was one of the films he cross-processed, and it turned out to give some really wild results. Almost unusable for my purposes, but it has an edge, especially if there are no people in your image.

See, the processing looks great, interesting color-shifts, green going a touch neon; perfect for some creative landscape or artistic animal work. But is just does not work for humans, as it turns any skin tone a funky shade of yellow. I do not like the look on skin. That is not to say that you might not like it, or may find a way to make it work in an image, its just I don't think I can.

So if you see a possibility for it, download it and take it for a spin. Let me know if you can make anything out of it.


There will be more upcoming C-41 to E-6 cross processes upcoming, most less harsh than this one. Also I have some revisits upcoming, where I shoot another roll of an already emulated film and emulate it again. Be it a different expiration date, different developer or just different conditions at time of test shots. I try to emulate any roll I shoot, and if they are good enough, they will make it here. Worst case scenario, you have 5 different Tri-X presets to choose from, but choice should never be a problem.

Back soon with Part 2 of the Presets series

Until Then,

Michael

20090320

Tutorial: Presets, In Depth - Part One: Installing and Reading Presets

Again, apologies to my regular visitors, and all of you who already know the information I am about to regurgitate. There will be a new preset release soon, as in tomorrow, so please bear with me. If you are new to Lightroom, then go ahead and read on.

Okay, so you just downloaded some new presets, and you can’t wait to take them for a spin. First you will need to import them into your application of choice, be it Lightroom or ACR. We will walk through the process for both applications. Then I will show you how you can look inside a preset and see what it does, without even running it in your application.
So first, place your preset files (Extensions of .lrtemplate for Lightroom, .xmp for Photoshop) into a folder on your desktop. Name it whatever you want, as it is just holding the files for now. If you downloaded an archive, such as the .zip files I use here, make sure you unpack the archive before moving on.

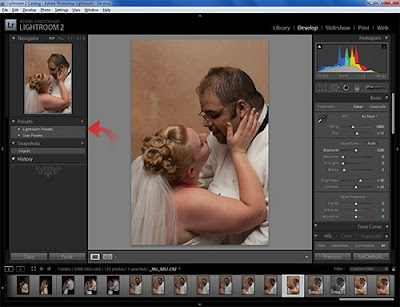
First we will look at the method for Lightroom. Simply fire up Lightroom and get into the Develop module. Once the module loads, look to the left panel, and scroll down to the Preset tab, if you don’t already see it. Make sure to expand the tab if it has not already been opened by clicking on the small triangle on the left.


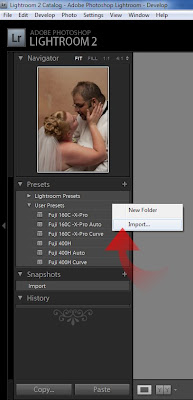
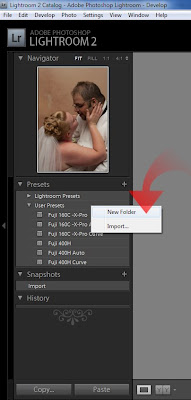
You should now see a folder entitled Lightroom Presets, which are the presets included with Lightroom itself. Beneath it is a folder entitled User Presets, bring your cursor next to it and right-click. Up pops the contextual menu with the options of “New Folder” and “Import”.


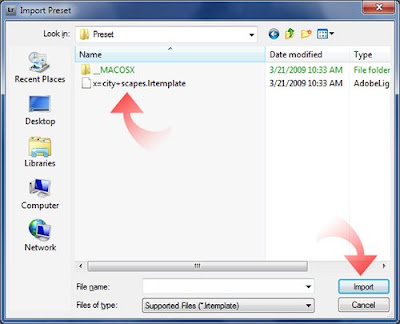
Click on “Import…” Once the dialog box opens, point the explorer to the desktop and open your folder you made earlier. Inside, highlight the .lrtemplate file you wish to import.


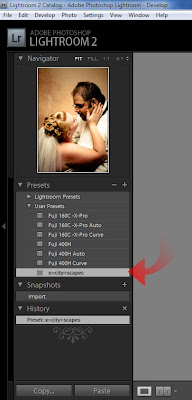
Then click “Import” and your new preset will be installed in the User Presets folder.


Now your preset is installed and ready for use. However you will rapidly make your User Presets folder a catastrophic mess. So you need to organize a bit. Let's go ahaead and make a new folder.

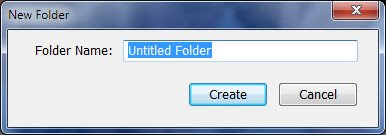
To make a new folder, right click again by the User Presets folder and choose “New Folder”.


Name it whatever you choose.


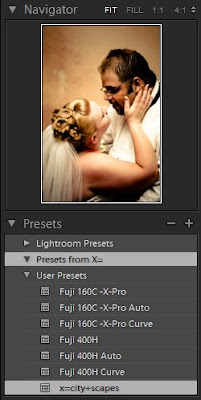
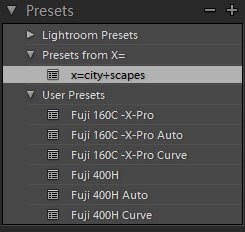
This will create the new folder in the presets menu.


You can then drag the imported preset to the new folder or right-click next to it and import another preset into the new folder.

Pay attention to how you organize your presets in Lightroom, as they are a pain to sort after you have amassed a large amount. This is since Adobe only allows 1 level of folders in the presets menu. Hopefully in future releases Adobe may endow us with nested folders, and if they do it will drastically improve organization of presets.

Installing presets in Adobe Camera Raw nowhere near as elegant or user friendly, however it is quick and effective. In fact, to install the presets, you do not even have to open Photoshop, let alone ACR. To install presets into ACR, it is easiest to do it via your operating system. So open up Finder in Mac or Explorer in Windows, and point it to the following path (I believe Vista should be the same as Windows 7, but I am not sure. Vista users try it both ways):

Macintosh: /Users/UserName/Library/Application Support/Adobe/CameraRawFolder/Settings

Windows: C:\Documents and Settings\UserName\Application Data\Adobe\CameraRaw\Settings

Windows 7: C:\Users\UserName\AppData\Roaming\Adobe\CameraRaw\Settings

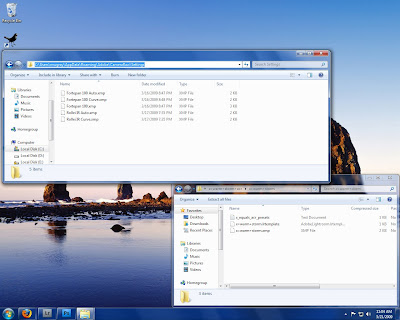
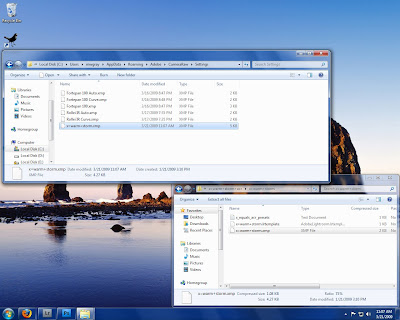
Please insert your user name for your system into the respective path where you see UserName. If your system is installed normally, this path will place you right into ACR’s preset folder. Here is a screen from my system:


Now all you have to do is copy the .xmp presets for ACR right into this folder.


Close the folder and start Photoshop. Open a RAW file to bring up ACR.


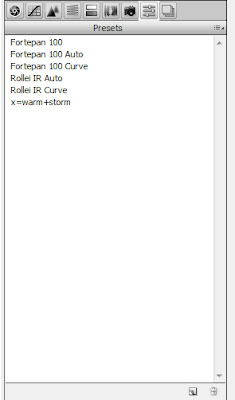
Once ACR opens, click on the presets tab.


Almost magically your presets are ready to go, no other work needed. I strongly recommend only keeping presets you frequently use installed in ACR, as there is no method by which to sort them.

This is not to say that this is the only way to install presets in either program, but they are the most straight-forward in my opinion. Likely most all of you already know how to do this, but I felt that I should cover it anyways. Now onto a topic some people I know are not aware of… how to see what a preset does without loading it into Lightroom, or “Reading” a preset.

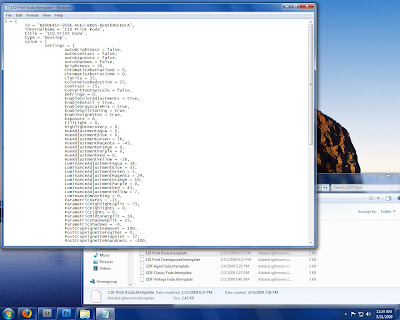
To read a preset, simply open the .lrtemplate file in any text editor. In Windows, you can just open Notepad and drag the .lrtemplate onto the empty Notepad window. This will open the preset in plain text. Although it can appear to be intimidating at first, take some time and look it over. You will start to see correlations between the text and the sliders in Lightroom. (Click the image below to view larger):


If you look at a presets text dump, I am sure you will start to see the correlations from the text file to Lightroom. A preset automatically configures your Develop Module tools for you, that is all they do. By looking at the text dump of any preset, you can see exactly what it will manipulate in Lightroom before you use it allowing you to know what to expect. It just takes a little time to get used to a tools internal name in the preset compared to the label on the slider in Lightroom. With a few reads and comparisons to the Develop Module you will get a quick understanding. You may not look at a preset’s text dump often or at all, but when you are away from your Lightroom computer, like at work, taking a peek inside a preset can tell you a lot, especially when you get familiar with Lightroom.

Also, it is possible to convert Lightroom presets to ACR. I have a tutorial up on X-Equals that explains the method to accomplishing that. Jump on over. Also, the presets I installed during this process were from Brandon's excellent collection of presets that can also be found on the X-Equals blog, click to be transported to his list of great presets. Don't forget to check out my article on sharpening in Lightroom over there too!

Hopefully this might help someone. If not, I just wasted a lot of my time writing, well not too much time. But again, I felt I needed to cover these tasks if I am to move firther into discussing presets in Lightroom and ACR.

Back again soon,

Michael