20090209

Tutorial: Snapshots (The Lightroom Version Control System)

When I shot a wedding about six months ago, I came to the startling realization that I had some major flaws in my photographic workflow. It was my first job of significant size, about 2000 images shot during the day. When I brought it into Lightroom, it was not too bad; I went in and flagged my photos, fixed bad crops, made the normal adjustments and exported for my proof prints. Not so bad. Fun even.

Then my print orders started coming in. This one in black and white in 5x7 and again in color, make it look like film, in 8x10. Spread this out across about 300 photos, the next think I knew I had about 1000 different virtual copies running about, in different crops with different processing. After that job, I decided I need to figure out how to organize a bit better.

I started playing around some, and in the process of developing my presets, I discovered the wonder of Lightroom Snapshots. Snapshots let you save a version of the file, with all processing intact to use later on. You can save multiple revisions of the same file into a handy menu located just above the History panel in the left develop pane. You can save a B&W version, color version, different crop sizes, different vignettes and keep it all contained in the original file in Lightroom. No virtual copies needed.

Now I'll walk you through the snapshot process.
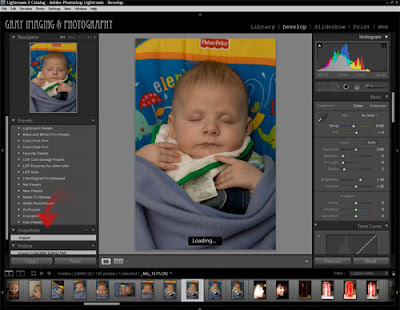


So we have the image up. Look for the arrow on the left side of the screen showing you the Snapshot pane. This is where the action goes on. Now, we will assume you have been processing you image and you have your final color version ready. So you are going to make a snapshot of the full frame image.

Just click on the plus icon on the Snapshot panel.
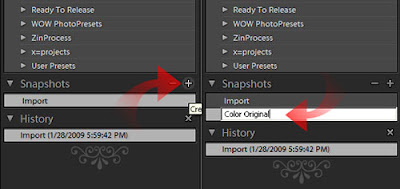


After you click on the plus icon, a white data box appears where you give the snapshot a name. The name you give is attached to the snapshot and embedded in the files entry in you LR catalog.

Now make another version of the same image. I am taking it B&W, cropping it to a 5x7 and adding a vignette.
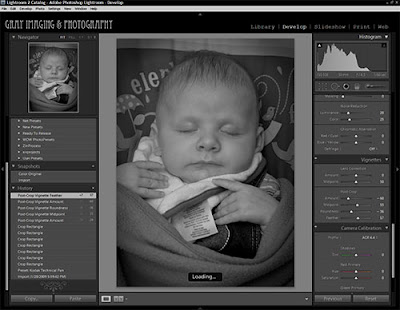

With that applied, I repeat the steps to make a snapshot.
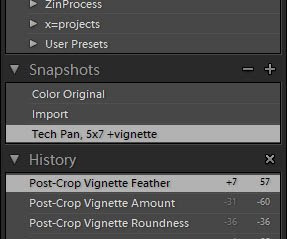

Now you can see 3 snapshots. one for the Color Original, one for import, and one for the B&W 5x7. Just by simply clicking on any of these snapshots load up all the adjustments to provide you with the image that you have saved. There is no limit I have ran into for snapshots and I often have over ten different versions of each image.

An added bonus, if you write the metadata to the RAW files from within Lightroom, all the snapshots will be saved in either the DNG or a sidecar XMP file. The snapshots are then portable and can be used in another copy of Lightroom or even Adobe Camera Raw. You will find the snapshots in the presets tab in ACR.

I know this is a rather rough run-down on the process of using snapshots, but give it a try. It is nice to have eight different revisions of an image at your fingertips without having excessive virtual copies running amok in your catalog. As I said, snapshots are Lightroom's own Version Control System.

Keep Shooting,

Michael

P.S. Cold Storage Presets Collection....you know the rest.

20090208

LR/ACR Preset: Rollei Retro


LR/ACR Preset: Rollei Retro, originally uploaded by GrayImaging.

Finally I am making with a new film emulation preset. I hope everyone enjoyed the style preset I released a few days ago, but now back on to the meat and potatoes.

This fine Sunday morning I bring to you LIDF's interpretation of Rollei Retro. Apparently, when this film was introduced, it was relabeled Agfa APX. However, when I developed this roll, the frame border stated MACO as the manufacturer. I don't know for sure what the real truth is behind the origin of this film, but I do notice a slight difference in color response. That may just be the effects of age and a different development process (the Agfa APX preset I made was developed at a local; shop, most likely in d-76; I developed the roll of Rollei Retro at home with 1:3 Rodinal for 15 min @ 24 C).


I hope that this and my other presets find a home in your workflow, be it for fun or professional work. I enjoy making them. If you enjoy using them, as much as I loathe to ask, would you please consider buying my Cold Storage Archive. It can be ordered in the right hand corner of the blog or you can click HERE for more information. Help me keep providing these tools to you. [I will keep begging until I have my hosting paid for, then I will lay off].

Anyways, everyone have a great day/night and hope your coming work week is good to you.

Until next time,
Michael

20090206

News: LIDF Update and Guest Blog Post

Just wanted to drop a note today. First, there will be a new film emulation preset posted this weekend. I had an overly busy week this week and fell behind on my emulation process. Back up and running and releases will ensue.

Next, wanted to update you on the Cold Storage set fundraiser. So far I have made 9 sales, and I thank those of you who have purchased it so far. I am just under half way to the cost of a year's service with the hosting company I want to use. So if you are thinking about it, please click on the box to your right to purchase the set. After I get the hosting purchased I will let you know, and then any more funds generated will go towards purchases of more film to emulate and toward the cost to develop said film for emulation. Come on, if you like what you get from this site, please consider supporting it's growth. As it grows I will be able to provide even more tools for getting that classic film look.

As to the redesign, I am working on a much better setup done in WordPress. Have it on a testbed Linux server in my home, and it is building up pretty good. at the rate I am getting funds from the Cold Storage project, I should have the new design ready to roll out as soon as I setup with my new host. I hope that the redesign improves on the look and usability of LifeInDigitalFilm.

Also working on some new projects. As I have already branched off into Adobe Camera Raw presets, I have started dealing ore with doing the same thing in Photoshop. I am working on a few Photoshop actions to get film effects, and a couple actions to give a conving grain for proper film types. Hopefully then if you process a file in LR with a film preset you can then hop into Photoshop to add a realistic grain. Stay tuned for that, no ETA yet, but it is coming.

Finally, I have been doing some work with Brandon from X-Equals. I have already had one guest spot on his blog so far, and a new one is posted today. Click on over to his great site to read about my personal approach to Lightroom and Photoshop in my business work-flow. Hop over and read it, if you haven't done so already. If you have never spent time on X=blog, stay a while and read some articles...you will learn something new. Go there soon...click HERE.

Well I'll be back in the next 48 hours to release my newest preset...

Until Then,
Michael

20090204

LR/ACR Preset: Fades


LR/ACR Preset: Fades, originally uploaded by GrayImaging.

Tonight I am deviating from standard operating procedure. Tonight's preset is a style preset, not emulating anything but an effect. In my fades set, you get three basic effect presets that fade the colors in your image. the Vintage and Aged presets give a color cast to your photo. Classic just kills saturation and kicks up Luminance. There are no auto versions, no curve, just basic.

I've been busy this week and have not had time to polish up any film emulations. These presets were cooked up for a discussion in the Flickr Presetting Lightroom group, where we were trying to emulate the style of a photographer with a preset. I failed at my intended goal, however this is the result. I like the finished preset, so I am releasing it to keep my promise of two new presets a week.

As always, there is a Lightroom and ACR preset for each.


As always, enjoy them, back to film emulation this weekend. Watch for my newest emulation then.

Until then,
Michael

20090201

LR/ACR Preset: Fuji Velvia Cross Processed [PresettingLR Exclusive]

A few days ago I released a preset only for the people in the Presetting Lightroom community over at Flickr. Just in case you were not aware of it, the Presetting Lightroom group is an excellent resource for great presets and a good place to look for help when you run into Lightroom issues. Please come on over and join us.

You can find my Fuji Velvia Cross-Processed preset in the discussions on the group. Look around, you'll find it...just look for the picture I am showing you above.

Click to head on over....[Presetting Lightroom group on Flickr]

Again I implore you to consider grabbing my preset collection, I know it's not manly to beg, but I really need to get this blog self-sustaining. I have options as far as hosting goes, as much as I would like to get the site hosted on it's own, but I do need money to keep getting film, paying for development chemistry an the other expenses incurred in the process of these emulations.

The purchase links are in the upper right hand side of the blog.

Until next time,

Michael