
[EDIT: New LifeInDigitalFilm is up int test mode. Very basic WordPress theme for the moment, but it is functional. Hope to have new posts starting this weekend. Check it out:
www.lifeindigitalfilm.net
When fully ready to go, I will either redirect the current lifeindigitalfilm.com or I will keep the blogger dot com site up for a while, linking to new posts on dot net. Let me know what you think is the best idea]
Just a heads up, LifeInDigitalFilm will be switching over to WordPress as a blogging platform. This switch will give me more option and more creative control over LifeInDigitalFilm. Most likely there will be no posts until the switch is complete. During this time, LifeInDigitalFilm.com will still be operational as it is. I will update this post with additional information as necessary, and give you the link to try out the new LifeInDigitalFilm before the switch is complete.
I hope to have the switch over completed as soon as possible, hopefully within the next week. If there are any delays I will let you know. I was planning on finishing up the tutorial and release a few more presets before the switch, but I decided I was going to jump on it now.
Bear with me, this is gonna be worth it.
Michael
PS: In the mean time, if you find you enjoy my presets and wish to show some support for LifeInDigitalFilm, consider purchasing my Cold Storage Preset Collection. It is a collection of many of my presets on this site, along with 12 exclusive presets. More information can be found HERE. Your purchase helps me aquire more film for emulation and pay for processing and scanning needed for emulation analysis.
Anyone who purchases (or have already purchased) the Cold Storage Collection will recieve a free upgrade to Cold Storage Vol. 2 upon its release in Late May, along with a special pack of presets just for my early supporters. More information on this will be sent to those who have ordered the Cold Storage Collection shortly before the release of Cold Storage 2. If you have already purchased the Cold Storage Collection and are using a new E-mail address send me an E-mail to help@lifeindigitalfilm.com with your new e-mail address as well as the e-mail address used for purchase so I can update my records for when I send out the upgrade links.
20090402
LR Preset: Holga+Classic Film

Today, in association with X=blog, LifeInDigitalFilm presents two film emulation presets featuring my new Holga effect. Today's download consists of my Kodak Kodachrome 25 and Kodak Panatomic X presets with the new Holga effect built right in.
When using these presets on normal dSLR images, without cropping, these presets are ready to rock. If you want the classic square cropping of a Holga with 120 film, simply change the Post-Crop Vignette Roundness from +33 to 0.
If you want to get the Holga effect in a preset of its own, hop over to X=blog. Brandon's site is the exclusive home to my Holga-effect preset. It is ready to stack ontop of any of my presets, or any other preset you want a Holga-look applied to. Refer to yesterday's tutorial on modifying presets to combine the Holga effect with any other preset into a brand new preset.
Currently the Holga effect and Holga-treated presets are only available for Lightroom. I am working on a method by which to use them in ACR, and will update when available. For now, enjoy with Lightroom.
[NOTE: I figured out a work-around to use the Holga Base preset in ACR. It is live over at X=blog. I am not going to release the Holga+Film presets for ACR due to the extra step involved to complete the effect. If you want Holga+Film effects in ACR, grad the Holga set at X=, follow the install instructions. Then get the desired film presets here and install. In ACR apply athe film preset first, then the Holga BAse, finally goto the Graduated Filter menu and add the Holga Base Gradient. This will stack the Holga Effect over the desire film preset.]

Until later,
Michael
20090401
Tutorial: Presets, In Depth - Part 3: Updating, Modifying and Combining Presets in Lightroom
In a departure from the past few articles, today I am going to focus strictly on Lightroom today. The manipulations of the preset files can be accomplished in ACR as well, but for clarity’s sake I am going to focus on Lightroom. I will address ACR at a later date, or if you need help in ACR feel free to ask in the comments, and I will address you issues. The past two posts got rather long and disjointed, and I feel focusing on one application at a time will help clear the articles up and make the article easier to read.
Jumping right in…
So, you know how to install and create presets in Lightroom. Wonderful, but now you have another situation. The preset you just made is not working right. It is manually setting the basic tone controls, when you wanted it to leave them be. Now you could just save a new preset and delete the previous, but that is redundant. Lightroom gives you the option to update existing presets, changing the problematic settings. Updating a preset is useful when designing presets for others to use, allowing you to make the preset, use in on other images, and alter and update the preset as you move along. Updating allows you to revise your existing work.
Let’s learn how to do an update… go ahead and open an image in LR and apply the preset you wish to modify. If you want to make alterations to any of the sliders, do so now, as any alterations will be saved when you run the update. Once you are ready to update the preset, head over to the presets tab in the develop module.

Find the preset you wish to update and Right-Click (Control-Click on Mac), to bring up the contextual menu:

Click on “Update With Current Settings” option.
This brings up the Update Develop Preset dialog box, which is identical to the New Develop Preset Dialog.

Now enable or disable any sliders that you need to adjust. Remember, disable any tools your preset does not need to use, this will facilitate in stacking and combining presets down the road. Plus, it is just good design.

Once everything you need to have saved in the preset is selected, click the “Update” button.You have now updated your preset with the new adjustments. The same preset name is used, however when clicked, it will apply the new settings.
Another task you may want to do is modify a preset you frequently use. When using a preset designed by someone else, you will often discover that you may need to make minor adjustments to the preset to make it more suitable to your needs. You have two different options here; updating the existing preset or creating a new preset based off the original. If you choose to update, follow the steps above. I recommend that you create a new preset based off the original; you may want to use the author’s original preset still, plus it is good to keep the original around to compare to while you fine tune your new version.
This will be short and sweet, since we already know how to make a new preset. Choose an image you want to play with. Apply the original preset you wish to modify, go ahead and make the changes you desire. Now make a new preset from your current settings, if you don’t know how to do this jump over to Part 1 of this series and follow the instructions for making a new preset. The steps are identical; just make sure to give the new preset a name that connects it to the original preset, so you don’t forget.
When you do modify another designer’s preset, do not release it as your own work. Check to see how the original designer licensed their preset, follow the rules. If they did not include a license, contact them before you release your modification. Make sure they are cool with it. Then give credit where credit is due.
Finally, you will often find that you want to combine the effects of two or more presets into one, stand-alone preset. When combining presets, at least one of the presets must be properly configured, changing only the settings needed. It works best when both presets are well-made, but if a preset is poorly designed, or simply a global preset, you want to apply that to the image first. After you apply the global preset, you will apply your second preset.
In the following instructions, I will combine a Kodak Gold 100 Curve preset and a 110 Frame preset, creating a 110 Kodak Gold preset. Since the Kodak Gold 100 Curve effects more sliders and is the primary effect, we will apply it first.

After it is applied, we will add in the 110 Frame preset; adding in a pseudo-frame with vignette tools.

Now both presets are stacked; the overall color adjusted by the film preset and frame applied with the frame preset. If you create a new preset at this point; you can save the effect of both presets into a single preset. Go ahead and save it as a new preset:

Once you get the New Develop Preset Dialog, make sure to select the tools used by both presets. If you are unsure what the presets actually alter, refer to Part 1 and “read” the presets in a text editor. In my example the 110 effect is in the Post-Crop Vignette; the rest of the tools are used by the Kodak Gold 100 preset. Here is what my New Develop Preset dialog looked like before saving:

Click Save, new preset is ready…follow up with Part 4 to find out how to export your new preset to share with the world.
Here is a download of the 110 Frame and Kodak Gold 100 Curve preset with the final 110 Kodak Gold 100 preset. You can play around and make your own 110 style presets.
Tomorrow will be fun, as I have been working with Brandon over at X= on a new preset. Check out x-equals.com/blog tomorrow for a new preset release I created for his site, then come back here tomorrow for some new presets I created using the new preset from X=. The new preset is an effect preset, enhancing an image for a particular look. It is designed to stack and to be combined with other presets...especially my LIDF Film Emulations. I will have two new presets on the table here tomorrow...so after you get the new release from X=, come back and get my new creations.
Until then,
Michael
20090329
Tutorial: Presets, In Depth - Part 2: Creating Presets (and designing them to play together nicely)
Alright, sorry for the delay, but making money takes precedence over the blog, and I am sure my clients see it the same way. But anyways, let’s continue our exploration of Lightroom and ACR presets.
Today we will discuss the methods by which you can create presets for Lightroom 2 and ACR. I am sure many of you already know how to do so, but I am sure some of you don’t. We will cover a basic creation process in both Lightroom and ACR, but first I would like to take a detour and discuss preset “stacking” for a few minutes. Once we understand the stacking of presets, we can make presets that play well together allowing for multiple effects to be combined.
One common complaint about presets is that you can only use one at a time. This is not entirely true, but in general seems to be the norm. Presets (in both LR and ACR) adjust the different sliders in the develop module to create the desired effect for the image created on export. If you apply one preset, then another, most usually you will end up with just the second preset applied. This is due to the fact that you only get one slider for each tool, this isn’t Photoshop and there are no layers. You only have one set of tools, and the last preset applied will always override and previous presets or manual settings. This is the reasoning behind the belief you can only use one preset at a time.
That is not to say that you cannot use well designed presets in unison with one another. When you create a preset in Lightroom, the default dialog setting will save every setting applied to the preset. This creates a preset that will over-ride every single slider in the develop module. Your brand new preset will not work with other presets, it will replace them. This is fine for an import preset you will apply to every photo you import, but is not good for general creative presetting.
When creating you image, make note of what tools you use to generate your effect. I have a text file I print out to make hard copy notes about what I alter in the process of making my presets, when filled out it shows me what sliders I adjusted and those I did not. This allows me to save my presets with only the tools needed for the desired effect. If you do not touch the Basic Tone settings, make a note of that. When it comes time to make the preset, we will exclude the Basic Tone settings from the preset. If your preset only adjusts the Tone Curve, when saving the preset, make sure that only the Tone Curve is selected to be saved in the preset. By creating presets that only adjust what is needed for the effect; you will be able to combine multiple presets to achieve your desired effects. If your preset does not require any given slider to be manipulated, you should not allow your preset to alter those tools when applied.
I will recreate my preset design form as a prettied up PDF file, and release it here on LIDF for anyone else interested in being as anal as I am about my preset design. I wasn’t always this way, as many of my early presets alter every single slider; even if they are not needed…it was bad design and it embarrasses me. I am slowly updating the older preset to fix this oversight, eventually it will be done. IF you are just starting, don’t make my mistakes.
Now that I have that covered/off-my-chest, let us move on with creating a preset. Choose yourself a photo, and go ahead and make a few adjustments. As you make adjustments, make not of what setting you are altering, as these notes will be used to ensure the stacking-compatibility discussed above. I chose a random image from a wedding I shot recently.
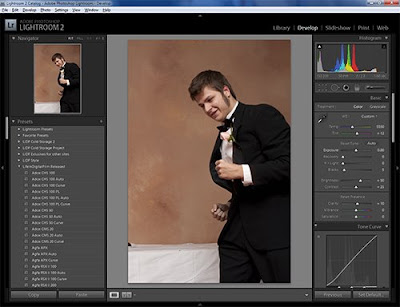
For this tutorial, I am going to make a preset that adjusts the Vibrance, Saturation, Clarity, Tone Curve, Split Toning and applies a strong vignette. Honestly, this preset sucks, it gives the picture a really bad look. However it is suitable for what we are going to do here. Here is a view of my develop module sidebar, showing only what is changed.
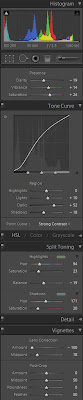
I make it a habit to start out my development process with all the tools closed. Only opening the tools I need as needed. As you can see, I did not even mess with HSL or Detail tools, so they are still closed. Once done with the image adjustments, I make my notes on which Items were adjusted in the Develop Module. We are ready to save this preset.
Now head over to the Left Sidebar and go to the Presets Tab. Click on the plus (+) icon on the Presets tab.
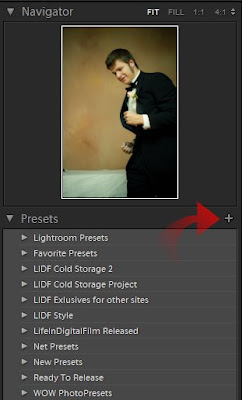
Once you click the plus icon, it will open the New Develop Preset dialog.
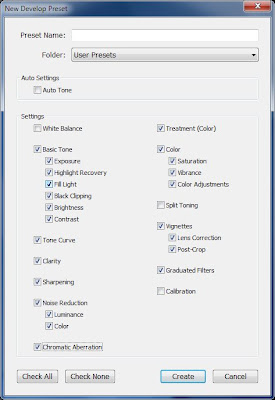
This image shows the dialog box with the normal default settings. You dialog will show the same options used in the last preset saved on your machine. If you click save now, your preset will be saved adjusting every slider in the develop module, not what we want. So, start un-checking the boxes of the tools you do not require. Here is my dialog, adjusted for my preset.
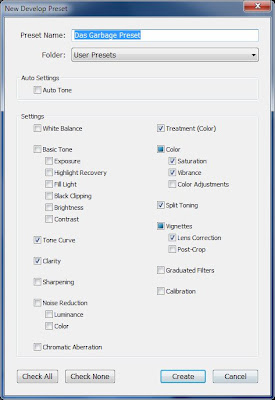
This dialog shows only the tools needed for the presetted effect selected. The Color and Vignette checks became boxes, as I only saved some of the sub-options there in (Vibrance and Saturation in Color; Lens Correction in Vignette). The Color check box’s Color Adjustment selection is used when you make changes to the HSL settings; I felt I should mention that, as it is not overtly clear.
Also, at the top of the preset dialog is a box of options, called Auto Settings:

Color images will show only Auto Tone, monochrome images will show Auto Tone and Auto Grayscale Mix. Auto Tone, when selected, caused the preset to automatically adjust the Basic Tone sliders to what Lightroom deem to be the most appropriate settings. Auto Grayscale Mix will allow Lightroom to automatically adjust the Grayscale mixer, to what it deems to be a proper grayscale mix. These tools can be handy, but can create unpredictable results in application. I never use the Auto Grayscale, but I frequently use the Auto Tone option, especially in my film emulation Auto Presets.
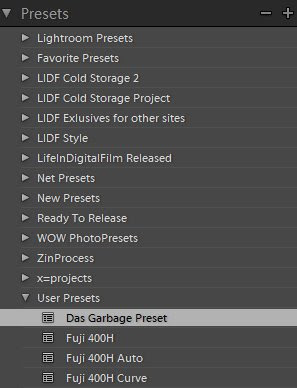
Now click the Create button, and your preset will appear in the Preset Folder defined at the top of the dialog.
You have made your preset, we will discuss exporting your presets for others to use later in Part 4 of this series.
So, that covers Lightroom. So we will just jump to ACR, and just cover the process to save your preset. We will assume that you already have the image adjusted.
I again have the same image adjustments made to the same image.
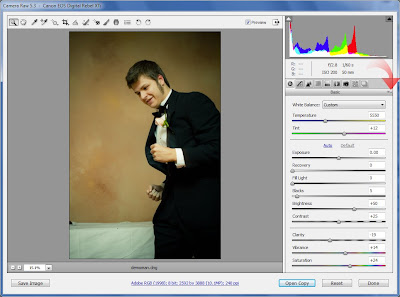
Click on the option icon, depicted by the arrow in the above image to open the File Settings Menu
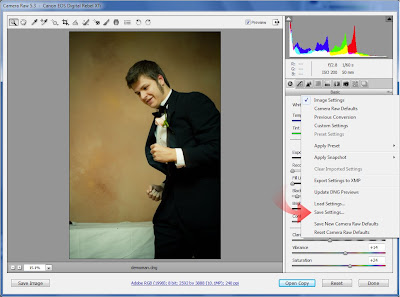
Click on Save Settings... This will open the save setting dialog.
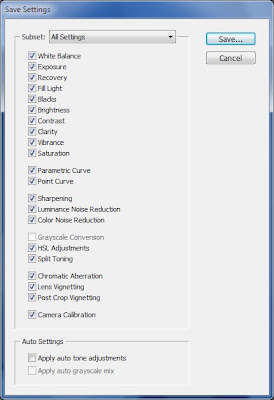
This dialog looks a lot like the New Preset dialog in Lightroom. Again, it selects every adjust made available to you. Follow the preset design rules, and only select the options that you need for the preset. Here is mine again.
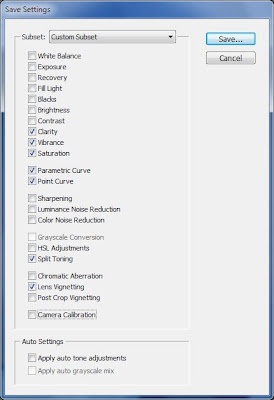
Once everything is properly configured, click Save… This saves your preset, bringing up the save dialog.
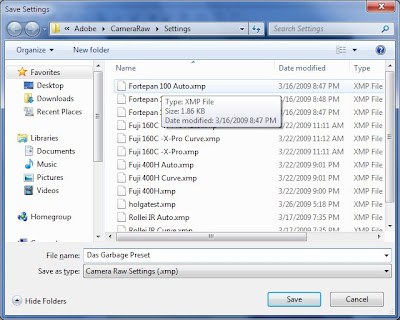
Give it a name, and click Save. You preset is now in ACR’s preset menu, as noted in the following image:
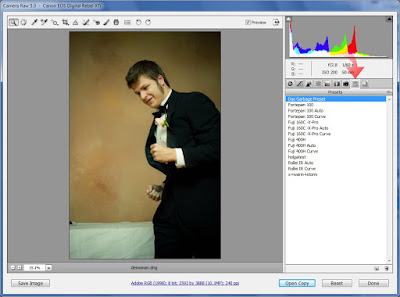
You are done.
I should have a few good posts in a row over the next few days, so check in again soon.
Part 3 will be coming soon. Covering updating and combining presets.
Until then,
Michael
Today we will discuss the methods by which you can create presets for Lightroom 2 and ACR. I am sure many of you already know how to do so, but I am sure some of you don’t. We will cover a basic creation process in both Lightroom and ACR, but first I would like to take a detour and discuss preset “stacking” for a few minutes. Once we understand the stacking of presets, we can make presets that play well together allowing for multiple effects to be combined.
One common complaint about presets is that you can only use one at a time. This is not entirely true, but in general seems to be the norm. Presets (in both LR and ACR) adjust the different sliders in the develop module to create the desired effect for the image created on export. If you apply one preset, then another, most usually you will end up with just the second preset applied. This is due to the fact that you only get one slider for each tool, this isn’t Photoshop and there are no layers. You only have one set of tools, and the last preset applied will always override and previous presets or manual settings. This is the reasoning behind the belief you can only use one preset at a time.
That is not to say that you cannot use well designed presets in unison with one another. When you create a preset in Lightroom, the default dialog setting will save every setting applied to the preset. This creates a preset that will over-ride every single slider in the develop module. Your brand new preset will not work with other presets, it will replace them. This is fine for an import preset you will apply to every photo you import, but is not good for general creative presetting.
When creating you image, make note of what tools you use to generate your effect. I have a text file I print out to make hard copy notes about what I alter in the process of making my presets, when filled out it shows me what sliders I adjusted and those I did not. This allows me to save my presets with only the tools needed for the desired effect. If you do not touch the Basic Tone settings, make a note of that. When it comes time to make the preset, we will exclude the Basic Tone settings from the preset. If your preset only adjusts the Tone Curve, when saving the preset, make sure that only the Tone Curve is selected to be saved in the preset. By creating presets that only adjust what is needed for the effect; you will be able to combine multiple presets to achieve your desired effects. If your preset does not require any given slider to be manipulated, you should not allow your preset to alter those tools when applied.
I will recreate my preset design form as a prettied up PDF file, and release it here on LIDF for anyone else interested in being as anal as I am about my preset design. I wasn’t always this way, as many of my early presets alter every single slider; even if they are not needed…it was bad design and it embarrasses me. I am slowly updating the older preset to fix this oversight, eventually it will be done. IF you are just starting, don’t make my mistakes.
Now that I have that covered/off-my-chest, let us move on with creating a preset. Choose yourself a photo, and go ahead and make a few adjustments. As you make adjustments, make not of what setting you are altering, as these notes will be used to ensure the stacking-compatibility discussed above. I chose a random image from a wedding I shot recently.

For this tutorial, I am going to make a preset that adjusts the Vibrance, Saturation, Clarity, Tone Curve, Split Toning and applies a strong vignette. Honestly, this preset sucks, it gives the picture a really bad look. However it is suitable for what we are going to do here. Here is a view of my develop module sidebar, showing only what is changed.

I make it a habit to start out my development process with all the tools closed. Only opening the tools I need as needed. As you can see, I did not even mess with HSL or Detail tools, so they are still closed. Once done with the image adjustments, I make my notes on which Items were adjusted in the Develop Module. We are ready to save this preset.
Now head over to the Left Sidebar and go to the Presets Tab. Click on the plus (+) icon on the Presets tab.

Once you click the plus icon, it will open the New Develop Preset dialog.

This image shows the dialog box with the normal default settings. You dialog will show the same options used in the last preset saved on your machine. If you click save now, your preset will be saved adjusting every slider in the develop module, not what we want. So, start un-checking the boxes of the tools you do not require. Here is my dialog, adjusted for my preset.

This dialog shows only the tools needed for the presetted effect selected. The Color and Vignette checks became boxes, as I only saved some of the sub-options there in (Vibrance and Saturation in Color; Lens Correction in Vignette). The Color check box’s Color Adjustment selection is used when you make changes to the HSL settings; I felt I should mention that, as it is not overtly clear.
Also, at the top of the preset dialog is a box of options, called Auto Settings:

Color images will show only Auto Tone, monochrome images will show Auto Tone and Auto Grayscale Mix. Auto Tone, when selected, caused the preset to automatically adjust the Basic Tone sliders to what Lightroom deem to be the most appropriate settings. Auto Grayscale Mix will allow Lightroom to automatically adjust the Grayscale mixer, to what it deems to be a proper grayscale mix. These tools can be handy, but can create unpredictable results in application. I never use the Auto Grayscale, but I frequently use the Auto Tone option, especially in my film emulation Auto Presets.
Now click the Create button, and your preset will appear in the Preset Folder defined at the top of the dialog.

You have made your preset, we will discuss exporting your presets for others to use later in Part 4 of this series.
So, that covers Lightroom. So we will just jump to ACR, and just cover the process to save your preset. We will assume that you already have the image adjusted.
I again have the same image adjustments made to the same image.

Click on the option icon, depicted by the arrow in the above image to open the File Settings Menu

Click on Save Settings... This will open the save setting dialog.

This dialog looks a lot like the New Preset dialog in Lightroom. Again, it selects every adjust made available to you. Follow the preset design rules, and only select the options that you need for the preset. Here is mine again.

Once everything is properly configured, click Save… This saves your preset, bringing up the save dialog.

Give it a name, and click Save. You preset is now in ACR’s preset menu, as noted in the following image:

You are done.
I should have a few good posts in a row over the next few days, so check in again soon.
Part 3 will be coming soon. Covering updating and combining presets.
Until then,
Michael
20090325
Status Update
Just letting everyone know, I am still working on the preset tutorial series and I have a few presets in the oven. Just a little busy on other projects currently, even took a few days off my day job to get caught up. In the middle of 3 projects for different clients, one involving a lot of slide scanning. Playing catch up on these today and maybe tomorrow. If all my tasks get done today I will have the next article in the series up Friday, and a new preset Saturday.
Just wanted to let everyone know I haven't forgot, just a bit busy.
Thanks,
Michael
Just wanted to let everyone know I haven't forgot, just a bit busy.
Thanks,
Michael
Subscribe to:
Posts (Atom)


