20091201
This blog is deceased if you were not aware.
If you are subscribed to the feed, please delete this feed and update your feed reader with my new feed that can be found on the new site.
Thanks,
Michael
20090727
Film Review: Kodak Ektar 100 – 135 Format
Film is dead…or so many people though until Kodak released their new Ektar 100 film to the public last year. Coming to market with the daring claim of “Finest Grain Ever” it would be an uphill battle to sell a new color print film to the general photographic public in the age of 10+ megapixel consumer-level DSLR cameras. It would take a really special film introduction to stand a chance up against the modern resolution of DSLR’s with a 35mm format film. Did Kodak do that? Yes they did.
First thing to note about Ektar, is that it was designed from the ground up to be scanned into a computer. As most labs now do digital prints, requiring the negative to be scanned before printing, Kodak had to design a film that could easily be scanned, have great color and high resolution. I have been scanning my rolls of Ektar with an Epson V500 at 3200 and 6400 DPI and my Plustek OpticFilm 7200 at 3600 and 7200 DPI.
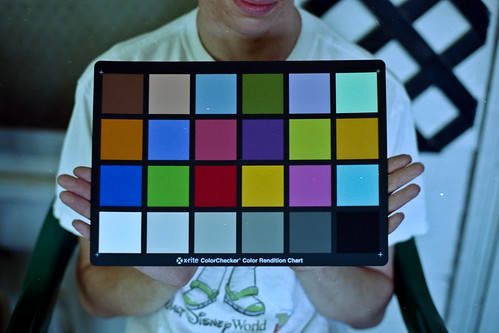
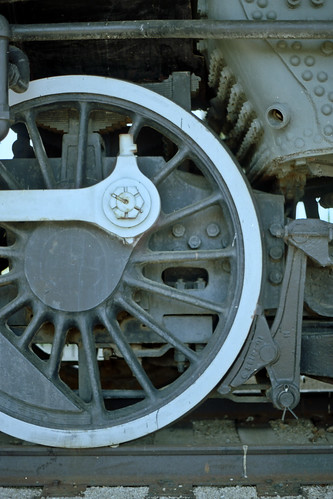
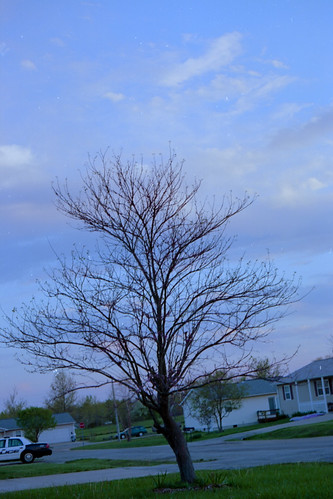
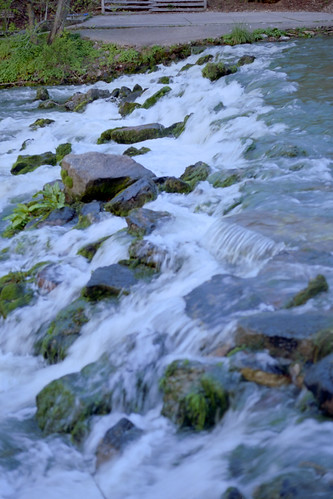
[NOTE: All Scans are made with V500 at 3200 DPI with Digital ICE off to avoid blurring. Click for fullsize.]
On either scanner Ektar 100 brought forth good contrast, bold colors and almost no grain. In fact I notice digital noise from my scanners more than I do traditional grain. Ektar has required little correction in Photoshop or Lightroom after scanning is completed.
As far as image quality goes, I have been successfully printing excellent 8x10’s from 3200 DPI scans on my V500 and 11x14’s at 7200 with my Plustek OpticFilm at 7200 DPI. No other negative film will allow me to make quality prints with these scanners and resolutions. Even most slide films will not scan this high quality for me with consumer grade scanners.
Ektar delivers a clarity nearing slide film, color characteristics not found in any other film with the wide exposure latitude of negative film. Ektar shows to produce good images in my testing from -1 EV to +2 EV (or shot at ISO 50 up to ISO 400) without needing to push the development. Albeit the further you get away from box speed the more image degradation occurs, but in a pinch you can pull a good image out of Ektar shot at ISO 800 with some good scanning techniques.
Ektar’s next big advantage is price. You can find Ektar in 135 format for little more than a roll of Kodak Gold and quite a bit less than Portra. At my local photo shop, Gold 200 goes for $4 USD, Ektar 100 for $5.25 and Portra 160 NC for $7. So for little more than the price of regular consumer film, you can get a high resolution professional-quality film. A film that can be scanned with an inexpensive flatbed scanner and produce images equal or greater than current low-end DSLR’s. With better scanners you can even outperform the quality of many high-end DSLR’s and still retain the unique look of film. I have a 20” x 30” print on my wall made from a drum scan of one of my Ektar shots and the print is beautiful with a barely perceptible grain, my Canon 400D XTi or 5D could never even come close to producing that print. At this point a $10 dollar yard-sale SLR and a few rolls of Ektar can do you as good as a $500 XTi, if not better.
Cost, ease of scanning, resolution, grain and exposure latitude alone are good reasons to grab this film, but the unique look is worth the price of admission and then some. What really gives Ektar a unique advantage is its appearance. I find it to have a strange modern nostalgic look when shot at ISO 50 or 64, like a quality film shot from the 70’s. It shifts a bit blue and retains bold colors. If Ektar is shot at box speed, I have found that it reproduces colors reasonable accurately, although more punchy than normal. I find myself overexposing street photography for the vintage look and shooting landscapes and nature at box speed. It is nice to have the option of two distinct looks from one film and get good results at either setting. Again, you can take Ektar on upwards toward ISO 800, but plan on spending some time in post getting you image looking good. Still, it can be done though.
Some have complained of Ektar being inappropriate for human subjects, being a bit too saturated for skin tones. I have not found this to be the case, as some simple adjusting of saturation in Photoshop can alleviate this issue without dulling the overall picture.
Oversaturated skin tones with Ektar tend to be most common at box speed, and taking it to 50 or 64 can help as well. However I have no issue shooting portraits at box speed with Ektar. In fact Ektar has almost replaced Portra 160 VC in my wedding gear for outside, nature portraits. I have been happy and so have been my clients.
In general, Kodak’s Ektar 100 is a great general purpose film. It is well suited for travel, with its punchy colors and great contrast. It can capture human subjects and look fairly natural, while at the same time give you saturated backgrounds. Ektar is the new film of choice to take for family photos at the Grand Canyon (Now that Kodachrome is gone).
It’s great to keep in your camera for indoor flash photography. Ektar is a great choice for a primary film, and I have shot the same roll at ISO 50-200 varying between frames and got great results with standard processing. Give Ektar a try and don’t be afraid to experiment with it, the results may surprise you.
If you are interested in grabbing a few rolls of Ektar to try out, please go down to your local pro shop and get yourself a few rolls. If you don’t have a good pro lab, then consider ordering from Amazon or Adorama from the links below, it’ll give me a little kickback then, but please support you local photo lab before ordering online. You may pay a bit more, but to have personal service and knowledge people nearby it is well worth it.
Try it...You'll like it!
Michael
Links to purchase Ektar below.
Buy at Amazon or...
Search for Ektar at Adorama.
.
20090718
LR/ACR Preset: Polaroid 600

Hey everyone, it's been a while, but it is finally time to resurrect LIDF from the ashes created by all my personal issues from the past few months. LIDF will now update on Saturdays and Wednesdays, with new articles, presets, reviews and my own rants. We will be taking a voyage more into film as we proceed, as I am now shooting film ten times more than digital. But LIDF will not be completely film based, as I will continue to feature Lightroom tips and presets on a regular basis.
Part of the reason I am shifting some focus to film on LIDF is because one needs to know about film to properly simulate the look of film. In fact you should shoot a roll or two regularly to make sure you are achieving the desired look when faking it. For more reasons to shoot film, check out my recent article over at the X-Equals blog +Improving Digital Photography with Film. As I shoot film to make more and improve existing emulation presets, I get more and more attached to the process. In fact, I am currently working on a series of articles covering a workflow for using film within Lightroom, from shooting, to scanning to processing. Watch for it in coming weeks.
I will be posting some film reviews pretty soon too. Hopefully by sharing my results with different films and providing you with links to get quality film stocks, you will be more likly to splurge on a roll or two.
But enough of all that, you probably want to get to the long-awaited new preset. Well today it is kind of a "beta" preset I am sharing. This preset was made in a few hours just today. It all started with me going out looking at yard sales, hoping to find some film gear. After an unsuccessful jaunt, no cameras or film today, I decided to drop by my local discount grocery store. You never know what these dent and bang stores may have inside their doors, and today I was rewarded with quite a haul. I mention to the shopkeep what I was seeking and she went in the back room and brought out a box of film, which I promptly bought for 12 dollars. Digging into the box, I came out with 17 rolls of 35 mm, 6 rolls of 110 and 4 rolls of APS film. All expired and of varying amounts of Kodak, Fuji and Ferrania store-brand films. But the big surprise was two lonely boxes of Polaroid 600 sitting at the bottom of the box. I have been wanting to get some 600 film to emulate, but the cost was rather prohibitive to me. Locally I can only find expired 600 integral film for about $15. But I got 2 boxes for $12, with 27 boxes of traditional filn for free!
So in celebration, I got home, shot my emulation targets and scanned in the Polaroids with my Epson V500. This is not the method I usually use for emulation. Although my system is color calibrated, I usually test my film for emulation out at a local optics lab, getting some baseline information on color response before I start my emulation.No time for that today, I have wanted a Polaroid 600 emulation in my catalog for quite some time, and now I had the needed tools to make one. So I did a quick and dirty emulation using the tools I have at home. So this is kind of a "beta" preset, as I am going to do my normal, in-depth analysis and then emulate again. But this one should get you playing with virtual Polaroid 600 until I get to a proper emulation in a few months.
This also got me back to writing LIDF. I have been building up a series of articles and reviews the past few months, and I have enough material ready to keep up a consistent schedule for a while. So with out further ado, the download....

Damn, it's nice to see my crappy download icon again!
Anyways, enjoy the new release. More will be coming soon. And if you have been suffering from a shortage of my ramblings and creations, be sure to check out X-Equals. In particular, check out my newest article +Monochrome Mojo - Mixing in Grayscale - Part 2 of 2. This article features a new collection of presets called the X-Equals Monochrome Toolkit, featuring 27 new presets to aide you in creating monochrome images that have the essence of real darkroom prints...especially when you print on real B&W photopaper, such as offered by Mpix.
Well, its good to be back. See ya next time,
Michael
PS: If you truly love Polaroid 600, support The Impossible Project, which is trying to bring back 600-compatible integral films. They have a difficult mission, check out their site for what they need and see if you can help! Also check out Polapremium, which is an on-line retailer specializing in Polaroid films (in fact they are part of The Impossible Project) supporting them by buying some Polaroid gear will also help out the Impossible Project!
20090622
Rant: Mama, they took my Kodachrome away!
I have shot 15 rolls of Kodachrome 64 in the past year, with 6 more in the freezer. If you have some, or decide to buy some, I recommend you get out and shoot it soon, as Dewayne's, the only K-14 processor in the world, announced continued support only through 2010. Once they close up the K-14 line, it's all over. If you have any left, your only option will be cross processing in B&W chemistry.
Kodachrome was and is the defacto standard when it comes to archival quality slides. Although they fade rather rapidly under the light of a projector, in dark storage, they colors stay true to the day they were shot. A quick search of the US National Archives will bring you scans of Kodachromes shot in the late 1930's that look as crisp and colorful as if they were shot yesterday. That longevity will be missed.
What will furthermore be missed will be Kodachrome's magical appearance. I can't describe the nuance that is Kodachrome, it it too subtle to define in words. Only a projection from a Kodachrome slide will ever do it justice. Kodachrome is difficult to scan, expensive to process and now scarce to get. But it is a film worth the expense and hassle, and I am glad to have gotten back into film photography to enjoy Kodachromes waning days.
In Kodak's press release, they recommend two excellent replacement films for the Kodachrome lover. The first is KODAK PROFESSIONAL EKTACHROME E100G, which is a beautiful film in it's own right. Not to disparage it, it lacks the subtlety of Kodachrome. However, I will concur it is the closest option you will get in an E-6 film (also try Fuji Astia if you shoot a lot of people, as I feel it renders better skin tones than E100G.) Kodak's second recommendation is their new EKTAR 100 negative film. Which is a wonderful option, as it has it's own special nuance that no other film comes close to (I will be posting an in-depth review of the film in the coming weeks). However EKTAR poses two problems. First, it is a negative film, not a slide film. As fine grained as it is, EKTAR still cannot capture the feel of a slide. Secondly, EKTAR is special in it's own right, with a great feeling to the colors, giving me a feel of the seventies in 2009. However it does not convey the timeless Kodachrome does. In short, there is no replacement for Kodachrome.
What I hope Kodak does, is spend some R&D money and produce us a new E-6 film that will carry the Kodachrome name and emulate the feel. A lot of Kodachrome's magic is in the K-14 process itself, but if Kodak can give us a film as nuanced as EKTAR or as beautiful as PORTRA VC they can bring us an E-6 film that can capture some of the true-to-life nature of Kodachrome. Ektachrome is great, but it doesn't bring the bang like Kodachrome.
For now, go out and get some Kodachrome and shoot a roll or two. Kodak estimates current stock will last through Fall 2009, however I am going to guess it will get scarce in the next month or so. If you don't shoot fil anymore, but want a feel of Kodachrome, try my two Lighroom/ACR Presets I have on the site. Try my current Kodachrome 64 and my Kodachrome 25. They will get you close, but they won't get you there. I have two emulation test rolls shot awaiting development currently of Kodachrome 64. Once I get them back I will do a fresh emulation and a Camera Profile for the results. That will be a while however.
In the end, today feels a bit like the day the music died. My heart sunk a little when I saw the news on Twitter. But we move on. There are great films still available and will continue to be, and out digital cameras and Adobe's magical tools will provide us with the means to bring us a little closer to the magic again. To me, today is a day i will remember for quite a while. It came as no surprise, the writing was on the wall and i was stocking up to complete a personal project. The finality of it still hits home.
Have a great day,
Michael W Gray
20090602
Rockin' at X= and Other Stuff

Well, it looks like its another post finally. But, its a fluff piece. I'm working on new content for LIDF, looking to broaden the horizons. To that extent I have been taking time to build up new content and laying low on the LIDF front. That is not to say that I have not been busy. I've been working on a new series of articles over at the X=blog delving deep into the Camera Profiles in Lightroom.
Part one is currently live over at Brandon's fine site. In it I cover the basics of camera profiles and how to use them. You can find it HERE. Part two will be dropping soon, so check out X= frequently to see it once it drops. In it I will be covering the process by which you can develop you own camera profiles, and how to share settings between cameras. Part three is currently in my text editor being written, and it will cover making creative profiles....such as camera profiles that simulate film, much like my presets. So get a color checker and join me over at X= for the profling fun.
As to me, I've spent much of the past two months getting back in touch with traditional film photography. Aside from a wedding and a few portrait sessions, I haven't touched my digital gear much lately. I can't say that I regret it either. Shooting film feels different and I enjoy it. In that same vein, I have developed scanning methods and a Lightroom workflow for dealing with film...I will be sharing the insights I have garnered on that from in the coming posts.
In all, please bear with me a little longer as I prepare to relaunch my efforts here on LifeInDigitalFilm. The new Cold Storage Collection is well on it's way to completion and should drop by the end of this month. I'll contact those of you who already have the 1st collection before I release it to get contact info to send you a link to your copy of the new set.
Hang around, once we're back rolling I think you will enjoy what I have cooking for you. And I'll throw in a couple presets too.
Until later,
Michael
20090521
Update: Contrary to rumors, I assure you I am still alive...
As for the WordPress migration, that is on hold for now. I have too much going on, and I wish I could devote more time to get my setup working right, I don't see that free time coming until late summer. I am not happy with the current incarnation, but I will be working with it throughout the summer. You can check out what's up with it at www.lifeindigitalfilm.net, but I am not going to post to it until it's ready, keep coming here for updates. I jumped the gun on this, and felt I could handle it, but I couldn't at the time.
Also, I will be getting some focus on the film side of everything, including scanning and integrating film into a Lightroom/Photoshop workflow. Possibly a few presets to expedite the manipulation of film scans in Lightroom. We'll see what happens.
Hopefully in the next few weeks, my personal issues will clear up and allow me a bit more energy to focus into the website. As it is a full time job and part time photography is alot, but they keep my family fed...the website comes second, but I still love writing LifeInDigitalFilm.
Thanks for your continued support,
Michael
20090403
Status: WordPress switch in Progress
www.lifeindigitalfilm.net
When fully ready to go, I will either redirect the current lifeindigitalfilm.com or I will keep the blogger dot com site up for a while, linking to new posts on dot net. Let me know what you think is the best idea]
Just a heads up, LifeInDigitalFilm will be switching over to WordPress as a blogging platform. This switch will give me more option and more creative control over LifeInDigitalFilm. Most likely there will be no posts until the switch is complete. During this time, LifeInDigitalFilm.com will still be operational as it is. I will update this post with additional information as necessary, and give you the link to try out the new LifeInDigitalFilm before the switch is complete.
I hope to have the switch over completed as soon as possible, hopefully within the next week. If there are any delays I will let you know. I was planning on finishing up the tutorial and release a few more presets before the switch, but I decided I was going to jump on it now.
Bear with me, this is gonna be worth it.
Michael
PS: In the mean time, if you find you enjoy my presets and wish to show some support for LifeInDigitalFilm, consider purchasing my Cold Storage Preset Collection. It is a collection of many of my presets on this site, along with 12 exclusive presets. More information can be found HERE. Your purchase helps me aquire more film for emulation and pay for processing and scanning needed for emulation analysis.
Anyone who purchases (or have already purchased) the Cold Storage Collection will recieve a free upgrade to Cold Storage Vol. 2 upon its release in Late May, along with a special pack of presets just for my early supporters. More information on this will be sent to those who have ordered the Cold Storage Collection shortly before the release of Cold Storage 2. If you have already purchased the Cold Storage Collection and are using a new E-mail address send me an E-mail to help@lifeindigitalfilm.com with your new e-mail address as well as the e-mail address used for purchase so I can update my records for when I send out the upgrade links.
20090402
LR Preset: Holga+Classic Film
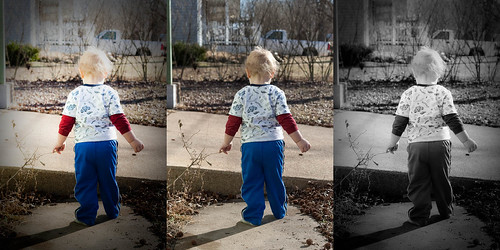
Today, in association with X=blog, LifeInDigitalFilm presents two film emulation presets featuring my new Holga effect. Today's download consists of my Kodak Kodachrome 25 and Kodak Panatomic X presets with the new Holga effect built right in.
When using these presets on normal dSLR images, without cropping, these presets are ready to rock. If you want the classic square cropping of a Holga with 120 film, simply change the Post-Crop Vignette Roundness from +33 to 0.
If you want to get the Holga effect in a preset of its own, hop over to X=blog. Brandon's site is the exclusive home to my Holga-effect preset. It is ready to stack ontop of any of my presets, or any other preset you want a Holga-look applied to. Refer to yesterday's tutorial on modifying presets to combine the Holga effect with any other preset into a brand new preset.
Currently the Holga effect and Holga-treated presets are only available for Lightroom. I am working on a method by which to use them in ACR, and will update when available. For now, enjoy with Lightroom.
[NOTE: I figured out a work-around to use the Holga Base preset in ACR. It is live over at X=blog. I am not going to release the Holga+Film presets for ACR due to the extra step involved to complete the effect. If you want Holga+Film effects in ACR, grad the Holga set at X=, follow the install instructions. Then get the desired film presets here and install. In ACR apply athe film preset first, then the Holga BAse, finally goto the Graduated Filter menu and add the Holga Base Gradient. This will stack the Holga Effect over the desire film preset.]

Until later,
Michael
20090401
Tutorial: Presets, In Depth - Part 3: Updating, Modifying and Combining Presets in Lightroom
Jumping right in…
So, you know how to install and create presets in Lightroom. Wonderful, but now you have another situation. The preset you just made is not working right. It is manually setting the basic tone controls, when you wanted it to leave them be. Now you could just save a new preset and delete the previous, but that is redundant. Lightroom gives you the option to update existing presets, changing the problematic settings. Updating a preset is useful when designing presets for others to use, allowing you to make the preset, use in on other images, and alter and update the preset as you move along. Updating allows you to revise your existing work.
Let’s learn how to do an update… go ahead and open an image in LR and apply the preset you wish to modify. If you want to make alterations to any of the sliders, do so now, as any alterations will be saved when you run the update. Once you are ready to update the preset, head over to the presets tab in the develop module.
Find the preset you wish to update and Right-Click (Control-Click on Mac), to bring up the contextual menu:
Click on “Update With Current Settings” option.
This brings up the Update Develop Preset dialog box, which is identical to the New Develop Preset Dialog.
Now enable or disable any sliders that you need to adjust. Remember, disable any tools your preset does not need to use, this will facilitate in stacking and combining presets down the road. Plus, it is just good design.
Once everything you need to have saved in the preset is selected, click the “Update” button.You have now updated your preset with the new adjustments. The same preset name is used, however when clicked, it will apply the new settings.
Another task you may want to do is modify a preset you frequently use. When using a preset designed by someone else, you will often discover that you may need to make minor adjustments to the preset to make it more suitable to your needs. You have two different options here; updating the existing preset or creating a new preset based off the original. If you choose to update, follow the steps above. I recommend that you create a new preset based off the original; you may want to use the author’s original preset still, plus it is good to keep the original around to compare to while you fine tune your new version.
This will be short and sweet, since we already know how to make a new preset. Choose an image you want to play with. Apply the original preset you wish to modify, go ahead and make the changes you desire. Now make a new preset from your current settings, if you don’t know how to do this jump over to Part 1 of this series and follow the instructions for making a new preset. The steps are identical; just make sure to give the new preset a name that connects it to the original preset, so you don’t forget.
When you do modify another designer’s preset, do not release it as your own work. Check to see how the original designer licensed their preset, follow the rules. If they did not include a license, contact them before you release your modification. Make sure they are cool with it. Then give credit where credit is due.
Finally, you will often find that you want to combine the effects of two or more presets into one, stand-alone preset. When combining presets, at least one of the presets must be properly configured, changing only the settings needed. It works best when both presets are well-made, but if a preset is poorly designed, or simply a global preset, you want to apply that to the image first. After you apply the global preset, you will apply your second preset.
In the following instructions, I will combine a Kodak Gold 100 Curve preset and a 110 Frame preset, creating a 110 Kodak Gold preset. Since the Kodak Gold 100 Curve effects more sliders and is the primary effect, we will apply it first.
After it is applied, we will add in the 110 Frame preset; adding in a pseudo-frame with vignette tools.
Now both presets are stacked; the overall color adjusted by the film preset and frame applied with the frame preset. If you create a new preset at this point; you can save the effect of both presets into a single preset. Go ahead and save it as a new preset:
Once you get the New Develop Preset Dialog, make sure to select the tools used by both presets. If you are unsure what the presets actually alter, refer to Part 1 and “read” the presets in a text editor. In my example the 110 effect is in the Post-Crop Vignette; the rest of the tools are used by the Kodak Gold 100 preset. Here is what my New Develop Preset dialog looked like before saving:
Click Save, new preset is ready…follow up with Part 4 to find out how to export your new preset to share with the world.
Here is a download of the 110 Frame and Kodak Gold 100 Curve preset with the final 110 Kodak Gold 100 preset. You can play around and make your own 110 style presets.
Tomorrow will be fun, as I have been working with Brandon over at X= on a new preset. Check out x-equals.com/blog tomorrow for a new preset release I created for his site, then come back here tomorrow for some new presets I created using the new preset from X=. The new preset is an effect preset, enhancing an image for a particular look. It is designed to stack and to be combined with other presets...especially my LIDF Film Emulations. I will have two new presets on the table here tomorrow...so after you get the new release from X=, come back and get my new creations.
Until then,
Michael
20090329
Tutorial: Presets, In Depth - Part 2: Creating Presets (and designing them to play together nicely)
Today we will discuss the methods by which you can create presets for Lightroom 2 and ACR. I am sure many of you already know how to do so, but I am sure some of you don’t. We will cover a basic creation process in both Lightroom and ACR, but first I would like to take a detour and discuss preset “stacking” for a few minutes. Once we understand the stacking of presets, we can make presets that play well together allowing for multiple effects to be combined.
One common complaint about presets is that you can only use one at a time. This is not entirely true, but in general seems to be the norm. Presets (in both LR and ACR) adjust the different sliders in the develop module to create the desired effect for the image created on export. If you apply one preset, then another, most usually you will end up with just the second preset applied. This is due to the fact that you only get one slider for each tool, this isn’t Photoshop and there are no layers. You only have one set of tools, and the last preset applied will always override and previous presets or manual settings. This is the reasoning behind the belief you can only use one preset at a time.
That is not to say that you cannot use well designed presets in unison with one another. When you create a preset in Lightroom, the default dialog setting will save every setting applied to the preset. This creates a preset that will over-ride every single slider in the develop module. Your brand new preset will not work with other presets, it will replace them. This is fine for an import preset you will apply to every photo you import, but is not good for general creative presetting.
When creating you image, make note of what tools you use to generate your effect. I have a text file I print out to make hard copy notes about what I alter in the process of making my presets, when filled out it shows me what sliders I adjusted and those I did not. This allows me to save my presets with only the tools needed for the desired effect. If you do not touch the Basic Tone settings, make a note of that. When it comes time to make the preset, we will exclude the Basic Tone settings from the preset. If your preset only adjusts the Tone Curve, when saving the preset, make sure that only the Tone Curve is selected to be saved in the preset. By creating presets that only adjust what is needed for the effect; you will be able to combine multiple presets to achieve your desired effects. If your preset does not require any given slider to be manipulated, you should not allow your preset to alter those tools when applied.
I will recreate my preset design form as a prettied up PDF file, and release it here on LIDF for anyone else interested in being as anal as I am about my preset design. I wasn’t always this way, as many of my early presets alter every single slider; even if they are not needed…it was bad design and it embarrasses me. I am slowly updating the older preset to fix this oversight, eventually it will be done. IF you are just starting, don’t make my mistakes.
Now that I have that covered/off-my-chest, let us move on with creating a preset. Choose yourself a photo, and go ahead and make a few adjustments. As you make adjustments, make not of what setting you are altering, as these notes will be used to ensure the stacking-compatibility discussed above. I chose a random image from a wedding I shot recently.
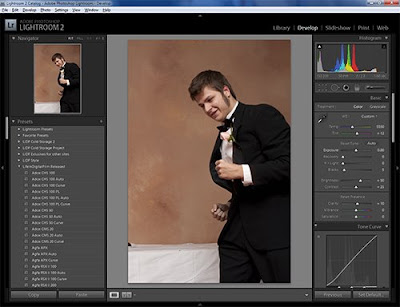
For this tutorial, I am going to make a preset that adjusts the Vibrance, Saturation, Clarity, Tone Curve, Split Toning and applies a strong vignette. Honestly, this preset sucks, it gives the picture a really bad look. However it is suitable for what we are going to do here. Here is a view of my develop module sidebar, showing only what is changed.

I make it a habit to start out my development process with all the tools closed. Only opening the tools I need as needed. As you can see, I did not even mess with HSL or Detail tools, so they are still closed. Once done with the image adjustments, I make my notes on which Items were adjusted in the Develop Module. We are ready to save this preset.
Now head over to the Left Sidebar and go to the Presets Tab. Click on the plus (+) icon on the Presets tab.
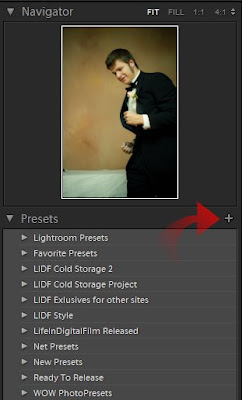
Once you click the plus icon, it will open the New Develop Preset dialog.
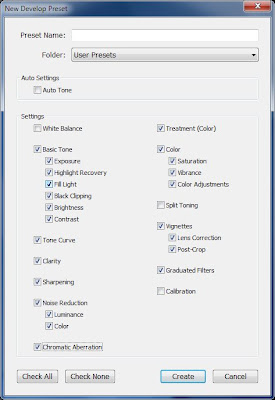
This image shows the dialog box with the normal default settings. You dialog will show the same options used in the last preset saved on your machine. If you click save now, your preset will be saved adjusting every slider in the develop module, not what we want. So, start un-checking the boxes of the tools you do not require. Here is my dialog, adjusted for my preset.
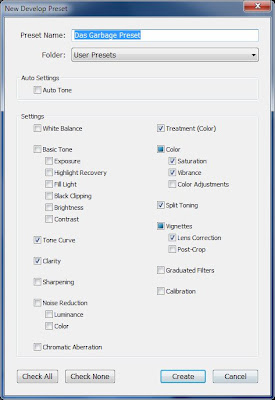
This dialog shows only the tools needed for the presetted effect selected. The Color and Vignette checks became boxes, as I only saved some of the sub-options there in (Vibrance and Saturation in Color; Lens Correction in Vignette). The Color check box’s Color Adjustment selection is used when you make changes to the HSL settings; I felt I should mention that, as it is not overtly clear.
Also, at the top of the preset dialog is a box of options, called Auto Settings:
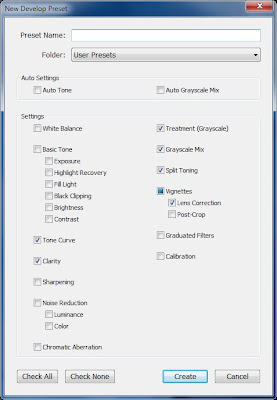
Color images will show only Auto Tone, monochrome images will show Auto Tone and Auto Grayscale Mix. Auto Tone, when selected, caused the preset to automatically adjust the Basic Tone sliders to what Lightroom deem to be the most appropriate settings. Auto Grayscale Mix will allow Lightroom to automatically adjust the Grayscale mixer, to what it deems to be a proper grayscale mix. These tools can be handy, but can create unpredictable results in application. I never use the Auto Grayscale, but I frequently use the Auto Tone option, especially in my film emulation Auto Presets.
Now click the Create button, and your preset will appear in the Preset Folder defined at the top of the dialog.
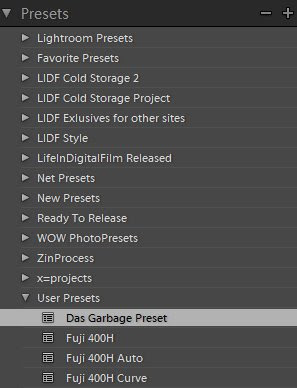
You have made your preset, we will discuss exporting your presets for others to use later in Part 4 of this series.
So, that covers Lightroom. So we will just jump to ACR, and just cover the process to save your preset. We will assume that you already have the image adjusted.
I again have the same image adjustments made to the same image.
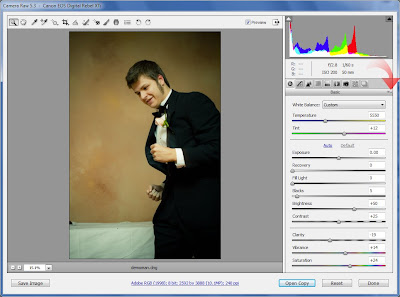
Click on the option icon, depicted by the arrow in the above image to open the File Settings Menu
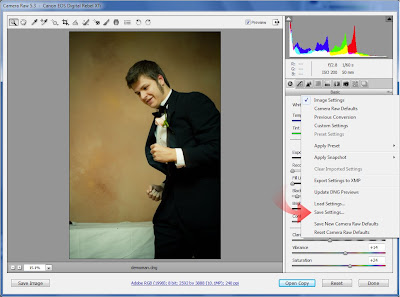
Click on Save Settings... This will open the save setting dialog.
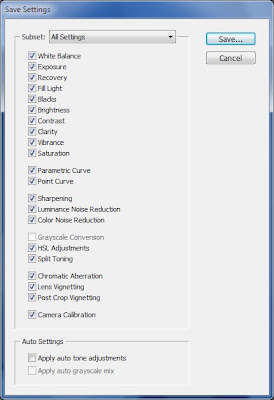
This dialog looks a lot like the New Preset dialog in Lightroom. Again, it selects every adjust made available to you. Follow the preset design rules, and only select the options that you need for the preset. Here is mine again.
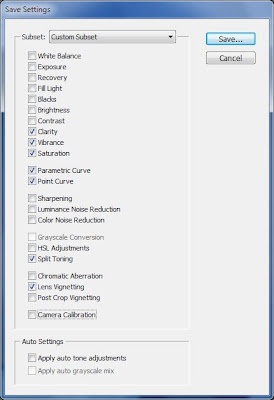
Once everything is properly configured, click Save… This saves your preset, bringing up the save dialog.
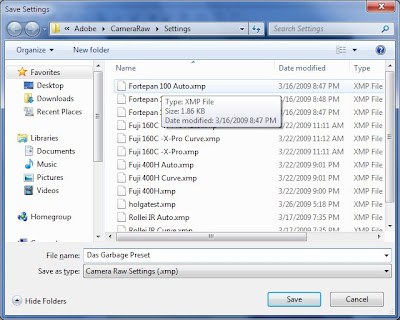
Give it a name, and click Save. You preset is now in ACR’s preset menu, as noted in the following image:
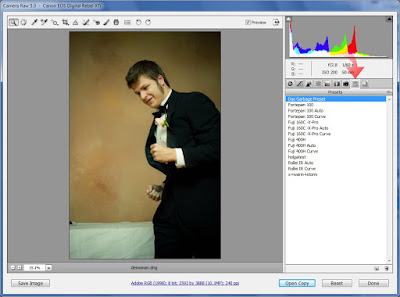
You are done.
I should have a few good posts in a row over the next few days, so check in again soon.
Part 3 will be coming soon. Covering updating and combining presets.
Until then,
Michael
20090325
Status Update
Just wanted to let everyone know I haven't forgot, just a bit busy.
Thanks,
Michael
20090323
LR/ACR Preset: Fuji 400H
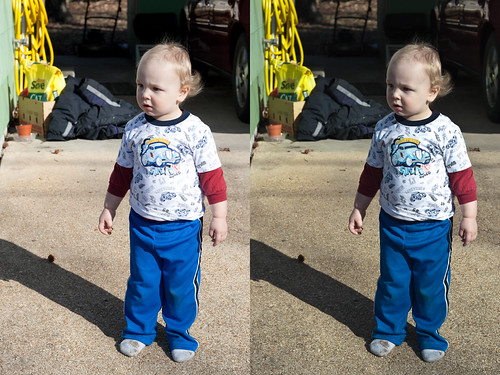
Sorry if you were expecting a Monday Update. Felt that it really was not needed this week. Will resume next Monday. Today I felt like releasing a new preset, kind of an atonement for the delay a week ago with the hard drive failure. Tomorrow the next portion of the Presets tutorial will be up.
So today I bring you a straight emulation of Fuji 400H. Fuji's middle range speed "pro" film, it features a more subdued color palette, placing it in line with the Kodak Portra 400 NC, making it great for candid portraits. The emulation does tend to run a little dark, so it is best on bright images. I hope you find the emulation enjoyable.
Well until tomorrow,
Michael
20090322
LR/ACR PReset: Fuji 160C X-Pro
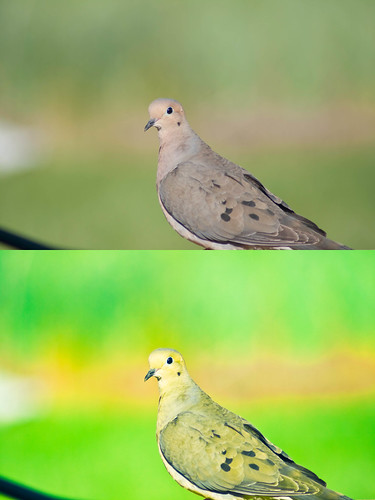
Recently a friend of mine was over at my house, discussing film emulation. As he was getting ready to leave, he asked me if I had any E-6 I needed processed, as he does his own and his chemistry is getting a tad old. I said I didn't have any E-6, but if he was getting rid of the chemistry soon anyways, as he no longer shoots film, he could run some c-41 print film through the slide process. He had never done it before, but he went ahead and took four rolls of C-41 film from me to process.
Well a few days ago, he got the film back to me. Fuji 160C was one of the films he cross-processed, and it turned out to give some really wild results. Almost unusable for my purposes, but it has an edge, especially if there are no people in your image.
See, the processing looks great, interesting color-shifts, green going a touch neon; perfect for some creative landscape or artistic animal work. But is just does not work for humans, as it turns any skin tone a funky shade of yellow. I do not like the look on skin. That is not to say that you might not like it, or may find a way to make it work in an image, its just I don't think I can.
So if you see a possibility for it, download it and take it for a spin. Let me know if you can make anything out of it.
There will be more upcoming C-41 to E-6 cross processes upcoming, most less harsh than this one. Also I have some revisits upcoming, where I shoot another roll of an already emulated film and emulate it again. Be it a different expiration date, different developer or just different conditions at time of test shots. I try to emulate any roll I shoot, and if they are good enough, they will make it here. Worst case scenario, you have 5 different Tri-X presets to choose from, but choice should never be a problem.
Back soon with Part 2 of the Presets series
Until Then,
Michael
20090320
Tutorial: Presets, In Depth - Part One: Installing and Reading Presets
Okay, so you just downloaded some new presets, and you can’t wait to take them for a spin. First you will need to import them into your application of choice, be it Lightroom or ACR. We will walk through the process for both applications. Then I will show you how you can look inside a preset and see what it does, without even running it in your application.
So first, place your preset files (Extensions of .lrtemplate for Lightroom, .xmp for Photoshop) into a folder on your desktop. Name it whatever you want, as it is just holding the files for now. If you downloaded an archive, such as the .zip files I use here, make sure you unpack the archive before moving on.
First we will look at the method for Lightroom. Simply fire up Lightroom and get into the Develop module. Once the module loads, look to the left panel, and scroll down to the Preset tab, if you don’t already see it. Make sure to expand the tab if it has not already been opened by clicking on the small triangle on the left.
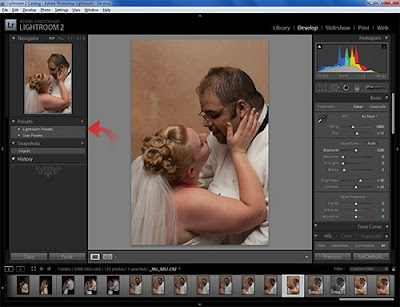
You should now see a folder entitled Lightroom Presets, which are the presets included with Lightroom itself. Beneath it is a folder entitled User Presets, bring your cursor next to it and right-click. Up pops the contextual menu with the options of “New Folder” and “Import”.
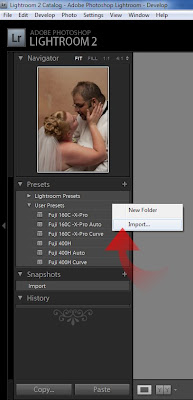
Click on “Import…” Once the dialog box opens, point the explorer to the desktop and open your folder you made earlier. Inside, highlight the .lrtemplate file you wish to import.
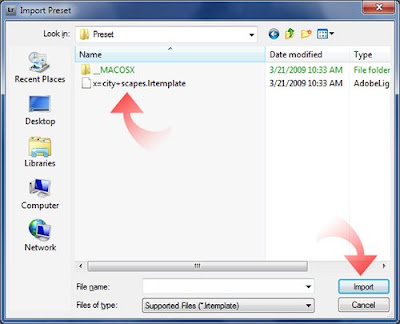
Then click “Import” and your new preset will be installed in the User Presets folder.
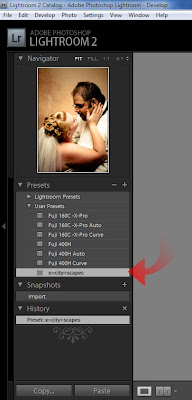
Now your preset is installed and ready for use. However you will rapidly make your User Presets folder a catastrophic mess. So you need to organize a bit. Let's go ahaead and make a new folder.
To make a new folder, right click again by the User Presets folder and choose “New Folder”.
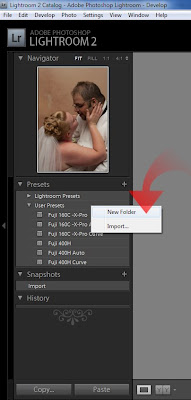
Name it whatever you choose.
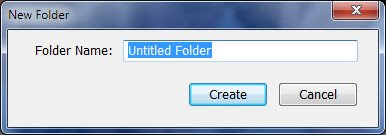
This will create the new folder in the presets menu.
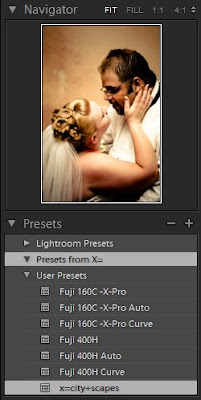
You can then drag the imported preset to the new folder or right-click next to it and import another preset into the new folder.
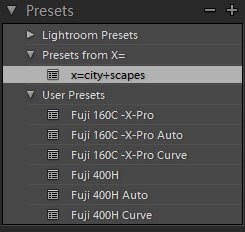 Pay attention to how you organize your presets in Lightroom, as they are a pain to sort after you have amassed a large amount. This is since Adobe only allows 1 level of folders in the presets menu. Hopefully in future releases Adobe may endow us with nested folders, and if they do it will drastically improve organization of presets.
Installing presets in Adobe Camera Raw nowhere near as elegant or user friendly, however it is quick and effective. In fact, to install the presets, you do not even have to open Photoshop, let alone ACR. To install presets into ACR, it is easiest to do it via your operating system. So open up Finder in Mac or Explorer in Windows, and point it to the following path (I believe Vista should be the same as Windows 7, but I am not sure. Vista users try it both ways):
Macintosh: /Users/UserName/Library/Application Support/Adobe/CameraRawFolder/Settings
Windows: C:\Documents and Settings\UserName\Application Data\Adobe\CameraRaw\Settings
Windows 7: C:\Users\UserName\AppData\Roaming\Adobe\CameraRaw\Settings
Please insert your user name for your system into the respective path where you see UserName. If your system is installed normally, this path will place you right into ACR’s preset folder. Here is a screen from my system:
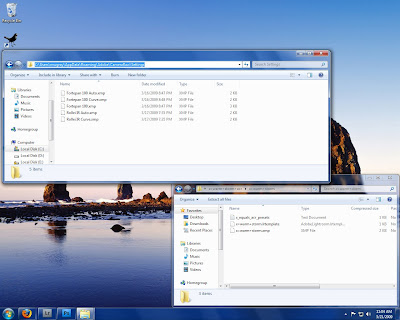
Now all you have to do is copy the .xmp presets for ACR right into this folder.
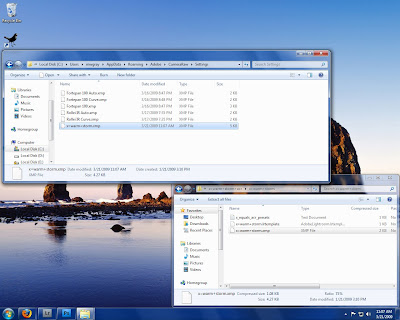
Close the folder and start Photoshop. Open a RAW file to bring up ACR.
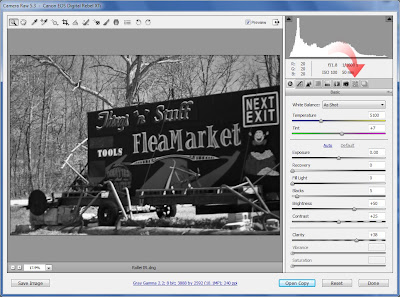
Once ACR opens, click on the presets tab.
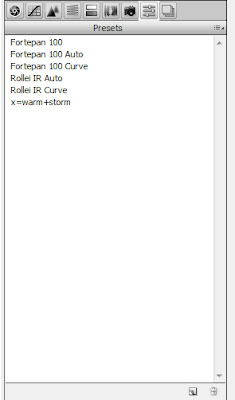
Almost magically your presets are ready to go, no other work needed. I strongly recommend only keeping presets you frequently use installed in ACR, as there is no method by which to sort them.
This is not to say that this is the only way to install presets in either program, but they are the most straight-forward in my opinion. Likely most all of you already know how to do this, but I felt that I should cover it anyways. Now onto a topic some people I know are not aware of… how to see what a preset does without loading it into Lightroom, or “Reading” a preset.
To read a preset, simply open the .lrtemplate file in any text editor. In Windows, you can just open Notepad and drag the .lrtemplate onto the empty Notepad window. This will open the preset in plain text. Although it can appear to be intimidating at first, take some time and look it over. You will start to see correlations between the text and the sliders in Lightroom. (Click the image below to view larger):
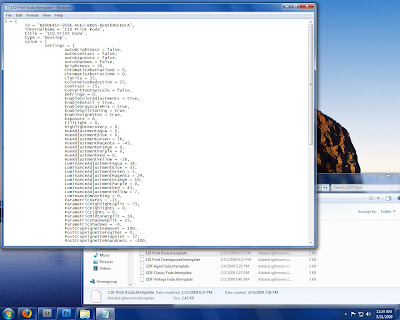
If you look at a presets text dump, I am sure you will start to see the correlations from the text file to Lightroom. A preset automatically configures your Develop Module tools for you, that is all they do. By looking at the text dump of any preset, you can see exactly what it will manipulate in Lightroom before you use it allowing you to know what to expect. It just takes a little time to get used to a tools internal name in the preset compared to the label on the slider in Lightroom. With a few reads and comparisons to the Develop Module you will get a quick understanding. You may not look at a preset’s text dump often or at all, but when you are away from your Lightroom computer, like at work, taking a peek inside a preset can tell you a lot, especially when you get familiar with Lightroom.
Also, it is possible to convert Lightroom presets to ACR. I have a tutorial up on X-Equals that explains the method to accomplishing that. Jump on over. Also, the presets I installed during this process were from Brandon's excellent collection of presets that can also be found on the X-Equals blog, click to be transported to his list of great presets. Don't forget to check out my article on sharpening in Lightroom over there too!
Hopefully this might help someone. If not, I just wasted a lot of my time writing, well not too much time. But again, I felt I needed to cover these tasks if I am to move firther into discussing presets in Lightroom and ACR.
Back again soon,
Michael

