20090130

LR/ACR Preset: Fuji Sensia 100

Well, it is that time again...time for LIDF's next free preset. Tonight I bring you my version of Fuji's Sensia 100 slide film. It comes across to me as a very balanced slide film, not overly saturated, but has enough pop to bring it. To me it seems very similar to Provia, albeit with limited range.

When using this preset, do not be afraid to crank up recovery or tone down the black levels. The curve that simulates the films response is rather unforgiving, and will black out shadows and blow out highlights. I think this may be the same reason that the tonal range of the film seems smaller than that of Provia.


Just a reminder again to consider dropping a ten spot and grabbing my Cold Storage preset collection. I have buttons at the top of the blog on the right sidebar if you would be so kind to support LifeInDigitalFilm. To those of you who already have, thanks for the support. It is much appreciated. For more info see the post here.

And I have been asked why the set is called "Cold Storage". Carry over photogs from the film days get it, but some of you newer ones were scratching your collective heads. Simply put, to keep film fresh, keep it cold. Most keep it in a refrigerator or freezer. This keeps the emulsion from oxidizing and the colors from shifting. Cold stored film keeps its tone and color much longer than at room temp, and pro film left at room temp rapidly becomes consumer film. Cold storage keeps film fresh, and I like to think so does my emulations.

Until next time,
Michael

20090127

LR/ACR Preset: Rollei R3


LR/ACR Preset: Rollei R3, originally uploaded by GrayImaging.

Now for my next free preset. Tonight we bring to you a German gift. By way of MACO Photographic's Rollei R3. Distributed by Rollei, the film comes in all formats, and uses a classic cubic silver halide emulsion. Depending on the developer used the manufacture claims an ISO latitude from ISO 32 to ISO 32,000. The film has moderate resolution and good tonality. Grain is similar to that of Ilford HP5+.

Preset developed using Rollei R3 film shot at ISO 200 and developed in regular D-76 soup. Will retry this film again using the recommended developer when money allows.


On another note, I would like to point out a great group on Flickr. I have spend some time there discussing Lightroom presets and sharing my work. Presetting Lightroom is a community of preset users and developers that share their work and help each other out. We have a compilation of over 180 presets free for download made by many of our members, see the download banner off to the left sidebar to jump right to that.

Currently at Presetting Lightroom we have started a photography contest for the coming month of February. Look for it in the thread and submit an image...just make sure you used a preset. Currently we have three prizes up for grabs, 3 copies of my Cold Storage Presets Collection for Lightroom and ACR. Please come join us over at Flickr's Presetting Lightroom group.

On the note of my Cold Storage Preset Collection, please consider purchasing it if you enjoy my presets. You will get 12 exclusive presets that you can only get in the Cold Storage package, and you get to help me continue to develop the film emulating presets you love.

For those who have purchased my collection, THANK YOU!!! For those thinking about it, and even those who are not, ask yourself if you get good results from my presets. If so, consider that most software that does a similar service costs well over ten times the price I ask. And they won't do custom emulations if you have a film/developer combo you desire and don't keep giving you more free presets to discover more classic film stocks. So think about it a bit.

Cart It
Add to Cart

Buy It
View Cart


Thanks,
Michael

20090125

LIDF Cold Storage Collection - 46 Film simulations - 12 Exclusive - $9.99

For a while now LifeInDigitalFilm has been the place to get Lightroom presets to emulate film. Recently I also added Adobe Camera Raw presets to the collection. Well as you have read over the past couple posts, I am not happy with the Blogger platform and I am ready to move on. I need to purchase hosting. I am not well-to-do, I live paycheck to paycheck, and I do my photography for money on the side. Hopefully one day it will be more, but for now I still have a day-job. I really cannot afford to outright buy hosting for my site, and pay for the expenses I incur developing these presets is getting immense. [Keep in mind, I have to track down old, sometimes rare film, shoot it and develop it to carry out a quality emulation] Something had to give, either the blog or my budget.

So I though of an alternative. I have bundled together every preset I have released on LifeInDigitalFilm since it's inception. From Kodak BW CN up to Ilford SFX, every release is there in both LR and ACR format. The only exceptions are my original B&W, print, and slide film collections, which were designed back in the summer before I developed my current procedure by which I develop presets.

I am calling this Set LifeInDigitalFilm: Cold Storage Preset Collection Vol. 1

The set is available for $9.99 for a direct download of the zip file containing all 34 film emulating presets I have release so far. So why pay for free stuff? First, think of it as a donation, no different than giving some money to your local public broadcasting station to ensure their excellent programming, a donation that gets you a DVD or maybe some tickets to an opera. Well for your donation you get every film preset on my site in one download. Second, do you really think I would ask for ten bucks just to give you what you can get for free? Hell no! I have created 12 new LR/ACR presets that are exclusive to the Cold Storage collection and only available to those willing to give ten bucks to help me offset the cost of this crazy endeavor of mine.

So a total of 46 film stocks emulated (actually 44, Polaroid 669 had 3 different presets), and each film stock has 3 presets; regular, auto and curve. That comes out to 138 presets for either Lightroom or ACR; they are both in the download!

Please consider supporting the site, I am not doing this to make spending money, I'm doing this to prevent me from choosing this blog or my dinner. Money is too tight for me to carry this on my own, and with your help we can keep it going.

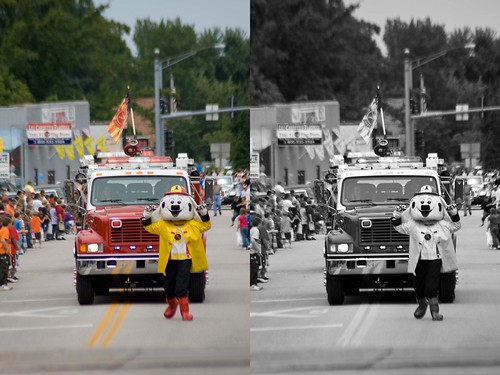
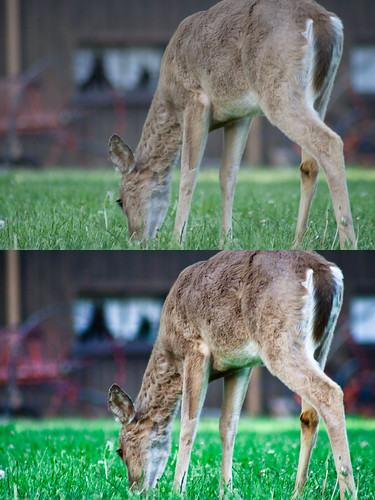
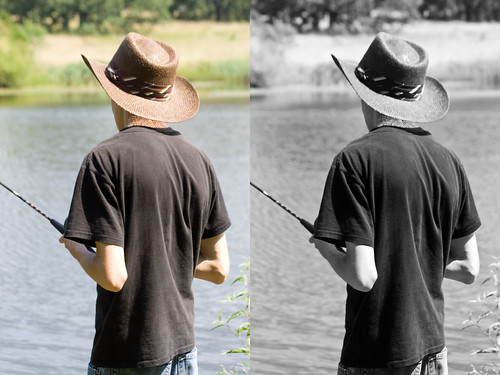
Is this site worth $10 dollars to you? Does $10 sound better than $199.00 or $299.00 USD for some film emulating Photoshop plug-in? The plug-ins might do a better job at it than my presets do, I don't think so, but they might. If my free presets let you enjoy film emulation with out doubling down for expensive plug-ins, is it worth it to pay $9.99 for Cold Storage Collection? Or even worth tossing me a $5.00 donation? If you have enjoyed my work, please consider purchasing the Cold Storage collection.. it is the only way to get the following emulations.

FUJI NEOPAN 100 ACROS


FUJI PROVIA 100F - Cross Processed


FUJI VELVIA 100


FUJI VELVIA 100F


FUJI VELVIA 50


KODAK EKTACHROME 100VS - Cross Proccesed


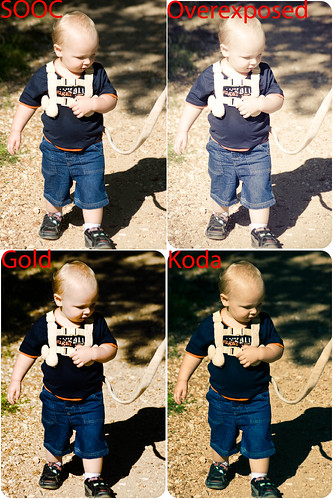
Kodak Gold 200 - Cross Processed


Kodak Panatomic X - Expired in 1977


Kodak Panatomic X - Expired in 1986


Kodak Portra 160 NC


Kodak Portra 160 VC


Kodak Portra 160 VC - Bleach Bypass


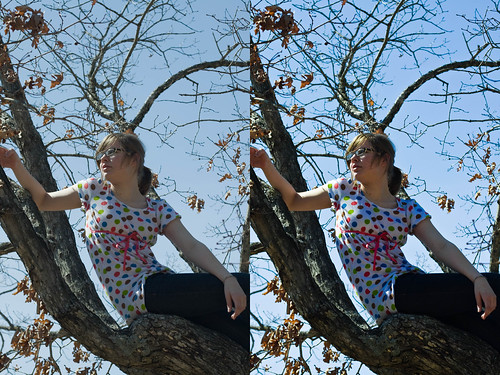
And so you know what it look like before conversion SOOC


Hopefully the samples have enticed you, if so, you can find the order buttons on the upper right hand side of the page. Click add to cart, then click on the cart to order.

Or do it here.

Purchase Cold Storage Presets Vol.1:Add to Cart

Click on Cart to Complete:
View Cart


Thank you for your support,
Michael W. Gray

20090124

LR/ACR Preset: Ilford SFX


LR/ACR Preset: Ilford SFX, originally uploaded by GrayImaging.

Today I complete my run of Ilford films for the time being. Today I bring you Iford's SFX, one of the few remaining IR films. This film was actually discontinued, however Ilford is not making Limited productions of it, one batch a year.

As always, my emulation of IR films is designed to be used on regular raw files. I have not tested this preset with a IR raw file, as much I I would like to, I just don't have any IR RAW files. I have a few IR JPGS, and the results were alright with them, however, I don't preset on JPGS often and I was not overly impressed with the results.


On another note, I will be taking a few days off from the blog, hoping to expedite my migration over to WordPress. There will be no presets during that time, maybe an article or two, but no big releases. When I resume, I plan on releasing two presets a week, with other content on non release days. This really does not change the frequency too much, I have release 33 releases in 13 weeks, which is about 2-3 a week. I plan on new presets coming out on Tuesdays and Fridays (make note: I am in USA). Hopefully I will have my new preset out on this coming Tuesday, but if not, watch for it on Friday.

I hope this year brings much more content to LifeInDigitalFilm, and I really hope the upcoming switch to WordPress improves the quality of the site. I look forward to being here doing this for a while.

Michael

20090123

LR/ACR Preset: Ilford XPS 2


LR/ACR Preset: Ilford XPS 2, originally uploaded by GrayImaging.

Next stop on the Ilford train is XP2 Super. Ilford color processing black and white. Designed to be developed in regular C-41 chemicals at any mini lab. A decent film, much like Kodak's BW CN in many ways. Not exactly my cup of tea, but a good film for B&W shots when you don't have your chemical lab running.


Enjoy,
Michael

20090122

GoogleFail: Google Sites Unresponsive

Ok, so tonight I was tweeted about my downloads not working. I had just made an upload, and tested the download, so it through me off. So I check on another PC and found out that indeed NONE of my download links were working. Google Sites had failed me. I guess I can't expect much, it is free (although I paid for the Google Apps suite and domain hosting...but anyway). But considering how disillusioned I already was with Blogger/Blogspot content management and hosting in comparision to WordPress content management....

So tonight I started to migrate away. Now all my downloads are hosted on Amazon S3. Brandon of X-equals, gave me a tip to check out this article on using S3 for file hosting. So I made that switch. Now I pay a little for alot of reliability. Thanks go out to both X-equals and Nettuts.com.

I am ferverently working on a good WordPress template on my private server, and migrating all current content to my new WordPress setup. As soon as I get some good hosting (aka get some money to buy hosting) I will bring the new version live. Hopefully it shant be long. I can't handle Blogger much longer.

Also, I have removed the link for my download page. I am not going to use Google sites at all. I will get a new download page set up over this weekend.

Michael

LR/ACR Preset: Ilford Ortho+


LR/ACR Preset: Ilford Ortho+, originally uploaded by GrayImaging.

Next in my Ilford series is Ilford's orthochromatic, continuous tone copy film, Ilford Ortho+. Emulation made possible by my friend Jason Dhenning by capturing my Color Check card on a sheet of Ortho+ with his 8x10 camera.

Suffering from a migraine currently so I am not going to expand any further, save to say one thing. When using this, or my Kodak Copy Film preset, you can really manipulate the channel mixer. Normally I only recommend adjusting the Orange channel is skin looks bad, but on this preset you can go about +/- 10 units without completely blowing the emulation. I try to keep my total amount of adjustment to 15 cumulative units or less (does that make sense?) and I feel the emulation holds up.

Get it HERE.

Until next time,
Michael

20090121

LR/ACR Preset: Ilford Pan F+


LR/ACR Preset: Ilford Pan F+, originally uploaded by GrayImaging.

Tonight is the first in my short series of Ilford films. Tonight I bring you the slow but sharp, fine grained Ilford Pan F+. Watch your black clipping and contrast using this preset, as a little too much can really black out shadow highlights.

As always, both Lightroom and Adobe Camera Raw preset files are included.

Get it HERE

As side notes, I will be redesigning LifeInDigitalFilm over the next few months. I will be moving the blog from Blogspot hosting to another hosting provider when I finally get my business website up. When I do make the hosting switch I will be migrating LIDF to WordPress, which I wish I would have used when I started this mess. The change should allow me to provide a better experience, and the web hosting will allow me to have actual information pages for each film I emulate. So if in the future I have lapses in posts over a day or two, know that I am working on making the site better, not blowing it off.

Also, today I converted a really great preset to ACR. It is x=warm+storm preset, and it throws a really great effect on your image. I ran it on a wedding catalog I have and I had great results. Check it out at x-equals.com/blog. You may have already seen it up at PresetsHeaven, if you have still run over to x-equals, Brandon has included the ACR version of his preset for your enjoyment.

Well, until next time,

Michael

20090120

LR/ACR Presets: Polaroid 54 & 55

Another collection of presets for you all to enjoy tonight. Mixing two worlds of photography up, with Polaroid 54 and 55. They are both instant and black and white films. Polaroid 54 was an ISO 100 pull-apart film, whilst 55 was an ISO 50 pull-apart print with a ISO 35 pull-apart negative, which happened to be reusable.

Both films have went the way of Polaroid...dead.

Get them below-

Polaroid 54 is HERE
Polaroid 55 is HERE

I hope you enjoy them. Project Ilford will start soon. 3 presets in a row.

Until next time,
Michael

20090119

LR/ACR Preset: Kodak Kodachrome 25

Sorry for the few day delay in updates, got more than a few projects in the fire at the moment. I have had this preset complete for quite sometime now, as observant presetters may notice. Tonight is Kodak Kodachrome 25, which I used in my 100 style preset last week as the Koda preset.

It is an emulation of Kodachrome 25, which, in almost every sample I had possesses a very different color curve than its ISO 64 counterpart. That is not a bad thing, as it gives me more to preset. It tends to pound greens a tad harder, while taking it easy on the blues.

Get it HERE.

Also I would like to let you know that my Convert LR preset to ACR article has been published by Brandon over at x=blog. I completely rewrote the article and even made screenshots [which I never do here :^P (I never use emoticons either { ...or nested comments })]. I feel the post at x= is far superior to my roughly written process I posted a few days ago. Please check it out HERE.

If you have not seen the x=blog, please do so. It is a veritable treasure trove of great photography, processing, computer, and business tips.

20090115

LR Style Preset: 110 Prints


LR Style Preset: 110 Prints, originally uploaded by GrayImaging.

In a departure from my usual film emulation fare, I decided to branch out and make a print emulating preset. I call it my 110 Print Presets. The set contains an overexposed preset, and two film styled presets. One based off Kodak Gold, called 110 Gold in both standard and auto. Also has 110 Koda, which is based off of Kodachrome 25, again in auto and standard.

I know that not just 110 3.5x5's were made with rounded corners...135 format was printed like this as well back in the day. However my family photos that look like this all have 110 negatives in the shoe box with them, so to me the look is distinctly 110.

I will recommend that if you send out for prints using this preset, to look for a photo finisher offering the Kodak Silk paper. Adorama offers this particular finish in 3.5x5 for the complete classic look. Just adjust the post crop midpoint to 50 in the Vignette menu, which eliminates the white border, leaving the rounded corners.

You can get the preset HERE.

Until next time,
Michael

20090114

Tutorial: How to convert LR presets to ACR

[This article has been rewritten and published at x=blog 01192009]

I recently stumbled upon a method by which you can import Lightroom develop presets into Adobe Camera RAW for use with Photoshop and Photoshop Elements. I’m sure someone has written this up before, but I have never seen it, as I discovered this by chance. In retrospect this seems overly obvious and many of you may know how to do this already, but if not read on.

As a die-hard Lightroom addict I personally never had the need to deal with Adobe Camera RAW. All my trips into Photoshop were initiated from the context menu inside Lightroom. However, I recently finished touching up a RAW file for a colleague and I wanted to have my edits saved with the file. Knowing she does not use Lightroom, as she is an Apple fan running Aperture, I needed to save the Lightroom edits to be rendered in Photoshop. I exported my edited file as a DNG she could open in ACR, then I hopped into Photoshop and opened said file. As I suspected all my edits were intact, they should be as ACR and Lightroom use the same RAW engine. Life was good.

However, looking at my fully edited file in ACR I realized that I could save these develop settings as a preset in ACR, opening the presets I design to a whole new audience. If you follow the steps below, you too will be able to convert any preset you use into an ACR preset.


1. Open Lightroom, and edit any RAW file in your catalog by applying the preset that you wish to convert over to ACR.

2. Once image is satisfactory, right-click (Windows) to bring up the context menu. Choose “Export” in the menu and then the “Export…” option. This brings up the export menu. Setup the export for “Files on Disk”. Choose your export location, set naming for custom name and give the file the name of the preset you are exporting. Most importantly, in the File Setting section, change the format to DNG. This will rewrap your RAW file into DNG and include any modifications currently done to the image (the applied preset).

3. You can now close Lightroom. Open up Photoshop (or Elements), and open the DNG file you just made. ACR will pop up showing your exported file with all edits intact. Take this time to run through ACR’s options and make sure everything looks right. If so, move on to the next step.

4. Now look at the ACR window. To the right, just under the histogram is the buttons controlling ACR adjustment features. Look for the one on the far right with the three sliders depicted on it. Clicking this leads to the Presets menu. Now simply click the small icon in the right corner of that window, it has 3 lines and a small arrow. It opens a menu, in which you will choose “Save Settings”.

5. This will open a dialog with all the controllable options for the preset, and is much like what you see in Lightroom when making or editing presets. Place a check by every option you want the preset to adjust. Uncheck any boxes you want the preset to leave alone. If you check “Apply auto tone adjustments” or “Apply auto grayscale mix” then the preset will override any of your Lightroom edits in those areas. I would not use it unless you know what you are doing.

6. Once done, click on “Save”. Then you are offered a Save dialog box with the filename of the DNG in the window. If you named your DNG for your preset, just click “Save”, if not change the filename and click save. Your preset is saved to the presets dialog in ACR. Open another RAW file and test it.
Now you can use your favorite Lightroom presets inside of Photoshop, or make a preset for a friend with Photoshop but no Lightroom. Let them see what they are missing.


Another benefit I have found to exporting my Lightroom preset to ACR is that I can store them on a USB drive and use them on anyone’s machine. You can copy your ACR .xmp files from this path:

C:\Documents and Settings\UserName\Application Data\Adobe\CameraRaw\Settings

Copy the .xmp files to your USB drive. You can them manually apply any preset off the drive. Just click on the menu icon in the presets tab, choose “Load settings…” and point the file browser to your usb drive. Click and go.

I hope this helps anyone who was curious as to how to carry out this process. Hope it helps you and your workflow.

Until next time,
Michael

20090113

Adobe Camera RAW Presets!

Today I released my Ilford HP4+ preset, and the download contained both presets for Adobe Photoshop Lightroom and Adobe Photoshop Camera RAW plug-in. This evening I went through every download on this site, with few exceptions, and added my new ACR presets to every download.

The only downloads not updated are MikeyG!s Color Slide Film Vol. 1, MikeyG!s Color Print Film Vol. 1, and MikeyG!s B&W film Vol. 1. I chose not to update those packages as of now due to the size of each package, and the fact that the methods I used for emulation then has changed so drastically. If I have spare time, I will update those 3 with Curve presets and ACR presets, but for now I am leaving them be.

Every other download on this site is now updated. You can tell for sure, look at the post header. If it say LR/ACR then the download has both inside.

I hope that this change opens more people up to my presets. Many more people have Photoshop than Lightroom, and many others have Photoshop and Aperture. This change now opens these presets to Photoshop and Photoshop Elements.

Until Next Time,
Michael

LR/ACR Preset: Ilford FP4+


LR/ACR Preset Ilford FP4+ , originally uploaded by GrayImaging.

And now for something moderately different:

Today I am presenting my version of Ilford's mid-speed B&W film FP4+. What is different today is that it is not just a Lightroom preset. Inside the zip file is a folder called "ACR Presets" containing .xmp files for Adobe Camera RAW.

To install .xmp presets simply drop them into the following folder in Windows...(no clue with Mac)

[C:\Documents and Settings\UserName\Application Data\Adobe\CameraRaw\Settings]

When you open a file with ACR, look on the right side of screen. Below the histogram and above the slider are icons for different RAW controls. The furthest button to the right shows 3 sliders as its icon. Click it to reveal the list of presets installed. Then simply click the preset of choice to apply it. Then teak the image in ACR before you open it into Photoshop.

From now on I will be including an ACR preset with my Lightroom presets. On slow days where I have no new presets, I will update the old releases with their ACR counterparts.

I hope this adds more value to your download and opens up my film emulations to a wider audience. My preset will now be usable on Lightroom and Photoshop [I believe PS Elements also uses ACR, if so it will work on it too...let me know.]

Anyway, FP4+ is a very good, mid-speed film produced by Ilford. I really like it a lot for portraiture, I feel it gives very good skin tones on a variety of skin. I use it quite a bit, and for a 100 ISO range film (125), it is quite good (not quite Fuji Neopan 100 Arcos).

Get it HERE.

Until next time,
Michael

20090112

Lightroom Film Emulation Preset Tips


Tour of Missouri - 5, originally uploaded by GrayImaging.

As I had mentioned yesterday a lot of people seem to think that these presets of mine are expected to produce film like results with one click. Although you can get excellent results from these presets with a single click, you will not properly emulate any film without some additional work. Hopefully this will guide you a bit further into using my presets for emulating the look of a film.

1: Know Lightroom's Limitations

Okay this is right out the barn door, know what Lightroom can and cannot do. You can not emulate grain in any way, shape or form currently. Outside of shooting at a high ISO to get noise, you will have to add grain in Photoshop, Paint Shop Pro, or GIMP. I have tried to simulate the look of grain with noise reduction turned off and sharpening cranked up...it does not work. If you need grain add it in your pixel editor.

Lightroom can manipulate any RGB image, however, it will not be able to utilize all its power on a rasterized image. If you need to edit a non-RAW picture, make sure that it is at it's highest quality. At least a 16-bit uncompressed TIFF or PSD. If it is a scan, get the highest color bit-depth and the highest resolution feasible, the more information Lightroom has to work with, the better. Whenever possible use RAW. I develop these presets assuming that they will be utilized for RAW processing. Apply them before you hop into Photoshop with an image.

Lightroom uses a unique colorspace based of Prophoto RGB. Know this when exporting. There will be color compression. Always proof your exported images. If you are doing pixel manipulations in Photoshop, I feel you should export as a PSD at highest bit-depth in the Pro-Photo colorspace. Or, you can export the file as a DNG with all your edits saved, and open that DNG in Photoshop ACR. (hint: if you use ACR alot you can save the develop settings embedded in the DNG in ACR and utilize any preset in ACR that way. Kind of making ACR versions of any preset. I will be getting to that eventually.)

The more you know about Lightroom, the better you will be able to use my, or anyone else's presets. Read tutorials, grab a book. As NBC says "The More You Know...."

2: Watch those skin tones!

In color slide presets, often you will get horrid skin tone, especially on Caucasian skin. If they appear too red or orange, go to the color mixer and lower the Orange channel saturation until the skin tone looks correct. If you only drop the saturation until the skin looks good, it will improve the photo and alter the color response being simulated only slightly. Beware, doing this with a lot of fall colors in frame, as they will be effected. The less change required the better. If it still does not look right, hit orange luminance next, and last red saturation. Try to avoid messing with red as much as possible, especially since it is a primary color and changes will effect the simulation quite a bit.

3: Dig for artifacts.

Primarily when working with black and white presets, keep an eye out for strange halation effects and odd toning in your subject, essentially "breaking" the image. If you notice either, lower or raise the offending color channel and see if it will alleviate the problem (refer back to the original color image). If that does not fix the problem, adjust the sharpening first (you can always sharpen in Photoshop), and then look at your contrast. Sometimes excessive contrast will cause images to "break".

4: Know what the film should look like.

If you shoot or have shot the film you know what to expect, making it easier to duplicate the look. Presets are made to give you a good starting point, and I develop these to simulate color reaction and tone curve as accurately as possible. However, film reacts differently in the real world, so know what you are looking for. If you never shot a particular film you can always google the film you wish to emulate and search flickr for images made with said film. Compare your conversion to these and make adjustments as needed. This is the best way to simulate film, if you know what you are trying to achieve, its easier to get there...the preset just started you in the direction. Keep in mind, exposure has MASSIVE effect on film, and different exposure will react differently. Two different frames of Tri-X will look different, even of the same subject, as exposure changes. Lightroom can not ever simulate the nuance of chemical reactions.

5: White balance keeps your whites whiter and brights brighter!

Use your selective white balance creatively! The white balance will change everything in an image. Experiment and find what you like, use it to warm and cool color. White balance can completely alter the toning of a monochrome image. Push it around to get what you need. If you are trying to copy the look of another photo, white balance is your best first step.

6: Split toning can cast your colors.

If your sample photo you are emulating has a slight color cast, figure out what shade it is and run down to the split toning in your develop tab and pop that color into both the highlight and shadow tones. Then set each tone to a level of saturation, I usually hit the highlight around 10 and the shadow around 20, then play with the balance until you get what you like. You can also create a duotone monochromatic image like this.

Some of my preset will have the split tone used to get a cast with the first click. Adjust the toning to suit your needs.

7: Watch your contrast and black clipping.

Any image you preset can be improved by adjusting the contrast and black clipping. Each image is different, and needs a unique approach. Even an Auto preset can get it way off. For what its worth, alter any of the Basic sliders until you get what you want. Or develop the image as it is imported until you get an exposure you like, then apply a Curve preset, applying only the color tones and curve.

8: The devil is in the details.

Don't forget to look at the clarity, sharpening and noise reduction for an image. If a picture does not look right, often increasing clarity, adjusting sharpening and cutting noise reduction (especially luminance) can give it a quick make over.

That is it for now, so go and play around. Presets do not make the image, you do. Also, do not feel compelled to have to duplicate a film's look. Often a single preset click can improve an image and you think it looks great...if that's the case leave it as is. You can always say it was inspired by Kodachrome 25 (such as picture above).

Read the readme.txt files included in zip files. I often have hints specifically for that preset. Often the hints are generic and good for any preset, other times the hints apply only to the particular preset.

My presets are to help you out when you want a film look from digital. I can not encourage you enough to go out and shoot film. It causes you to look at photography differently. I carry two film bodies every day, a Minolta 7000 and a Yashica Manual SLR. I shoot them as often as I do my Canon EOS digitals. If you have to go get a five dollar point and shoot film camera, get it and a good quality film and head out for a day. A fixed focus 28 mm point and shoots loaded with Portra VC can take great pictures on a slim budget, and force yoy to only consider your composition.

Hope this helps a bit, more hints in the future.

Until next time,

Michael

Note: All sample photos I post with releases ARE 1-click applications. I do no further editing. Just click the preset, export to jpg and post to flickr.I felt I needed to clarify that, I did not want people thinking that my samples were further processed, they are there to show the presets action.

20090111

LR/ACR Preset: Agfa Scala


LR Preset Agfa Scala, originally uploaded by GrayImaging.

[Adobe Camera RAW preset added 01132009]

Today is Agfa Scala Slide Film's turn for my attempt at emulation. A unique film, with many similarities to it's print counterpart, APX. But instead of primarily being used for negatives, this film was marketed for use as a slide film (although you could develop it either was, as with most B&W films).

Get it HERE.

Hopefully later today or tomorrow I hope to have a post up about getting better results with these presets. I am working on it now. I have gotten a lot of feedback back about people not getting desired results, only to find out that they were simply clicking the preset and calling it done. It might work that way, but not always, you still have to do a bit more post to nail a films look. Each photo is different, and needs a slightly different approach, my presets just give you a start on the path.

If you like how they look straight-up, great! A lot of people seem to, but other really think that these will nail a film's look 100% with one click. Not even Alien Skin Exposure 2 or Nik Silver Efex Pro can truly duplicate the look of a film. You still have to follow them up in Photoshop to get a good simulation.

If you are die hard about making your digital images look exactly like film, with little to no extra post processing, shoot film. If you want to make your shots look like film, and are willing to finesse Lightroom, then I will have some tips up later for you. My presets get you started, but they will never make it look perfect. Although I still feel the 1-click results are still good, and still close. Just not a 100% copy of the film.

Hopefully will get it out later today or tomorrow.


Michael


PS: If you have any specific questions about how to use these presets, email me - michael@lifeindigitalfilm.com , I will answer as soon as possible.

20090110

LR/ACR Preset: Polaroid 669


LR Preset: Polaroid 669, originally uploaded by GrayImaging.

[Adobe Camera RAW presets added 01132009]

Bonus Preset day! Today you can also enjoy my new Polaroid 669 preset, in 3 flavors, plain, warm and cold. The zip include the standard color-balanced preset, a warm toned preset, and a cool toned preset. The color casting was achieved via my normal method of split-toning. For a much more different approach try X=blog's version of Polaroid HERE also.

I assume you all know about 669 film, and if you don't, give it a Google. It's my bonus preset for the day, so I am making this short.

Get it HERE.

Until Next Time,
Michael

LR/ACR Presets: Adox Films [(CHS 50,100,100PL) (CMS 20)]


[Adobe Camera RAW presets added 01132009]

This afternoon I am releasing 4 different film emulation presets, all for Adox films. Adox uses a traditional 1950's era emulsion, high in silver contents and low in speed. 100 is their highest speed in the CHS line due to the chemistry in the emulsion.

Check out their film:
Adox film on Sale at Freestyle
Adox film website

Now for the downloads:
Adox CHS 50 >>> HERE
Adox CHS 100 >>> HERE
Adox CHS 100 PL >>> HERE
Adox CMS 20 >>> HERE

Enjoy,
Michael


PS:

I am looking for more film samples, and if you shoot film and have access to a MacBeth style color card, next time you have a spare frame, find good light and snap a picture of your color card. Get a good, HQ scan of the image, and email it or a link to me at michael@lifeindigitalfilm.com . The image of the colorchecker is the 1st step in my emulations and if anyone can help thank you. I need images for film I have not emulated and film I have, as I will update them after I get my first release cycle done. Please attach the Manufacturer, Name, ISO and development process (push, pull, c-41 in e-6 xpro) for color film. Add detailed devlopment info for B&W films, such as the devloper used, dev time, and any other step you choose to include. I hope to add different developers to my B&W presets, as currently they are all assuming d-76.


Thank You

20090108

LR/ACR Preset: Kodak Kodachrome 64

[Adobe Camera RAW preset added 01132009]

Finally I am back up and online, sorry for the extended absence, but I got a good belated Christmas gift for all of you. My Kodak Kodachrome 64 emulation.

Be warned, this is not as straightforward as most of my other presets. If you are of the school of thought that a preset is the last thing you do to an image, this may not be for you. This preset really needs attention after the preset has been applied. It is a little finicky in the contrast/brightness areas. I have not found an image yet that I did not have to adjust one or the other. Mind you, this will get a good approximation of the colors, saturation and response curve of the film, but you will have to pay attention to the brightness and contrast.

Also, if you use my Auto-toning presets, the Kodachrome Auto tends to overexpose, unless your original exposure was dead-on. Much like the actual film, you must have a good exposure when using Auto. Alternatively, just bring down the exposure, it will improve the image if it appears washed out.

This preset can require a bit more work to finesse out a good image, however I feel the results are great when you find the sweet spot. I could have spent much more time tweaking this preset, but I like the results...it just requires a little extra after the preset has been applied.

Also, if you read the readme.txt file in the zip, I have instructions on how to use the split-toning feature to simulate the discoloration of the 60's era and 70's era stock. Just in case you are interested.

So grab the file HERE. [man, I really need to get a download icon....]

Until next time[ hopefully much sooner tha last time],
Micahel