Just wanted to let you all know that there will be no real post for today or tomorrow. I didn't want to just leave you all hanging, so I figured that I would let you know. I am in the middle of a fairly massive job for a client, so I don't have time this weekend to devote to the blog. I will be back by Monday, and should be back on schedule with daily posts early each day.
If I do get some time before hand, I will try to get a post up on Sunday, but it does not look favorable at the moment.
Thank you all for dropping by and giving me some time to take care of real-world issues, LIDF will be back in swing soon. I hate taking time off from this project, but there is no other option this weekend. It would have been longer, but I knew I had a busy week coming up so I got my daily posts for the past week done last weekend. I just hoped the I would have been done with the project by this weekend, but alas, that was not to be.
Back soon,
Michael
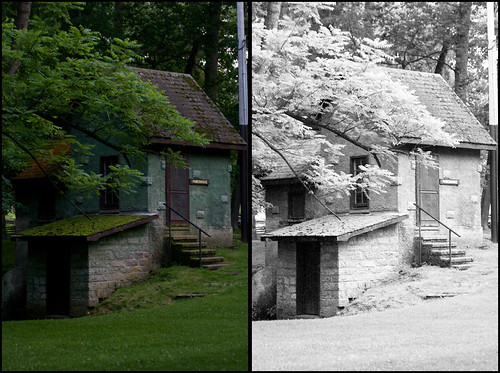
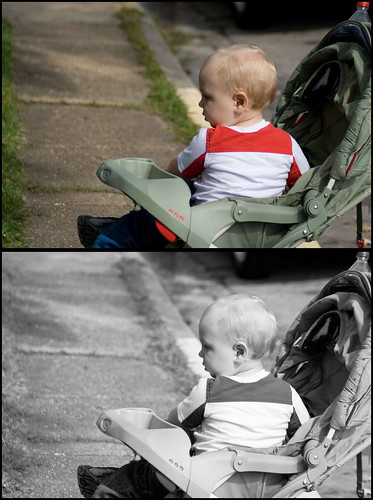
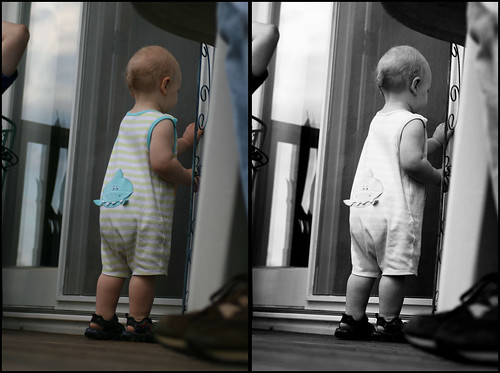
20090228
20090227
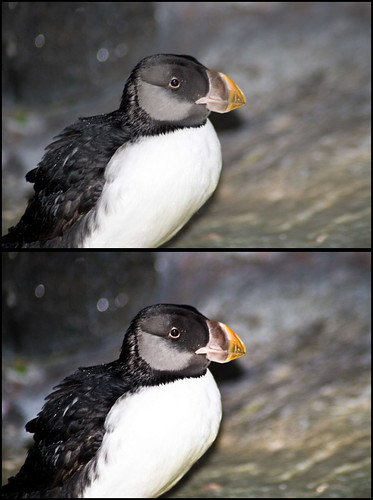
LR/ACR Preset: Maco IR
Today I bring you another attempt at simulating an infrared film. It is a fairly difficult task that cannot be done anywhere near as accurately as a normal B&W film. So when using my IR presets, keep in mind that you are not creating anything near what the actual film would create. I think I have the general feel of the film captured, however it is impossible for me to create a preset that can take a standard RAW file and give it an IR look.
However, if anyone has access to a IR-converted DSLR, and could send me some RAW files to test with, I should be able to work up a proper IR preset for use with IR modified camera RAW files. If you do, please contact me at michael@lifeindigitalfilm.com
Anyways, today I give to the world preset in the style of Maco IR. I can't really call it an emulation, but it has similar tonality and reacts to colors in a way that makes it kinda look IR. I hope you enjoy it and can find a use for it.

Don't forget to show LifeInDigitalFilm some love. Buy the Cold Storage collection, or even just donate a couple bucks. Every little bit puts more film in my hands, resulting in more presets. Find the buttons on the right side of the page.
A lot has been going on for LIDF lately, I have a few items in the works, so keep dropping by. New things are coming, I just can't say when yet.
Also, today is essentially the last day to make an entry into the Flickr Presetting Lightroom photo contest. Not alot of enteries, and there is a copy of HDRSoft's Photomatix Pro and 3 copies of my Cold Storage collection up for grabs. To enter you need to post an image to the group, with a title, preset used, and why it was used. the contest collection is small, so the odds of winning are pretty good. Jump over there to join in.
Until then,
Michael
20090226
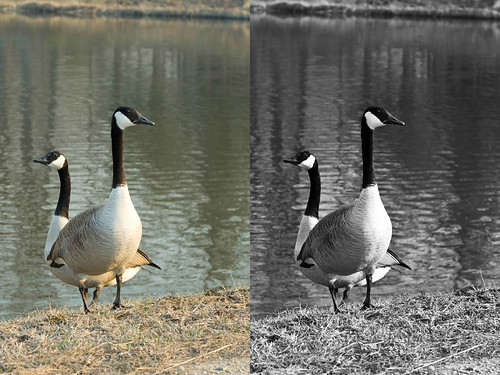
LR/ACR Preset: Maco PO
Now to follow up my Maco Cube preset from this past weekend, I now give you my version of Maco PO, their Orthopanchromatic film. Being an Orthopanchromatic film, it has a very subdued response to red, but does not render it black as an Orthochromatic film would. Being said, that is all I can say I find special about this film. It is still a good, solid film, but nothing makes it stand out to me, especailly when compared to Fuji Neopan 100 Arcos, another Orthopan film.
I hope you enjoy it
Back again tomorrow, in the mean time don't forget my Cold Storage collection. If you enjoy my presets and wish to support their further development, the $9.99 usd purchase price goes towards costs for the website and to aquire new film and processing to prepare the film for emulation. The process for making these presets is fairly involved and does require an outlay of cash on my part...your support helps offset these costs. For more information on how I make my emulations click HERE.
Until tomorrow,
Michael
20090225
Random Items: ACR presets and Customizing LIDF Presets for Your Needs
So lately I have been fielding some questions via e-mail and reading some great criticism on other blogs. All in all, I feel the response to my presets has been amazing, but in the interest of always improving, I want to say a few thing that may help clear up some common issues.
Issue 1: Over Aggressive Tone Curves
Alright, I admit some of my tone curves can be harsh when used on high contrast images. I have noticed this and I am currently revising some of the worst offenders to help alleviate the problem. Frankly, it is hard to duplicate the effect of film, as each batch is different, and every frame can differ based on condition in which the photograph was taken. If you notice your image is breaking (excessive posterization in shadows, strange artifacts, etc) I recommend you take a look at the tone curve and make a few adjustments.
If the tone curve is steep, with deep shadows and bright highlights, you may want to pull the curve back on either side, flattening out the image. You may also want to adjust the Point Curve option in the Tone Curve window down a step: from Strong to Medium, Medium to Linear. These alterations may improve your image. The primary concern in my emulation preset is the color settings, with the tone curve coming in second. Try to fix any problems using the tone curve, it may help you out more if/when you take the image into Photoshop.
If you find yourself frequently altering the tone curve of a particular preset, you may want to consider permanently altering the preset to your needs. After making your corrections, right click the preset name and select Update. Hit okay afterward, now you have made the preset your own. If you find that you get better results, email me about your alterations...you may be the extra set of eyes that helps me improve my emulation. Contact emails are on the left side of the blog.
Issue 2: Adobe Camera Raw Presets
For a while, every preset I make has an ACR preset included in the release. The ACR presets are located inside a folder in the archive entitled "ACR Presets". Every film emulation preset on LIDF now has ACR counterparts to the Lightroom presets. Most of my style presets also have ACR counterparts.
To install the ACR presets all you have to do is copy them to the corret folder for ACR to access them. They folders are as follows:
Macintosh: /Users/UserName/Library/Application Support/Adobe/CameraRawFolder/Settings
Windows: C:\Documents and Settings\UserName\Application Data\Adobe\CameraRaw\Settings
Simply replace your current user name into the folder structure where you see UserName. These folder paths lead you right to where you need to copy the .xmp files found in the ACR Presets folder. Once you have them copied over, the next time you open ACR the presets will be available in the Preset tab in ACR (Which is the button furthest to the left under the histogram).
Alot of people were not aware how to install these presets, and if you are interested in converting Lightroom presets yourself, please refer to my post over on X-Equals. It walks you through the process, and gives more indepth direction on installing presets into ACR.
Issue 3: Non RAW Images
If you have been to LIDF lately you may have seen the poll on the top left side of the blog asking if I should make presets for raster images in Lightroom. Overwhelmingly the answer was no, but I saw enough intrest in raster images that I made a decision. I am going to start woking on Photoshop actions to accomplish much the same effect as my presets. This will likely be a way off, and the releases nowhere near as frequent as my Presets, but I plan on doing it.
I decided to forgo presetting for jpegs, as I found the results less than adequate, and I feel Photoshop is the place to make these pixelpushing changes anyways. Take away the power of RAW data and Lightroom is rendered fairly inept for my emulation purposes.
Keep an eye open, they will be coming.
Issue 4: Using My Presets
Finally, if you are using my presets and getting great results, let me know. I want to see and hear about successes. In the same right let me know about problems you encounter, feedback will help these presets improve.
If you use my presets on your own personal blog, drop me an email or a tweet on Twitter, and let me know. I love to see others work with my tools and I will happily send everyone who views this site to you to see what you have done. I enjoy showcasing those who use m presets.
If you are on Flickr and post images processed with my presets, you don't even have to email me. Just tag you image with "LifeInDigitalFilm" or "LIDF" along with the emulation used in the description, I will find them as once a week I troll Flick looking for examples of my presets in use. If you have a number of images using my presets, I will showcase your Flickr stream just as I would a photoblog.
Maybe it is vanity, but I enjoy seeing my work paying off. Also I can see any inadequacies I did not encounter whilst testing the presets out myself. Again seeing them used can help me further refine and improve my presets.
Well thats it for today, another preset is coming tomorrow!
Until then,
Michael
20090224
LR/ACR Preset: Fuji Fujicolor Press 800
Alright, here is a preset I had mentioned I have been working on for a little while. Today I release my version of Fuji's Fujicolor Press 800 film, which was design to be a high-speed film primarily for media use in adverse lighting conditions. The emulsion is rather grainy, but grabs sharp, clear images. This was one of the first Fuji film emulsions that utilized their 4th color layer, leading to vibrant images even under bad lighting without sacrificing shutter speed.
A warning up front, my presets are primarily designed from me physically shooting a roll of film and then further analysis. Sometimes this can lead to unique effects from roll to roll. I feel this is a case of that, the blues in this roll and emulation are really washed out, as you can see in the image above. I could correct this, and make the blues look more "correct" however that would be an inaccurate emulation of this roll. I emulate actual film, not the average look of the film. As I shoot more, there will be new emulations of every film I have done so far. It is the way I am choosing to do this project...there is no end all be all emulation for any film, each batch of film created will differ in appearance and reaction from batch to batch...therefore my emulations retain the quirks of each individual roll and each processing method used.
To compensate for the washed out blues, I recommend that you first slowly lower the Blue channel Luminosity, bringing some more depth to the color. If that is not enough, increase the Blue Saturation slowly until you get what you are looking for. Only do this if you really nee to do the blues, as most other colors look accurate compared to other samples of the film I have encountered. Enjoy the preset.
That is all for today, quick post just to make the release. Enjoy your day, and if you have any beautiful photos that you have just process with my or anyone else's preset, please consider entering it in the Presetting Lightroom contest on Flickr. Just a few days left to enter!
Until Tomorrow,
Michael
20090223
Monday Update: In Other Words, Nothing New Today...
Well, it is Monday, My busiest day of the week in the "real" world, so I am going to continue with my Monday Update reviews. Don't expect new contents often on Mondays, but something may sneak in from time to time.
Well, although it was difficult to do, I succeeded in getting a new post out every day again this week. However, I did not get any new articles out as I had hoped to...that just rolled into a new project. More on that when the time comes.
Still working on my new WordPress redesign for LifeInDigitalFilm. I am not going to migrate until I have everything ready to rock, so it should still be a while. When it happens you will know.
It was a good week for presets this past week, with a series of releases. The big focus on presets this week was on the Agfa RSX II family of slide film. I hope you all enjoyed it, as I was not planning on releasing them all at once, but lack of creativity preculded me from writing actual content, so they all got rolled out way too fast. A day by day breakdown....
Tuesday: Rollei Ortho
Wednesday: Agfa RSX 100
Thursday: Agfa RSX 200
Friday: Agfa RSX 50
Sunday: Maco Cube
Only article written was Saturday's rant about me and why I still shoot film. That is not counting shooting it to emulate it, but to explain why I have 50 rolls of file in the freezer waiting to be shot and another 15 waiting to be developed, while 3 rolls currently reside inside three different cameras. All being used whilst my DSLR rests in it's camera bag. To read on my retro-photo life click HERE.
This week I started a new mini-feature in my release posts... As I have encountered photoblogs using my presets, I have been featuring them on LifeInDigitalFilm. Sometimes it's good to see other people use my presets, actually it is always good, since I see my own photos too often and only can use my personal snap-shots to demo my presets...I don't like using client or project photos for this purpose. So here are the phot-blogs featured this past week on LIDF.
Wednesday: 365photosin2009 - Julie McLeod
A fun photoblog, depicteing Julie's progress through her 365 photo challenge. Every photo has to meet a theme that is listed on the blog, and every photo is a different theme. Quite a challenge and it is fun to see how she meets the themes with her photos. She had frequently used LIDF presets in her project and I ask you to take a look.
Thursday: Beau A.C. Harbin Photography Blog - Beau A.C. Harbin - Twitter: @bacharbin
Beau has a knock for creative composition and processing, and most of his images include a small snippet of text describing the image itself, so you can understand it in the context of how it was shot and processed. He has used LIDF presets occasionally on his images, most recently on a stunning HDR image of a bridge over the Chittenango Falls. His images will take you somewhere, if only for a moment.
Friday: Phototerium & The Photog Formula - Nate Lawson - Twitter: @nate_lawson
Phototerium is simply an amazing presentation. It is the home to Nate Lawson's 365 photo project, and he is putting up some simply stunning images. And as if that was not enough, he has frequently been posting the outtakes and seconds to his other blog, The Photog Formula. He has been on a kick of late using alot of LIDF presets in his work...Hop over, have a look, get some inspiration for finding the art in an everyday moment.
Saturday: profiPhotos - Markus Griebling - Twitter: @profiphotos
While not a photoblog in the same sense of the previous three, Markus' profiPhotos is an excellent resource for Lightroom tips. He recently posted a video on creating High Dynamic Range (HDR) images in Lightroom via HDRSoft's Photomatix Pro, check it out if HDR is an interest of yours or may someday be.
Markus is also a fellow Admin over at the Presetting Lightroom group on Flickr. Both of us want to invite you to join in on the conversation and to join in on the current photo contest. Less than a week to enter a phot for a chance to win HDRSoft's Photomatix Pro or a copy of my Cold Storage Collection. Join in the contest HERE.
Bonus Blog: x-equals blog - Brandon Oelling - Twitter: @xequals
Finally, even though I did not make mention of this site in the past week, please hop over to the X-Equals blog, in fact you should make this a frequent stop. Brandon brings you some of the best tip, trick and presets for Lightroom and also features alot of information on workflow, file-maintenance and often does in-depth features on some great photographers.
Recently Brandon put the spotlight on Tom Hoops, who is a great portrait photographer. The article is an interesting and informative read, giving insight into the mind of a great photographer.
In all Brandon's site is a great resource for Lightroom users and photographers in general. Take some time and visit his site. You might even find a few articles n me in his archives.
Well that is all for today, a rather quick post, given it's length. That's what recaps are good for, making you look prolific whilst not having to produce any new content. Come back tomorrow for a new color preset.
Until then,
Michael
20090222
LR/ACR Preset: Maco Cube
Alright, it is Sunday here in Mid-America, and I have nothing better to do that bring you my newest film emulation preset. Today is a rendition of Maco Cube, from Maco of Germany, the manufacturer of the Rollei films. Maco Cube is a 400 speed (nominally rated) Black & White film emulsion. The manufacturer claims an ISO latitude from 100 to 6400 with the same film, depending on development process used, with a fine grain across the ISO spectrum. They claim to accomplish this by utilizing three emulsioon layers with chemicall different silver crystals, that react at different speeds, allowing for fine grain and high speed. I did not test it at any other speed thusfar except for 400, as the deevloper I have on hand currently is D-76 and the only speed rating on the datasheet for D-76 was 400 [10 minutes @ 20C].
I find that it does have a fairly fine grain, but that is of no difference currently in Lightroom as there is no tool allowing for inclusion of grain (please Adobe...V3? Please?) I got the general color response reasonably accurate and I find the emulation to be reasonably close to Maco Cube @ 400 in D-76, for what it is worth. Enjoy.
As I mentioned yesterday, please join Flickr Presetting Lightroom group and enter into out photocontest. We have less than a week to go and less than 20 entries, those are pretty good odds to win a copy of HDRSoft's Photomatix Pro, with it's new Lightroom Plug-in. Also you have a shot at getting my Cold Storage Collection, three copies are up for grabs. Presetting Lightroom has more than just the competition too, we have a collection of now over 200 free presets that you can get to from our community discussion board. Come on by and enter!
And if you think you have a good shot at winning, you might want to check out the video from profiPhotos, coverin the use of HDRSoft's Photomatic Pro with Lightroom! Follow over to it HERE!
And if you got some mad tax-return money burning a hole in your pocket, and you like the presets I make, please consider grabbing a copy of Cold Storage and get the 12 exclusive presets along with every preset released on LIDF up to the end of Janurary 2009. $9.99 to go to film and processing to keep the emulations coming and improving! Thanks!
Until tomorrow,
Michael
20090221
Rants: Shoot Film! (and other stuff)

[Photo Info: Kodak Portra 160 NC, Minolta Maxxum 7000, Minotla Maxxum 50mm f/1.7]
Okay, I still have not written an actual article, and I don't want to release a preset tonight as I have released quite a few this week...I will have a new black and white preset up tomorrow however. I did want to take a few minutes though to say s few things that dropped into my mind today.
So, today I opened my freezer and saw rolls of film that I have shot over the past year, awaiting development. The picture above is one of the frames snapped on the rolls I had developed. I also had my roll of Fuji Press Film 800 I bought a while back developed finally, so an emulation is a week or so away, but I digress. As I dropped the film off at Wal-Mart, as I told them "develop only, no prints" I got a look of confusion from the clerk at the counter. Almost like, why are you even shooting film if you don't want prints. I didn't say anything, it just jump started my brain.
On the drive back over to my mother-in-laws house to pick up my wife, I was asking myself "Self, why did buying a fancy new DSLR lead your right back into the world of film photography?" Now I know the answer for the one roll of Press Film, I am going to emulate this film for LIDF so I can get a look similar to this film on any of my digital shots. That did not explain the other three rolls I just got processed. It had me wondering, and I came upon my answer, shooting film makes me a more disciplined photographer. Shooting film also keeps me firmly in touch with the past and makes me appreciate the advances in the field of photography. Plus, shooting film seems organic, like a natural determined act. That makes no sense, but its how I feel.
I think it is refreshing to get out with a film camera and a roll or two of film. I know I only have 24/36 photos to take, and that each one has a defined cash value. I think about my shots, I don't take 20 frames of the same subject to find the right one later, I take time to find the correct shot and take it....then I move along. I am not saying there is anything wrong with taking a long series of photos to get the right shot, but it forces you to think more when those same 20 shots esentially end your shooting for the day.
I love the feeling of opening the envelope and seeing my photos for the first time. I still can't develop C-41, so i can't say pull the negative out of the spool, but it is the same feeling. This is the first time my eyes have seen these images. On my DSLR, I can see everyimage instantly, there is no wondering. When you have that perfect shot, you smile and move on, you are out shooting after all. With film, the second your mirror blocks out your viewfinder, that is the last time you will see anything approximating that image until you open the envelope. And when you are sitting in your car in the parking lot and see that you got the perfect shot, you rejoice...celebrate even. The time removed from the act of shooting allows you this luxury. You can enjoy the beauty of your shot for the first time and breath it in. Your LCD does not go black, reminding you to get shooting again. This is Zen.
Then when you look at the images, the color and tone, the feel of film is different. Which that is what LIDF is all about, bringing that feeling to digital. But it is only inspired by the original film. Making your perfect shot look like it was taken on Velvia is not the same as actually capturing it on Velvia. Both feelings are great, but there is just something about the old-fashioned way...Not saying that using my presets is not also great...but it is not the same. But it may soon be the only way to live that moment with your favorite film.
Please, take some time and shoot a roll of film if you have not done so lately. Get back in touch with the past. You don't even have to have a great SLR, a good point and shoot film camera works great...hell, even a disposable will remind you what it felt like before. If you have never shot film, give it a chance. Take a film camera out for a day, maybe even learn to develop the film yourself. It is really fulfilling, but that is just me.
Well that ends my rant, on to some items I want to cover before I log off for the night.
First I would like to ask you to take a jump over to profiPhotos. Markus just posted a new video tutorial today on making HDR images using HDRSoft's Photomatix Pro plugin with Lightroom. It is very informative, as is his entire site. If you love Lightroom, this is a definite must visit. Just make sure to give him a visit!
Speaking of both Markus and Photomatix, I want to remind you that there is only one week left in the Presetting Lightroom photocontest on Flickr. Markus and I both adminstrate the group, and have been trying to kick up the activity level there. We have a photocontest running currently with HDRSoft's Photomatix Pro as the grand prize and three copies of my Cold Storage collection floating around for the top 3 finishers. There are not many entrants thusfar and the odds are pretty good to take home some type of prize. So please, come by and enter one of you preset processed photos...and by all means, feel free to enter a photo of your's processed with a LifeInDigitalFilm preset, I have no supporters entered in the contest so far. Follow the link HERE TO ENTER!
So that is it for the evening, come back for a new preset tomorrow.
Until then,
Michael
20090220
LR/ACR Preset: Agfa RSX II 50
Ah, it is Friday, my work week is over. Hopefully I can get some articles written...I can hope. But anyways, I did not even try to write an article for today, I decided to complete my trio of RSX II presets. Today I present my Agfa RSX II 50 preset. It completes the set, and is the best looking one on the vast majority of my images. Enjoy.
More and more photographers are using my LifeInDigitalFilm presets, and as I discover them I am going to keep sharing them with you. Today I would like to ask you to drop by Nate Lawson's photoblog Phototerium. Today he posted an interesting photo entitled "Learning Curve" utilizing my Adox CHS 50 preset. When I look at his image I have to say it screams art...look at it close, you will see what I mean. If you like his work, please follow him on Twitter @nate_lawson.
So, with that I am going to get back to my text editor and get to work on some articles I hope to eventaully complete and get up on LIDF. Also I am going to spend some time getting my WordPress theme worked on, and iron out some bugs in my "sandboxed" version of the new LIDF. Hoping to get it live in the next month or so.
Back tomorrow!
Michael
20090219
LR/ACR Preset: Agfa RSX II 200

Well I hoped to have an article up for today, however the article expanded well beyond the scope I desired for a post on LIDF. The article is on getting the most of of the LIDF film presets, but I decided I am going to work on it more and roll it into a PDF file that I will post here on the site once I get it completed. A manual of sorts to help people get started with my presets.
As for today, my post is running late..as will tomorrows..but I should get back to early releases over the weekend. I am going ahead and releasing the next preset based off my recent experiments with some expired Agfa RSX II. Today's flavor is the ISO 200 version that I got finished last night. Similar to the ISO 100, but with some shifting of color in the reds and in general a much higher key presentation of the photo.
Please download and use, see if you like it. If so please let me know. If not let me know also. If there is any film you want to see emulated, let me know...I'll do what I can. But for now enjoy today's release.
And another shout out to another great photoblogger out there putting my presets to use. I ask you to hop over and take a peek at Beau A.C. Harbin's blog. He has a stream of great photographs, one of the newest being and HDR image treated with my Fuji Velvia 50 preset from the Cold Storage collection. The image is unique and stunning. Please drop by and take a gander, click HERE. If you enjoy creative images you will enjoy his blog.
Speaking of the Fuji Velvia 50 preset, it can only be found in the Cold Storage collection, which can be purchased in the upper right side of the blog. If you need more information, please refer to the blog post for it HERE. I hope to have a dedicated page to the collection soon, with more information for those of you who are not sure...but for 9.99 it's an easy sale for anyone who wants to help LifeInDigitalFilm keep growing. There are so many different film stocks with so many ways to process it that we can keep the emulations going for quite some time, as long as there is a way or me to pay for film and processing.
Anyways that is all for today, hopefully things smooth out over the weekend and I am back to early posts every day...I almost missed today's post!
Until then,
Michael
20090218
LR/ACR Preset: Agfa RSX II 100

So, I am suffering from writers block and having an issue finishing off the article I planned for today. So instead of beating my head into the wall, I am going to let it slide another day and release my new preset a bit earlier.
Recently I received a small collection of older film. In that small collection, I received 9 rolls of Agfa RSX II film, 3 of each speed. This emulation is of the 100 speed that I shot and got developed at my local photo lab. I plan on shooting another roll and cross-processing it and shooting the final roll when I get started devloping E-6. So I shot a roll of 50, 100 and 200 and sent them all off at the same time. This is the first one I completed.
RSX II was designed as a low-contrast, neutral color film. It may have been where I got it developed, or just the fact it is expired, but the colors were fairly neutral but did run a bit toward red. Also, it is more contrasty than what I expected, but that could also be due to a slight underexposure in my test frames shot for emulation.
Please try it out and see what you think.
Before I log out for the morning, I would like to point you over to an interesting 365 photoblog I have stubled across. Julie McLeod has been working on her 365 Photos in 2009 blog, aiming for 365 photos, most of which shot in accordance with a list of themes. I find the concept fun, but I don't think I could ever to it with the style she has done so far. Also a few of her images have used my presets and I really loving seeing them in action. She is a very talented photographer with a great eye for wonderful images, so do me a favor and hop over to her blog and leave some kind comments. Click Here to make the hop 365photosin2009
Anyway, that is all for today, wish I had an article for you, but I'm sure most of you would rather have the presets. And if you ever have any questions about my presets feel free to reach me at help@lifeindigitalfilm.com, I check the mail in the account once a day in the evening and will try to get back to you as soon as possible.
Micahel
20090217
LR/ACR Preset: Rollei Ortho
Time for another quick post, busy work week so far, but I am not going to let LIDF slip. So here is my newest Black & White preset, simulating Rollei Ortho processed in Rollei Low Speed Developer, for enhanced tone and contrast.
This seems to be a very versatile film, and I need to shoot it again and develop in Rollei High Speed developer. Anyways, I gotta run, not enough time to do a write up, but please enjoy the preset.
Be back tomorrow, hopefully have some time to get up the article I have been working on.
Michael
20090216
Monday Update: New release at PresetsHeaven
Over the weekend, Pierre over at PresetsHeaven released another package of my presets. If you hop over there you can grab theLIDF Fuji & Ilford B&W Collection, containing all the Ilford and Fuji Black & White Film Emulations I have released on LifeInDigitalFilm over the past few months. If you have been grabbing them here as I release them you have most everything in the set, however there is a PresetsHeaven exclusive preset hiding in the download that you can only get over there.
The exclusive preset is an emulation of an expired roll of Fuji Neopan 100 Acros that passed its prime in 2005. Acros is my favorite B&W film, and you can only get my emulations of it at either PresetsHeaven for the expired version or In my cold Storage Collection for a fresh version of the film. Pierre was kind enough to make sample images for me, and as I am not at home, I cannot post one for you to view. So hop on over there and grab the exclusive preset HERE.
The past week has been my most active week on LifeInDigitalFilm so far. Had a few releases and a few articles, so if you haven't been by in a while, take a few minutes to get caught up. Flashing back to last Monday I released an article about using Snapshots in Lightroom, allowing you to have multiple incarnations of the same file, without cluttering up your catalog with redundant images. An added feature of using snapshots is that you can write the metadata to the RAW file, and if you open that same file in Adobe Camera Raw, your snapshots will be saved in the presets tab inside ACR, allowing you access to all your modifications in ACR. Jump back to that article HERE.
Tuesday I released an article coving making monochrome images with Lightroom. It is a general overview, but I threw in a few tips on using my B&W presets for those of you who use them a lot. Check it out HERE.
Yesterday, I posted a list of my favorite Flickr groups, letting you see where I go to see what is going on in the photo world. If you are a member of Flickr you should really check them out HERE.
The rest of the week was filled with preset releases:
Wednesday: Classic Film Classic Pan 200 (also had a featurette about Twitter)
Thursday: Daguerreotype (my attempt to simulate the historic photography process)
Friday: Classic Film Classic Pan 400
Sautrady: Kodak Ektachrome 100VS
So I have to say it was a rather productive week. Trying to keep it up, which is why there is a review post today.
Also of note, don't forget to join Presetting Lightroom on Flickr and get in on the photo contest there. One copy of HDRsoft's Photomatix Pro with the Lightroom plug-in is up for grabs. Click HERE to hop over to the group and join and get in on the contest. You have until Feb 28 to make your entry. Don't forget to persue the preset collection there, over 200 free presets to grab and use!
Also, I want to thank everyone who has purchase LIDF Cold Storage. Should be getting my hosting soon, and then any funds made from the collection will be used to aquire and process more film to be emulated. As long as people keep buying the package, I will be able to keep getting more film and processing it in many different ways. Every purchase pushes LifeInDigitalFilm just a little bit further towards becoming the ultimate source for simulating film. If you haven't already, sonsider purchasing Cold Storage and get the 12 exclusive presets avilable therein, including the Kodak Porta 160 NC and VC presets! More info HERE.
On the note of LIDF keeping the emulations coming, I have a poll up on the site asking if I should bother adapting my presets for use on JPEG and TIFF files. So far the response has been overwhelming for keeping my presets RAW only. If you need support for JPEG images, make sure to speak up, because as it stands now it would be a waste of my time to develop JPEG versions.
Finally, just wanted to let you know I just got 3 rolls of Agfa RSX II back from the lab with scans. Had a roll each of 50, 100 and 200 speed. Aquired the film from a local photographer who has made the switch to digital, so it was kept cold even though it has expired. Been working on simulating them over the weekend, so hopefully they should be ready for release sometime this week.
Stay tuned,
Michael
20090215
Flickr: Groups
Alright, it is Sunday morning here in the middle of Missouri, not much going on; I've came off a fairly productive week here on LifeInDigitalFilm and my LifeInRealWorld has been going pretty good of late also. So I figured I would take it easy today and just point you toward some of the Flickr groups I frequent, even if I don't partake in the discussions much at most of them.
Okay, so I am a serial lurker. I like to read what others have to say, only interjecting my opinion when I feel it is absolutely needed. Before I got back into photography, I was solidly in the tech scene and spend hours a day scouring the thread over at Slashdot and Digg. As I slowly fell back into photography I migrated my daily thread searching from those two sites to a few photo-related forums. The best of which I have found is the discussions inside multiple groups in Flickr. So, I am going to list off a few here that I love, and read daily.
Presetting Lightroom :
Rightoff the bat I will get this group out of the way. It is one in which I admin and I have been pushing it pretty hard here on LIDF. I push it hard because it is a growing group, with a great vibe, focused on Lightroom and using presets to your advantage therein. There is a number of skilled preset designers in the group and an even larger number of people affluent in Lightroom. If you run into problems with presets, using or designing, come on over. I ask anyone who frequents LIDF to hop over and join up and join in.
While I have you on the subject of the Presetting Lightoom group, I wanted to push our photo-contest we have going on. Our contest is simple, process a photo in Lightroom using a preset...Name the preset and why you used it. You have until February 28 to enter, at that point entries cease and voting begins. Voting on the winners will be done by the group its self. Currently we have a few prizes up for grabs, and new ones will be posted in the group. As of now we have a copy of my Cold Storage collection for the top 3 photos and a copy of HDR Soft's Photomatix w/ Lightroom Plug-in for the overall winner. You have just under two weeks to get involved, the more entries the more prizes we might be able to line up for this and future photo competitions in the group.
Now back to my Flickr list....Next up
Adobe Lightroom:
A group devoted to Adobe Lightroom, obviously. Also one of the best resources to get a Lightroom problem resolved. Most problems you encounter can be solved simply by searching the group discussions. If it is not answered in the discussions or the groups FAQ pages, then feel free to post your question. With the size of the group and their general level of knowledge, you will not go long without an answer.
It is a very active group, and quite a few members names you will notice from across the rest of the Lightroom world on the internet.
This Week In Photography:
The official Flickr group of the TWIP podcast. A very diverse and knowledgable group, with many active members. Awesome group to go to for general phtography issues, and the grouop often has some very lively discussions. In all the group is not too connected to the TWIP show or blog and is very accessible even if you don't listen to TWIP.
TWIP Critique:
Another TWIP group, however do not go here asking general questions. Bring a photo you want critiqued, and the others will bring on the honesty. Be prepared for honest critiques, you will get multiple opinions and you will learn from your own work in a way that forces you to look at you own work critically.
Some really awsome people over there; bbusschots and kentgoldings are some names that really stand out as consistant participants with good advice. You will really know you are doing good when you get kind words from BruceHP!
Do It Yourself Black & White:
Although this may not interest you unless you are into film (I am obviously); this group is an exellent resource when you decide to step back into the darkroom. Alot of knowledge here, and I utilized this group a lot when I decided I was walking back into the darkroom after 10 years outside of it.
Well I hope this list gives you some places that you may desire to visit, albeit just a few. If you are on these groups, look for me by my Flickr ID of grayimaging. I will be through each group at least once a day to catch up, and I am on Presetting Lightroom quite a few times a day since I admin there. I will periodicall update the list, and once I get my Wordpress site up I will have a dedicated Fliker list up.
Please do consider entering in the Presetting Lightroom group photo contest. We have some gret entries already, but not many. Enter soon at the entries will be locked on Feb 28th and voting commences. Right now if you enter you will come off with a really good shot of winning a prize. I mean, there are 3 copies of my own preset collection up for grabs...but don't let that stop you from buying your own copy of Cold Storage! (((please...)))
Later,
Michael
20090214
LR/ACR Preset: Kodak Ektachrome 100VS
Another day, another preset. And today is Valentines Day, so I am releasing a special release of one of the most popular emulations from my original Slide Film Collection. Kodak Ektachrome 100VS was the one emulation in that pack that I received the most compliments on, so recently I went out and bought two fresh rolls of E100VS and set out to make a new version, using my new emulation procedure.
Six hours went into this preset, starting with the analysis and general development to get it close, finishing with 3 more hours this morning fine tuning it. I hope everyone enjoys this as much as my first attempt.
For those of you still using my original MikeyG!s Color Slide Film Collection, those presets are still fine, however they are not as accurate as those being released on LifeInDigitalFilm currently. While developing my Kodak B&W collection I developed as more through and accurate way to simulate film, and that method is being utilized in this preset. (More Information on my development process can be found at the Flickr Presetting Lightroom Group) If the old emulation still works for you, wonderful! I just ask you give this newer one a shot, as I feel it is much more accurate in it's depiction of the capabilities of this film stock.
Also, this can be a finicky preset under certain circumstances, so I highly recommend reading the readme.txt file in the download archive. You may find it of help, however I don't feel like getting technical on the blog today.
This preset was not free for me to make. I used 2 rolls of E100VS and Lab processing to get the final results. Between film costs and development costs this emulation cost about $25 USD to develop. I can back that off to about $12-$15 when I consider that about half of each roll got shot on personal projects, however ther was still a definable expense to do so. I would like to thank those who have purchased the Cold Storage preset collection for helping finance my site and emulations. For every 1 purchase made, I make enough to be able to purcahse and develop a roll of B&W film (lower since I do my own devloping). For every 3 purchases made I can develop 2 Color (C-41 or E-6) emulations (as I am currently still sending this out to a lab until I get better at color development). The purchases are also helping to purchase hosting for the blog, which will be migrated as soon as I finish getting my Wordpress theme the way I want it.
If you have not done so already, please consider buying the collection for $9.99 USD. There are links at the top right side of the blog, or click the following link for more information on the 12 exclusive presets available within: Cold Storage. Also included in that preset is a version of this same E100VS that I had Cross-Processed at the lab a while back.
Thank you,
Michael
Will be back tomorrow, I am getting better at these regular posts!
20090213
LR/ACR Preset: Classic Film Classic-Pan 400

Short post today. It's Friday, so I have a lot to get done today, and no time to do it before the weekend. Releasing the Classic Film Classic-Pan 400 preset today. It has a brighter tone that the 200 speed. A good film, home developed by me in D-76 for 9 minutes at 60C. Enjoy the emulation.
I hope to have another post this evening, if not I will have an article up for you to read sometime tomorrow. Really trying to have daily content.
Until then,
Michael
20090212
LR/ACR Preset: Daguerreotype

LR/ACR Preset: Daguerreotype, originally uploaded by GrayImaging.
Here is one from my experimental preset collection. Been working on it for a bit, as I have no access to an actual Daguerreotype, or means to create one, I was doing this with only the aide of pictures of Daguerreotypes. Not opportune. Well I don't feel I completely nailed the look, however I don't think it can properly be done in Lightroom currently. This preset gets everything looking right, but it needs aged. I feel that this is a good jumping off point for making a simulated Daguerreotype.
My biggest recommendation is to adjust the Contrast, Recovery and Fill to get the balance you are looking for. Don't forget to use some negative clarity to get that soft look on portraits. Also try getting prints of these images made on metallic paper, such as Adorama offers.
Hope you enjoy this one off project. Back to proper film emulations with my next release this weekend. In the mean time, I will beat a dead horse a bit. If you haven't done so, please get the Cold Storage collection that I have for sale here on the site. When you purchase you get a complete archive of my presets up until January and 12 new, exclusive presets. As an added bonus, I am creating new presets that will be exclusively sent to those who purchase the Cold Storage collection. Just another reason to support LIDF. Look on rightside bar to purchase or click here for more info.
Thanks,
Michael
20090211
LR/ACR Preset: Classic Film Classic-Pan 200

Now for the next preset in LifeInDigitalFilm's ever growing collection. Classic Film is a German Film manufacturer/reseller. Currently they have two emulsions on the market, that I am aware of, Classic-Pan 200 and Classic-Pan 400. The manufacturer calims that the films a designed to be reminiscent of the older Kodak films, such as Double Super-XX and Plus-X.
The roll shot for emulation was processed myself in stock D-76 @ 20C for 8 minutes, as per DigitalTruth. I discovered after development that the two different ISO speeds are fairly different, so once again, there will be both a 200 and 400 speed preset. 400 coming soon, get 200 speed now.
I hope you enjoy it, I got a backstock of presets built back up, so release should consistantly be 2-3 a week for a while. Come back for more!
Twitter Resources:
Have to ask you, do you use Twitter? I do, as you can see from my Twitter feed on the right side of the blog. It is a great way to keep in touch and share ideas. For photographers of all levels Twitter is an excellent networking tool. I have amassed a collection of qulity people that I follow, who on a regular basis share good photography tips, resources and links. If you have a question, often Twitter is a great place to get and answer, or opinion, oridea, or solution. It is quick, simple and to the point. Definately join if you have not dones so, and if you have allow me to make some recommendations on people I think you should follow.
LIDF's Twitter Follow List:
@mwgray - This is me, you should follow me.
@xequals - The man over at the X-Equals blog, Brandon offers great tips and links.
@profiphotos - Fellow curator of Flicker PresettingLR group,runs a great blog, too!
@auer1816 - Brian from the blog Epic Edits , always has some good info.
@pairadocsdesign - An interesteing photographer, fun to read, great Flickr stream.
@whoisariston - Another good photog, frequent tweeter, good links and info. Great site too!
I will be listing other great follows for Twitter periodically. These are some of the people I depend on to keep me up to date and thinking photography. Sometimes sources of inspiration. If you do Twitter, check these tweeples out.
Well until next time,
Michael
20090210
Tutorial: Monochrome Magic in Lightroom (ACR too!)

Okay, so as you can tell, I enjoy my black and white photography. The majority of my presets were B&W at first. To that extent I have spent quite some time making monochrome images in Lightroom. So now I will share what I have learned. This is not a step-by-step tutorial and I will be assuming you are familiar with all you develop tools in Lightroom (or ACR...the tools are pretty much the same).
1] Color Mixer
To me, the most important tool in a monochrome conversion is the Grayscale Mixer. In this panel you adjust the intensity of each color channel represented in the black and white image. A slider to the far left renders the color channel very dark, all the way to the right, very bright. You want to manipulate these sliders to get the right look for your image.
Of particular interest for photos with people in them are the Red, Orange and Yellow channels. These three color channels control the skin tone of people, regardless of skin color. The orange channel wields the most control over skin tone, adjusting the overall tone. Red comes in second most influential, effecting blushing and blemishes. Yellow really only effects highlights. Balance these three to get the desired skin tone.
As far as the other colors are concerned, simply adjust them as needed to complete the look. Always adjust slowly and incrementally, allowing yourself time to view the changes. Avoid over adjusting, as it will lead to unbalanced image tone and possible artifacts in the image.
If you are using my film presets, try to avoid adjusting any color slider more than absolutely needed, as any alterations to the color mixer change the tone and therefore change the effect. I recommend only altering the orange channel to save skin tone whenever possible. You shouldn't have to adjust much as I spend extra time making sure skin tones look good.
2] Tone Curve and Contrast
Contrast is of the utmost importance in monochrome images. Too much and the picture gets muddied up, too little and the image gets too thin. You are looking for a happy medium with both dark blacks, bright whites in the image and smooth transitions between them. You have two tools at your disposal for this, the Contrast slider and the Tone Curve.
The Contrast slider adjusts the contrast in the image globally, and is the easiest method by which to adjust contrast. However it is a bit simplistic, not allowing for fine control over the image.
Where you really tweak the contrast is the Tone Curve. Before making alterations to the curve itself, look below it for the Point Curve. It will be set to one of the following; Linear, Medium Contrast or Strong Contrast. Select between the three setting looking for the one tht gets you closest to what you are looking for. It won't be dead on normally, but one of the three will give you a good starting point.
After adjusting the Point Curve, start manipulating the curve itself. You have two options here, to adjust the region sliders or to drag the curve to where you like it. The region sliders refer to different areas of the tone curve graph. Across the bottom of the graph you see a bar with three adjustment points with four sections varying in shade. The far left is the shadow ( darkest parts of the image), middle-left is the darks, middle right is the lights and far right is the highlights (brightest parts of the image). If the highlights are too bright or blown out, you can drag the highlight slider to the left or click & hold on the tone curve line on the right side of the graph and drag it slowly down. If you move the line you will notice the slider automatically moving; I much prefer dragging the curve myself as opposed to manipulating the sliders, but move it the way you like.
Tweak the tone curve until it fits. You will notice when dragging the line Lightroom imposes some limits on how far you can move it. Try to avoid laying right on Lightroom imposed boundaries, it crates bad images in my opinion. You can lay the shadow and brightness to that edge to get absolute black and absolute whites when needed.
When using my film presets, I do not recommend adjusting the Tone Curve any further that altering the Point Curve setting. Doing so changes the desired response for the film being emulated. Changing the Point Curve is fine as it changes the size of the curve, not the basic shape. Feel free to use the Contrast slider with my presets as it will allow contrast changes whilst staying inside the confines of the simulated film' tone curve.
3] Local Adjustments (Brushes and Gradients)
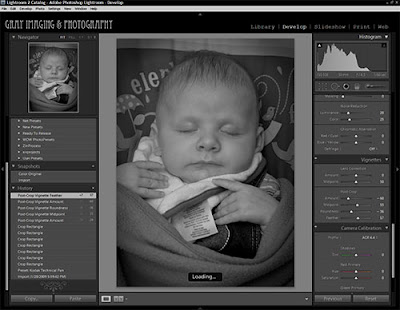
Bring back some of the old darkroom magic with local adjustments in Lightroom. Dodging and Burning are time honored techniques in the darkroom and are easily simulated in Lightroom. Say the image is too dark in parts leading to loss of focus on the subject. This was the case in the photo at the top of the post. My son's shadow merged with his pants after I applied my Neopan Acros preset. So I simply clicked on the adjustment brush, selected the shadow and increased its exposure, lightening the shadow to differentiate it from his pants.
You can bright and darken by this method. You can locally adjust contrast and brightness. Most importantly to me you can locally adjust clarity. Most of my film presets crank up clarity to get the sharp look of film, however this may not be desirable in photos of people. If this is the case, locally select the face and drag the clarity down. This will reduce the detail level in the face, allowing you to soften their look to make it more appealing. You can even bring clarity down into the negative range to create a soft focus effect, blurring out fine detail whilst retaining normal detail. In other words, fade away wrinkles, freckles and so forth...plus negative clarity makes skin glow, and you can make it look almost surreal.
Local adjustments with the adjustment brush allow you to really fine tune your monochrome image, but do not forget to use graduated filters when you need them. Drop a grad filter across a bright sky and bring the exposure down a bit to bring out detail and balance your image. Play around with you local tools, as they let you bring back the old darkroom techniques that were used to create prints. As any old school B&W photog will tell you, making the picture on film is only part of the process, putting it on paper is the rest. Dodging and burning to bring added depth to a print, sometime even from a flat negative.
4] Image Details (Sharpness, NR and Vignettes)
Don't forget about sharpening and noise reduction either. It is often easy to forget to do so when working in monochrome. Sharpen you image for you desired output, be it screen or print. Sharpening ca also be used to accentuate noise in the image, which is desirable if you are emulating a high-speed film such as Neopan 1600. Work the noise reduction sliders to either smooth out the image or allow more grain to shine through. These tools allow you to give your image that classic film look about as good as you can in Lightroom. Hopefully one day they add a grain control also.
Although I am not big into vignettes, the look great in monochrome. Play around with getting those corners darker, sometimes it unlocks a feeling in an image that you do not get otherwise.
5] Toning
Finally if you want to tone your monochrome image, play with split toning. You can choose either the highlight or shadow split tone and give it an orangish-red to create a sepia image. You can even set the highlight and shadow to different hues and saturation levels and adjust the balance slider to get a nicely balance duo-tone image. Play around, try sepia, blue and green tints. Toning is another way to really kick up an image.
Obviously these are just a few of the tools at you disposal to create beautiful monochrome images, however these are the area I work the most with and I figure I would share it with everyone. Sorry there were no screen shots, but this is a fairly long post and I wanted to get it up before I went to sleep. If you are familiar with Lightroom you get what I was saying. In the same right these tools are also in Adobe Camera Raw, so those of you with just Photoshop are not left out either.
These steps work if you are making a monochrome from scratch or utilizing my presets or those of others. Just take some time and explore each of these areas in Lightroom deeper and you will be making great black and white images in no time.
Oh, a new preset up tomorrow!
Until then,
Michael
20090209
Tutorial: Snapshots (The Lightroom Version Control System)
When I shot a wedding about six months ago, I came to the startling realization that I had some major flaws in my photographic workflow. It was my first job of significant size, about 2000 images shot during the day. When I brought it into Lightroom, it was not too bad; I went in and flagged my photos, fixed bad crops, made the normal adjustments and exported for my proof prints. Not so bad. Fun even.
Then my print orders started coming in. This one in black and white in 5x7 and again in color, make it look like film, in 8x10. Spread this out across about 300 photos, the next think I knew I had about 1000 different virtual copies running about, in different crops with different processing. After that job, I decided I need to figure out how to organize a bit better.
I started playing around some, and in the process of developing my presets, I discovered the wonder of Lightroom Snapshots. Snapshots let you save a version of the file, with all processing intact to use later on. You can save multiple revisions of the same file into a handy menu located just above the History panel in the left develop pane. You can save a B&W version, color version, different crop sizes, different vignettes and keep it all contained in the original file in Lightroom. No virtual copies needed.
Now I'll walk you through the snapshot process.
So we have the image up. Look for the arrow on the left side of the screen showing you the Snapshot pane. This is where the action goes on. Now, we will assume you have been processing you image and you have your final color version ready. So you are going to make a snapshot of the full frame image.
Just click on the plus icon on the Snapshot panel.
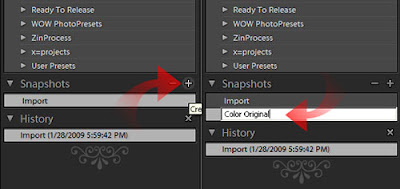
After you click on the plus icon, a white data box appears where you give the snapshot a name. The name you give is attached to the snapshot and embedded in the files entry in you LR catalog.
Now make another version of the same image. I am taking it B&W, cropping it to a 5x7 and adding a vignette.
With that applied, I repeat the steps to make a snapshot.
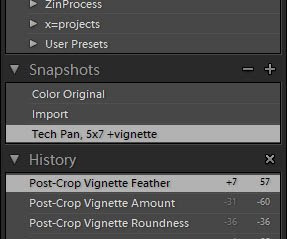
Now you can see 3 snapshots. one for the Color Original, one for import, and one for the B&W 5x7. Just by simply clicking on any of these snapshots load up all the adjustments to provide you with the image that you have saved. There is no limit I have ran into for snapshots and I often have over ten different versions of each image.
An added bonus, if you write the metadata to the RAW files from within Lightroom, all the snapshots will be saved in either the DNG or a sidecar XMP file. The snapshots are then portable and can be used in another copy of Lightroom or even Adobe Camera Raw. You will find the snapshots in the presets tab in ACR.
I know this is a rather rough run-down on the process of using snapshots, but give it a try. It is nice to have eight different revisions of an image at your fingertips without having excessive virtual copies running amok in your catalog. As I said, snapshots are Lightroom's own Version Control System.
Keep Shooting,
Michael
P.S. Cold Storage Presets Collection....you know the rest.
Then my print orders started coming in. This one in black and white in 5x7 and again in color, make it look like film, in 8x10. Spread this out across about 300 photos, the next think I knew I had about 1000 different virtual copies running about, in different crops with different processing. After that job, I decided I need to figure out how to organize a bit better.
I started playing around some, and in the process of developing my presets, I discovered the wonder of Lightroom Snapshots. Snapshots let you save a version of the file, with all processing intact to use later on. You can save multiple revisions of the same file into a handy menu located just above the History panel in the left develop pane. You can save a B&W version, color version, different crop sizes, different vignettes and keep it all contained in the original file in Lightroom. No virtual copies needed.
Now I'll walk you through the snapshot process.

So we have the image up. Look for the arrow on the left side of the screen showing you the Snapshot pane. This is where the action goes on. Now, we will assume you have been processing you image and you have your final color version ready. So you are going to make a snapshot of the full frame image.
Just click on the plus icon on the Snapshot panel.

After you click on the plus icon, a white data box appears where you give the snapshot a name. The name you give is attached to the snapshot and embedded in the files entry in you LR catalog.
Now make another version of the same image. I am taking it B&W, cropping it to a 5x7 and adding a vignette.

With that applied, I repeat the steps to make a snapshot.

Now you can see 3 snapshots. one for the Color Original, one for import, and one for the B&W 5x7. Just by simply clicking on any of these snapshots load up all the adjustments to provide you with the image that you have saved. There is no limit I have ran into for snapshots and I often have over ten different versions of each image.
An added bonus, if you write the metadata to the RAW files from within Lightroom, all the snapshots will be saved in either the DNG or a sidecar XMP file. The snapshots are then portable and can be used in another copy of Lightroom or even Adobe Camera Raw. You will find the snapshots in the presets tab in ACR.
I know this is a rather rough run-down on the process of using snapshots, but give it a try. It is nice to have eight different revisions of an image at your fingertips without having excessive virtual copies running amok in your catalog. As I said, snapshots are Lightroom's own Version Control System.
Keep Shooting,
Michael
P.S. Cold Storage Presets Collection....you know the rest.
20090208
LR/ACR Preset: Rollei Retro
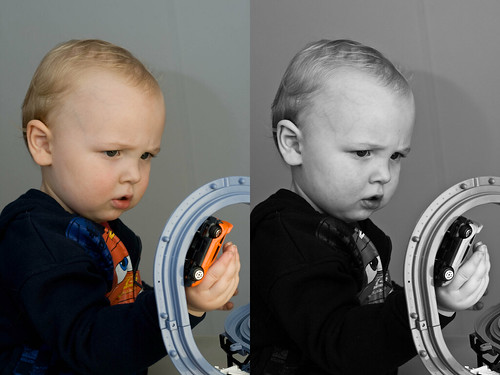
Finally I am making with a new film emulation preset. I hope everyone enjoyed the style preset I released a few days ago, but now back on to the meat and potatoes.
This fine Sunday morning I bring to you LIDF's interpretation of Rollei Retro. Apparently, when this film was introduced, it was relabeled Agfa APX. However, when I developed this roll, the frame border stated MACO as the manufacturer. I don't know for sure what the real truth is behind the origin of this film, but I do notice a slight difference in color response. That may just be the effects of age and a different development process (the Agfa APX preset I made was developed at a local; shop, most likely in d-76; I developed the roll of Rollei Retro at home with 1:3 Rodinal for 15 min @ 24 C).
I hope that this and my other presets find a home in your workflow, be it for fun or professional work. I enjoy making them. If you enjoy using them, as much as I loathe to ask, would you please consider buying my Cold Storage Archive. It can be ordered in the right hand corner of the blog or you can click HERE for more information. Help me keep providing these tools to you. [I will keep begging until I have my hosting paid for, then I will lay off].
Anyways, everyone have a great day/night and hope your coming work week is good to you.
Until next time,
Michael
20090206
News: LIDF Update and Guest Blog Post
Just wanted to drop a note today. First, there will be a new film emulation preset posted this weekend. I had an overly busy week this week and fell behind on my emulation process. Back up and running and releases will ensue.
Next, wanted to update you on the Cold Storage set fundraiser. So far I have made 9 sales, and I thank those of you who have purchased it so far. I am just under half way to the cost of a year's service with the hosting company I want to use. So if you are thinking about it, please click on the box to your right to purchase the set. After I get the hosting purchased I will let you know, and then any more funds generated will go towards purchases of more film to emulate and toward the cost to develop said film for emulation. Come on, if you like what you get from this site, please consider supporting it's growth. As it grows I will be able to provide even more tools for getting that classic film look.
As to the redesign, I am working on a much better setup done in WordPress. Have it on a testbed Linux server in my home, and it is building up pretty good. at the rate I am getting funds from the Cold Storage project, I should have the new design ready to roll out as soon as I setup with my new host. I hope that the redesign improves on the look and usability of LifeInDigitalFilm.
Also working on some new projects. As I have already branched off into Adobe Camera Raw presets, I have started dealing ore with doing the same thing in Photoshop. I am working on a few Photoshop actions to get film effects, and a couple actions to give a conving grain for proper film types. Hopefully then if you process a file in LR with a film preset you can then hop into Photoshop to add a realistic grain. Stay tuned for that, no ETA yet, but it is coming.
Finally, I have been doing some work with Brandon from X-Equals. I have already had one guest spot on his blog so far, and a new one is posted today. Click on over to his great site to read about my personal approach to Lightroom and Photoshop in my business work-flow. Hop over and read it, if you haven't done so already. If you have never spent time on X=blog, stay a while and read some articles...you will learn something new. Go there soon...click HERE.
Well I'll be back in the next 48 hours to release my newest preset...
Until Then,
Michael
20090204
LR/ACR Preset: Fades
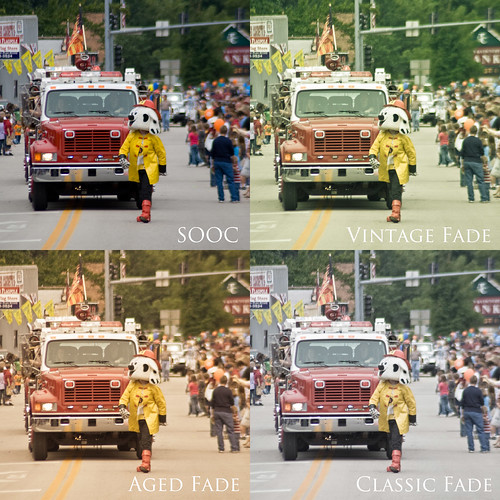
Tonight I am deviating from standard operating procedure. Tonight's preset is a style preset, not emulating anything but an effect. In my fades set, you get three basic effect presets that fade the colors in your image. the Vintage and Aged presets give a color cast to your photo. Classic just kills saturation and kicks up Luminance. There are no auto versions, no curve, just basic.
I've been busy this week and have not had time to polish up any film emulations. These presets were cooked up for a discussion in the Flickr Presetting Lightroom group, where we were trying to emulate the style of a photographer with a preset. I failed at my intended goal, however this is the result. I like the finished preset, so I am releasing it to keep my promise of two new presets a week.
As always, there is a Lightroom and ACR preset for each.
As always, enjoy them, back to film emulation this weekend. Watch for my newest emulation then.
Until then,
Michael
20090201
LR/ACR Preset: Fuji Velvia Cross Processed [PresettingLR Exclusive]
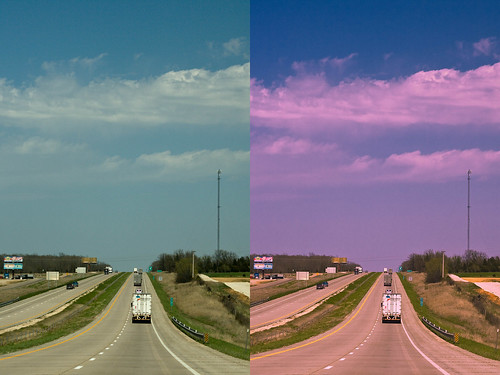
A few days ago I released a preset only for the people in the Presetting Lightroom community over at Flickr. Just in case you were not aware of it, the Presetting Lightroom group is an excellent resource for great presets and a good place to look for help when you run into Lightroom issues. Please come on over and join us.
You can find my Fuji Velvia Cross-Processed preset in the discussions on the group. Look around, you'll find it...just look for the picture I am showing you above.
Click to head on over....[Presetting Lightroom group on Flickr]
Again I implore you to consider grabbing my preset collection, I know it's not manly to beg, but I really need to get this blog self-sustaining. I have options as far as hosting goes, as much as I would like to get the site hosted on it's own, but I do need money to keep getting film, paying for development chemistry an the other expenses incurred in the process of these emulations.
The purchase links are in the upper right hand side of the blog.
Until next time,
Michael
Subscribe to:
Posts (Atom)