20090329

Tutorial: Presets, In Depth - Part 2: Creating Presets (and designing them to play together nicely)

Alright, sorry for the delay, but making money takes precedence over the blog, and I am sure my clients see it the same way. But anyways, let’s continue our exploration of Lightroom and ACR presets.

Today we will discuss the methods by which you can create presets for Lightroom 2 and ACR. I am sure many of you already know how to do so, but I am sure some of you don’t. We will cover a basic creation process in both Lightroom and ACR, but first I would like to take a detour and discuss preset “stacking” for a few minutes. Once we understand the stacking of presets, we can make presets that play well together allowing for multiple effects to be combined.

One common complaint about presets is that you can only use one at a time. This is not entirely true, but in general seems to be the norm. Presets (in both LR and ACR) adjust the different sliders in the develop module to create the desired effect for the image created on export. If you apply one preset, then another, most usually you will end up with just the second preset applied. This is due to the fact that you only get one slider for each tool, this isn’t Photoshop and there are no layers. You only have one set of tools, and the last preset applied will always override and previous presets or manual settings. This is the reasoning behind the belief you can only use one preset at a time.

That is not to say that you cannot use well designed presets in unison with one another. When you create a preset in Lightroom, the default dialog setting will save every setting applied to the preset. This creates a preset that will over-ride every single slider in the develop module. Your brand new preset will not work with other presets, it will replace them. This is fine for an import preset you will apply to every photo you import, but is not good for general creative presetting.

When creating you image, make note of what tools you use to generate your effect. I have a text file I print out to make hard copy notes about what I alter in the process of making my presets, when filled out it shows me what sliders I adjusted and those I did not. This allows me to save my presets with only the tools needed for the desired effect. If you do not touch the Basic Tone settings, make a note of that. When it comes time to make the preset, we will exclude the Basic Tone settings from the preset. If your preset only adjusts the Tone Curve, when saving the preset, make sure that only the Tone Curve is selected to be saved in the preset. By creating presets that only adjust what is needed for the effect; you will be able to combine multiple presets to achieve your desired effects. If your preset does not require any given slider to be manipulated, you should not allow your preset to alter those tools when applied.

I will recreate my preset design form as a prettied up PDF file, and release it here on LIDF for anyone else interested in being as anal as I am about my preset design. I wasn’t always this way, as many of my early presets alter every single slider; even if they are not needed…it was bad design and it embarrasses me. I am slowly updating the older preset to fix this oversight, eventually it will be done. IF you are just starting, don’t make my mistakes.

Now that I have that covered/off-my-chest, let us move on with creating a preset. Choose yourself a photo, and go ahead and make a few adjustments. As you make adjustments, make not of what setting you are altering, as these notes will be used to ensure the stacking-compatibility discussed above. I chose a random image from a wedding I shot recently.
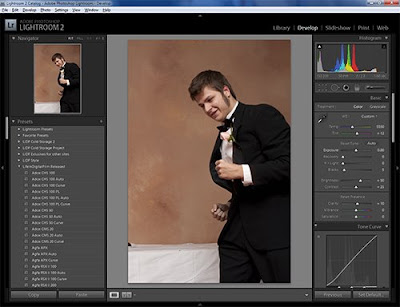

For this tutorial, I am going to make a preset that adjusts the Vibrance, Saturation, Clarity, Tone Curve, Split Toning and applies a strong vignette. Honestly, this preset sucks, it gives the picture a really bad look. However it is suitable for what we are going to do here. Here is a view of my develop module sidebar, showing only what is changed.


I make it a habit to start out my development process with all the tools closed. Only opening the tools I need as needed. As you can see, I did not even mess with HSL or Detail tools, so they are still closed. Once done with the image adjustments, I make my notes on which Items were adjusted in the Develop Module. We are ready to save this preset.

Now head over to the Left Sidebar and go to the Presets Tab. Click on the plus (+) icon on the Presets tab.
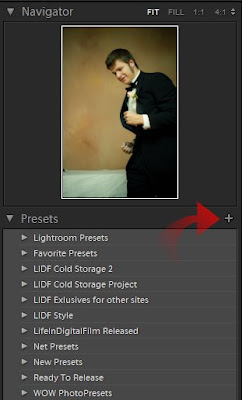
Once you click the plus icon, it will open the New Develop Preset dialog.
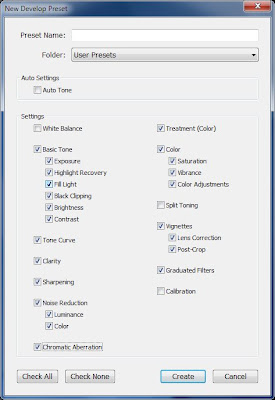

This image shows the dialog box with the normal default settings. You dialog will show the same options used in the last preset saved on your machine. If you click save now, your preset will be saved adjusting every slider in the develop module, not what we want. So, start un-checking the boxes of the tools you do not require. Here is my dialog, adjusted for my preset.
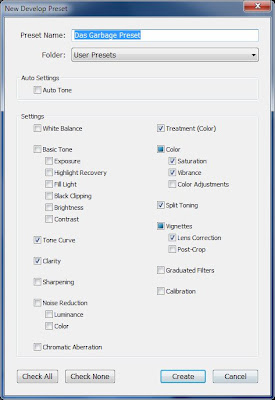

This dialog shows only the tools needed for the presetted effect selected. The Color and Vignette checks became boxes, as I only saved some of the sub-options there in (Vibrance and Saturation in Color; Lens Correction in Vignette). The Color check box’s Color Adjustment selection is used when you make changes to the HSL settings; I felt I should mention that, as it is not overtly clear.

Also, at the top of the preset dialog is a box of options, called Auto Settings:
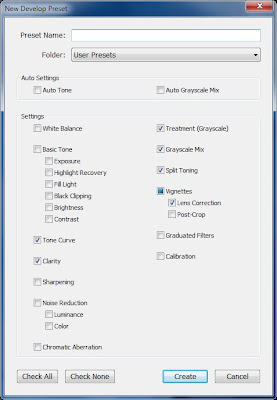

Color images will show only Auto Tone, monochrome images will show Auto Tone and Auto Grayscale Mix. Auto Tone, when selected, caused the preset to automatically adjust the Basic Tone sliders to what Lightroom deem to be the most appropriate settings. Auto Grayscale Mix will allow Lightroom to automatically adjust the Grayscale mixer, to what it deems to be a proper grayscale mix. These tools can be handy, but can create unpredictable results in application. I never use the Auto Grayscale, but I frequently use the Auto Tone option, especially in my film emulation Auto Presets.

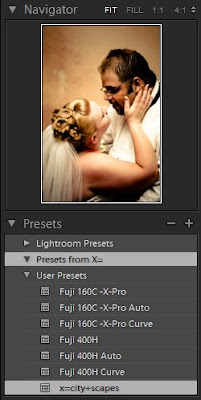
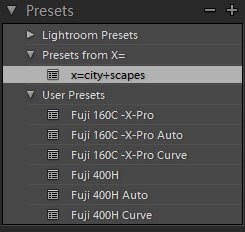
Now click the Create button, and your preset will appear in the Preset Folder defined at the top of the dialog.
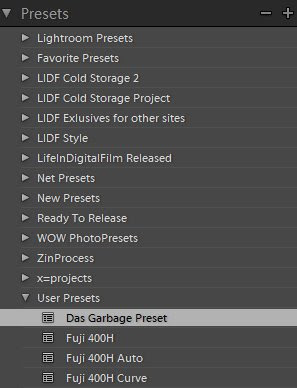

You have made your preset, we will discuss exporting your presets for others to use later in Part 4 of this series.

So, that covers Lightroom. So we will just jump to ACR, and just cover the process to save your preset. We will assume that you already have the image adjusted.
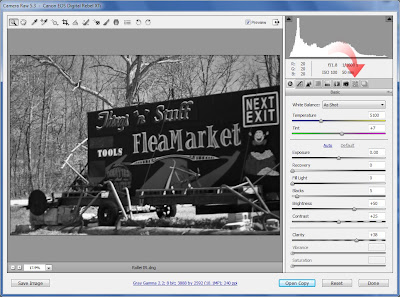
I again have the same image adjustments made to the same image.
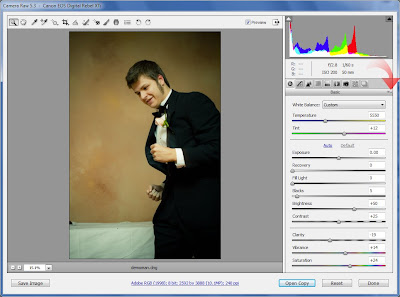

Click on the option icon, depicted by the arrow in the above image to open the File Settings Menu
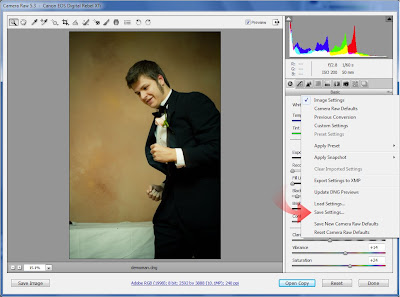

Click on Save Settings... This will open the save setting dialog.
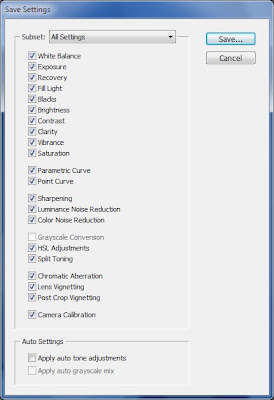

This dialog looks a lot like the New Preset dialog in Lightroom. Again, it selects every adjust made available to you. Follow the preset design rules, and only select the options that you need for the preset. Here is mine again.
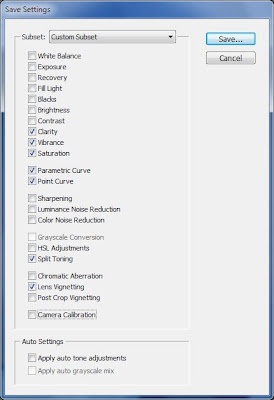

Once everything is properly configured, click Save… This saves your preset, bringing up the save dialog.
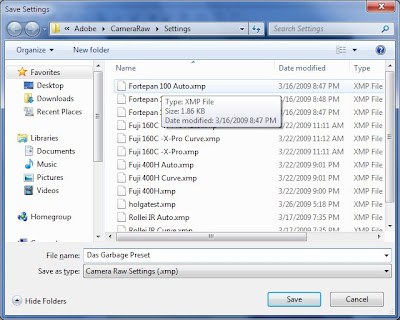

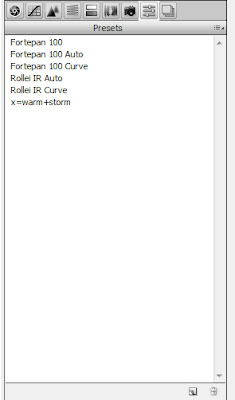
Give it a name, and click Save. You preset is now in ACR’s preset menu, as noted in the following image:
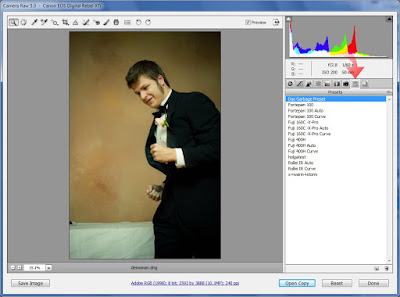

You are done.

I should have a few good posts in a row over the next few days, so check in again soon.
Part 3 will be coming soon. Covering updating and combining presets.

Until then,

Michael

20090325

Status Update

Just letting everyone know, I am still working on the preset tutorial series and I have a few presets in the oven. Just a little busy on other projects currently, even took a few days off my day job to get caught up. In the middle of 3 projects for different clients, one involving a lot of slide scanning. Playing catch up on these today and maybe tomorrow. If all my tasks get done today I will have the next article in the series up Friday, and a new preset Saturday.

Just wanted to let everyone know I haven't forgot, just a bit busy.

Thanks,

Michael

20090323

LR/ACR Preset: Fuji 400H

LR/ACR Preset: Fuji 400H

Sorry if you were expecting a Monday Update. Felt that it really was not needed this week. Will resume next Monday. Today I felt like releasing a new preset, kind of an atonement for the delay a week ago with the hard drive failure. Tomorrow the next portion of the Presets tutorial will be up.

So today I bring you a straight emulation of Fuji 400H. Fuji's middle range speed "pro" film, it features a more subdued color palette, placing it in line with the Kodak Portra 400 NC, making it great for candid portraits. The emulation does tend to run a little dark, so it is best on bright images. I hope you find the emulation enjoyable.


Well until tomorrow,

Michael

20090322

LR/ACR PReset: Fuji 160C X-Pro

LR/ACR Preset: Fuji 160C Cross Processed

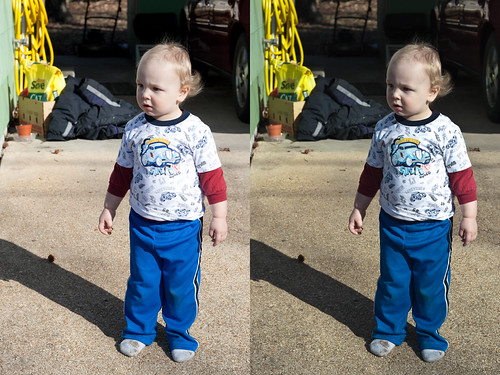
Recently a friend of mine was over at my house, discussing film emulation. As he was getting ready to leave, he asked me if I had any E-6 I needed processed, as he does his own and his chemistry is getting a tad old. I said I didn't have any E-6, but if he was getting rid of the chemistry soon anyways, as he no longer shoots film, he could run some c-41 print film through the slide process. He had never done it before, but he went ahead and took four rolls of C-41 film from me to process.

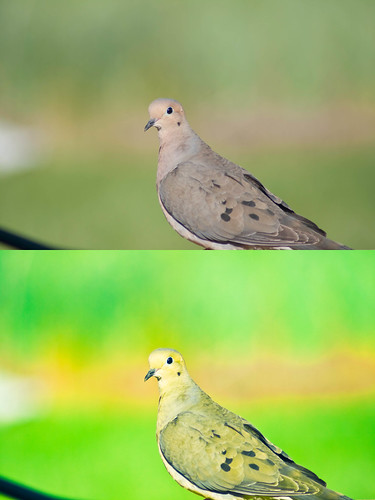
Well a few days ago, he got the film back to me. Fuji 160C was one of the films he cross-processed, and it turned out to give some really wild results. Almost unusable for my purposes, but it has an edge, especially if there are no people in your image.

See, the processing looks great, interesting color-shifts, green going a touch neon; perfect for some creative landscape or artistic animal work. But is just does not work for humans, as it turns any skin tone a funky shade of yellow. I do not like the look on skin. That is not to say that you might not like it, or may find a way to make it work in an image, its just I don't think I can.

So if you see a possibility for it, download it and take it for a spin. Let me know if you can make anything out of it.


There will be more upcoming C-41 to E-6 cross processes upcoming, most less harsh than this one. Also I have some revisits upcoming, where I shoot another roll of an already emulated film and emulate it again. Be it a different expiration date, different developer or just different conditions at time of test shots. I try to emulate any roll I shoot, and if they are good enough, they will make it here. Worst case scenario, you have 5 different Tri-X presets to choose from, but choice should never be a problem.

Back soon with Part 2 of the Presets series

Until Then,

Michael

20090320

Tutorial: Presets, In Depth - Part One: Installing and Reading Presets

Again, apologies to my regular visitors, and all of you who already know the information I am about to regurgitate. There will be a new preset release soon, as in tomorrow, so please bear with me. If you are new to Lightroom, then go ahead and read on.

Okay, so you just downloaded some new presets, and you can’t wait to take them for a spin. First you will need to import them into your application of choice, be it Lightroom or ACR. We will walk through the process for both applications. Then I will show you how you can look inside a preset and see what it does, without even running it in your application.
So first, place your preset files (Extensions of .lrtemplate for Lightroom, .xmp for Photoshop) into a folder on your desktop. Name it whatever you want, as it is just holding the files for now. If you downloaded an archive, such as the .zip files I use here, make sure you unpack the archive before moving on.

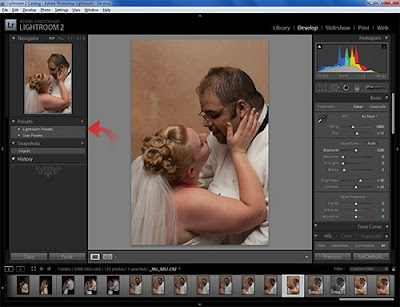
First we will look at the method for Lightroom. Simply fire up Lightroom and get into the Develop module. Once the module loads, look to the left panel, and scroll down to the Preset tab, if you don’t already see it. Make sure to expand the tab if it has not already been opened by clicking on the small triangle on the left.


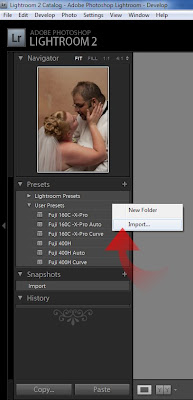
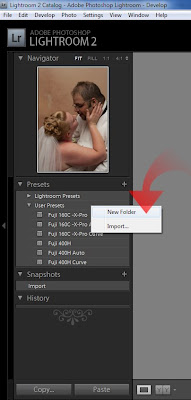
You should now see a folder entitled Lightroom Presets, which are the presets included with Lightroom itself. Beneath it is a folder entitled User Presets, bring your cursor next to it and right-click. Up pops the contextual menu with the options of “New Folder” and “Import”.


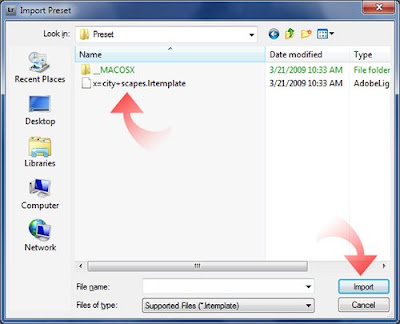
Click on “Import…” Once the dialog box opens, point the explorer to the desktop and open your folder you made earlier. Inside, highlight the .lrtemplate file you wish to import.


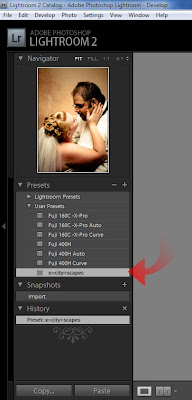
Then click “Import” and your new preset will be installed in the User Presets folder.


Now your preset is installed and ready for use. However you will rapidly make your User Presets folder a catastrophic mess. So you need to organize a bit. Let's go ahaead and make a new folder.

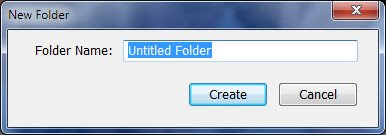
To make a new folder, right click again by the User Presets folder and choose “New Folder”.


Name it whatever you choose.


This will create the new folder in the presets menu.


You can then drag the imported preset to the new folder or right-click next to it and import another preset into the new folder.

Pay attention to how you organize your presets in Lightroom, as they are a pain to sort after you have amassed a large amount. This is since Adobe only allows 1 level of folders in the presets menu. Hopefully in future releases Adobe may endow us with nested folders, and if they do it will drastically improve organization of presets.

Installing presets in Adobe Camera Raw nowhere near as elegant or user friendly, however it is quick and effective. In fact, to install the presets, you do not even have to open Photoshop, let alone ACR. To install presets into ACR, it is easiest to do it via your operating system. So open up Finder in Mac or Explorer in Windows, and point it to the following path (I believe Vista should be the same as Windows 7, but I am not sure. Vista users try it both ways):

Macintosh: /Users/UserName/Library/Application Support/Adobe/CameraRawFolder/Settings

Windows: C:\Documents and Settings\UserName\Application Data\Adobe\CameraRaw\Settings

Windows 7: C:\Users\UserName\AppData\Roaming\Adobe\CameraRaw\Settings

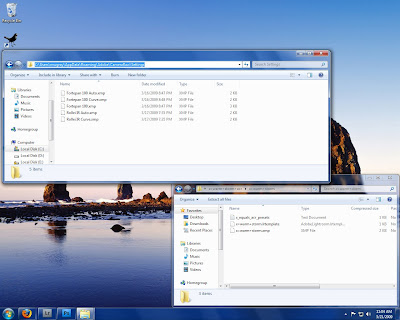
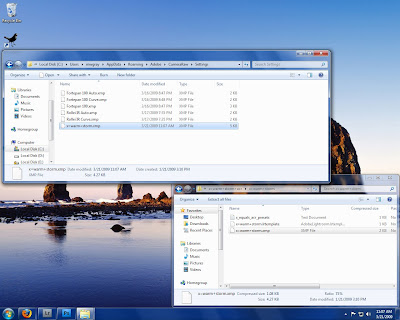
Please insert your user name for your system into the respective path where you see UserName. If your system is installed normally, this path will place you right into ACR’s preset folder. Here is a screen from my system:


Now all you have to do is copy the .xmp presets for ACR right into this folder.


Close the folder and start Photoshop. Open a RAW file to bring up ACR.


Once ACR opens, click on the presets tab.


Almost magically your presets are ready to go, no other work needed. I strongly recommend only keeping presets you frequently use installed in ACR, as there is no method by which to sort them.

This is not to say that this is the only way to install presets in either program, but they are the most straight-forward in my opinion. Likely most all of you already know how to do this, but I felt that I should cover it anyways. Now onto a topic some people I know are not aware of… how to see what a preset does without loading it into Lightroom, or “Reading” a preset.

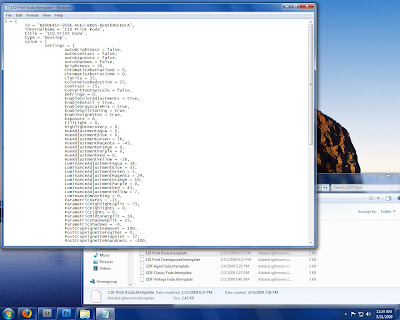
To read a preset, simply open the .lrtemplate file in any text editor. In Windows, you can just open Notepad and drag the .lrtemplate onto the empty Notepad window. This will open the preset in plain text. Although it can appear to be intimidating at first, take some time and look it over. You will start to see correlations between the text and the sliders in Lightroom. (Click the image below to view larger):


If you look at a presets text dump, I am sure you will start to see the correlations from the text file to Lightroom. A preset automatically configures your Develop Module tools for you, that is all they do. By looking at the text dump of any preset, you can see exactly what it will manipulate in Lightroom before you use it allowing you to know what to expect. It just takes a little time to get used to a tools internal name in the preset compared to the label on the slider in Lightroom. With a few reads and comparisons to the Develop Module you will get a quick understanding. You may not look at a preset’s text dump often or at all, but when you are away from your Lightroom computer, like at work, taking a peek inside a preset can tell you a lot, especially when you get familiar with Lightroom.

Also, it is possible to convert Lightroom presets to ACR. I have a tutorial up on X-Equals that explains the method to accomplishing that. Jump on over. Also, the presets I installed during this process were from Brandon's excellent collection of presets that can also be found on the X-Equals blog, click to be transported to his list of great presets. Don't forget to check out my article on sharpening in Lightroom over there too!

Hopefully this might help someone. If not, I just wasted a lot of my time writing, well not too much time. But again, I felt I needed to cover these tasks if I am to move firther into discussing presets in Lightroom and ACR.

Back again soon,

Michael

20090319

Tutorial: Presets, In Depth – Introduction


Right off the bat, I would like to apologize for the following posts. Many of you will already know everything I am going to get into with this article (and the next part in the series). I have always assumed that if someone found my blog and presets that they already knew quite a bit about presets; what they actually are, how to make them, change them and use them to their fullest extent. However, I have received many questions from people who have just gotten into Lightroom who are not entirely clear on what presets are. Even though many people, more talented than I, have covered this topic, I felt maybe I should devote some time to the subject. Please bear with me if you know all this already (anyways it more content and more practice writing).

So, for everyone still with me, let us dig on in. Lightroom and Adobe Camera Raw are both amazing, powerful tools that allow you to manipulate, interpret and create images. When using RAW files, the tools provided to you in the Develop Module allow a level of control over your images that is almost insane. The Develop Module offers you over 60 sliders to enhance your image, each affecting the image in different ways. That is not even counting the local adjustment tools or the tone curve! The sheer amount of tools provided and the power of each one allow you to interpret the RAW data provided by your camera in amazing ways, and can be a bit overwhelming.

The manners in which all of these tools are configured make your “recipe” for your image. When working with the sliders, it can take quite some time to achieve the effects you desire. However if you have to adjust every image in your shoot, making them look similar, it can become quite tedious. You have the option to copy and paste these settings from image to image, which may work fine for a single project. However you may find yourself referring back to that same “recipe” time and time again. Having to go to that original image each time and copy its settings would become quite the burden.

To remedy this situation, Adobe endowed both Lightroom and Adobe Camera Raw with a system to save these image “recipes” and to apply them to any image in just one click. This system is called Presets and the act of making them has been coined “presetting”. Countless individuals have made it a personal hobby to create these presets and share them with the world; others have set out to make finely-tuned presets that they offer for sale. These Presets allow others to apply the same processing that the creator made to their own images, greatly improving their workflow.

Presets can be used many ways. Some people simply choose an image; choose a preset, click and BAM! They have their image. While this works for a great many, and is great to discover what a preset does, it is usually not the best method to produce you final image. Presets should be used as a starting point. You choose the preset you wish to apply to your image, apply it and then proceed to further process your image. You may tweak the colors, white balance, tone curve and so forth. You should always sharpen and reduce noise yourself, when needed. That is not to say that your image won’t look great without further work; I have seen many 1-click images I found stunning, but you should always give your images the benefit of deeper study. You may decide that the image is perfect as soon as you click that preset, but more often than not, you will see where a little attention can make a good image great.

So over the coming days, not necessarily every day, I will continue this series. Now that you know what a Preset is, in general, we can move forward in discovering how you can use, modify and create your own presets. Once you get all this information, you will see what the true power of presets is, the ability to save you time and repetition. Hopefully this may lift some of the stigma presets carry, that they are lazy and counter-productive to creativity. Yes, you can do what any preset does without using a preset; it will just cost you time. When you have 100 photos to adjust, time tends to works against you.

So, a quick syllabus to let you see what will be forthcoming in this series:

Part 1: Installing and Reading Presets – I will run you through the installation process for both Lightroom and Adobe Camera Raw and then show you how to open you presets in a text editor, so you can see exactly what is adjusted when you use a preset.

Part 2: Creating Presets – A short instructional on the steps involved in creating a preset from a developed image. Covering the process of creating the preset and configuring it to adjust only what needs to be adjusted in an effort to produce presets that can be used together, also known as “stacking”.

Part 3: Customizing Presets – Sometimes, you have a preset you use frequently, but you often have to make some adjustments to the images afterwards. If you find yourself making the same alterations time and again, then you need to modify that preset to fit your needs. I will run through the steps required to alter an existing preset, tailoring it to your needs.

Part 4: Preset Tips – In the final chapter, I will delve further into some tips and techniques you can use to enhance your workflow with presets, be they your own creation or those of others. I will also discuss how to make “Preset Sets” that you can install and uninstall as needed, to keep your preset panel clean.

So stay tuned, I will release a few presets during the run of the series, so it won’t all be dry reading. I will be back tomorrow, don’t know if I will be bringing presets of words, but I will have something for you.

Until then,
Michael
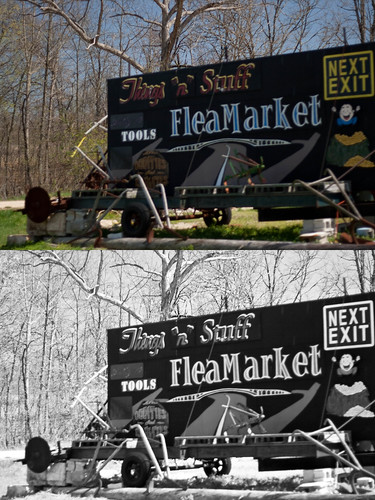
PS: I have a new tutorial up over at X-Equals delving deeper into the sharpening tools in Lightroom. Part 1 is up today focusing on sharpening in the Develop Module. Hop over to X-Equals to check it out. Part 2 on export sharpening is forthcoming.

20090318

LR/ACR Preset: Rollei IR

LR/ACR Preset: Rollei IR

Today I present another of my inaccurate representations of an infrared film. Although, it is actually a normal emulation of a regular panchromatic black and white film that claims to be an infrared film. Rollei IR has en extended red range that pushes well into the infrared spectrum, however the emulsion is still technically panchromatic, and when shot without a IR filter, the film can be shot as a regular 400 speed black and white film. The effect of the infrared light is overpowered by visible light when shot without a filter, and it has a look similar to Tri-X, albeit with different color responses.

So, this emulation was based off a sample roll shot as regular film, not infrared. Therefore the response show little in the way of IR effects. I felt this was the best way to handle this film, as I still have no access to IR RAW files. Enjoy the preset.


That it all for today, back again tomorrow,

Michael


20090317

LR/ACR Preset: Forte Fortepan 100

LR/ACR Preset: Forte Fortepan 100

Sorry for the delay in new content, sometimes the unexpected occurs and you don't have a back-up plan. Good news is, I am back up and running. $50 bucks bought a new hard drive, and after 3 nights of fighting to get WinXP SP3 up and running, I gave up and instead dropped on the Windows 7 beta on my main machine. Turned out to be the best thing I have done in a while. If this is the sign of what Microsoft has planned for Windows, I may not migrate to Mac after all. I have always preferred to run a Linux or BSD machine as my main machine, but how 7 feels, I think I can actually stand to run Windows again...but I will let you know what I really think in a month or two, after the system has time to get bogged down. That is where Windows traditionally fails, I am hoping 7 shows to be more reliable in the long run.

Anyways, I have one of the presets I rescued from the crash for you today. Today I continue the collection of Forte films that I started releasing a week ago. Today I preset to you Forte Fortepan 100. I hope you enjoy it.


Sorry I don't have anything else today, I am still trying to get ramped back up on making more content for LIDF, and I had some other obligations to fulfill also. I have a guest post coming up on X-Equals soon on the topic of sharpening in Lightroom. Keep checking Brandon's site for that, as it should be up later this week.

Until tomorrow,

Michael

20090312

Recovery and New Post

I currently have my system back up and I am catching up on a backlog of photowork and guest blog posts. LIDF will resume this Sunday/Monday. New presets are coming. Maybe even Saturday night if all goes well.

Be back soon,

Michael

20090310

LIDF Update

Just to let everyone know, I recovered my finished presets from my failed drive. I get my new hard drive Wednesday and will be installing after I get off work. If all goes well, regular posting will resume on Thursday.

20090309

Monday Update: A Week Best Forgotten

So, again I come off another week feeling like I was a punching bag in a boxing gym. I never succeeded in getting back ahead with my releases on the blog, had to replace my film scanner and now my primary photo computer has a failing hard disk. Not getting ahead whatsoever. Thank goodness I started these Monday updates...give me the rest of the day to find a way to get caught back up and hopefully save the presets I lost in my data crash. Hopefully after running through a repair program my presets will be intact. If not, I still have the draft versions of them on my Linux machine, which I can pull off and finish them back up again. Hopefully I will again have something for tomorrow.

Here are the releases made this week:

Tuesday: Fuji 160C
Wednesday: Fuji 160S
Friday: Foma Fomapan Classic
Sunday: Forte Fortepan 400

Had a review of the great, inexpensive canvas products from ZaZa Gallery on Thursday. Definitely check out the review and their site is you are looking to get some gallery wraps made. Great quality at a reasonable price, make them your first stop when shopping around for prices. And if you need to uprez an image for a canvas wrap project, read Dennis Hays' write up on Genuine Fractals 6 over at X-Equals.

Saturday I made a post with a couple reminders...Vote on a winning image at the Flickr Prestting Lightroom group's photocontest. Please drop by and vote.
And drop by X-Equals to learn more about Dripbook, a great new online portfolio service.

And now I am going to continue in my epic struggle against failing hardware and hope that I can produce more content for tomorrow. Hopefully I can get my next article for X-Equals done soon too. Need to get my screenshots and then I will have an article all about sharpening in Lightroom ready to go. Just need a working Lightroom computer. This Linux machine is fine for everything but photos...no Adobe love for Linux.

Hopefully see you tomorrow,

Michael


UPDATE: My local Hard disk is trashed, and I was unable to recover my finished presets. As it is, it should be Wednesday before I can get a new drive, and Thursday before I can finish off a preset from the WIP presets that were last saved to my server the night before. In other words, no new releases until then. I don't know what I am going to cover the next few days, as I have no Lightroom/Photoshop PC at the moment, but releases will resume by the end of this week. And so it is written in stone, this week is best left forgotten.

20090308

LR/ACR Preset: Forte Fortepan 400

LR/ACR Preset: Fortepan 400

A quick release for tonight. I have had a hard drive failure on my production PC, bringing almost everything to a grinding halt. I luckily had an rsync update from my PC to my Linux RAID server on site, so I only lost the last day's worth of work, but that equates to 5 finished presets, 2 articles, and 2 articles for other blogs. Not a good day.

So here is one of the few finished presets I was able to scavenge, Fortepan 400.


Sorry I can't write more tonight, gotta get back to work trying to stabilize my system and prevent further data loss. Hopefully I can scavenge today's work before my hard drive totally becomes useless. Be back as soon as possible, hopefully tomorrow.

Until then (and wish me luck)

Michael

20090307

Miscellaneous: Stuff

Sorry for the late post, I have been distracted by yet another project, that has put off the article I was working on for today. Anyways, that will see the light of day soon, and since it is late I though I would just stop in to say hi!

In case you are involved in the Flickr Presetting Lightroom group, we are now voting on images that were submitted to the photo contest. If you partake in the group, please consider joining in on the voting. If you have not been by yet, come on over and join in on a great community for Lightroom. We are hoping to have more contests/challenges in the future, so keep checking in.

If you are a pro photographer or aspiring to be one, you most likely have a digital portfolio. If you do you may want to consider looking into Dripbook. They offer a great service that could be very beneficial if you maintain various contact points for your portfolio. More information on this service is available ovar at X-Equals.

I am having quite the experience with my new Plustek OpticFilm 7200 Film Scanner. Priced for those on a budget, it is quite lacking in features, however I am getting excellent results from it. I will be doing a full review and guide to getting good results from this high-res scanner that won't break your budget. Although I will miss my old Coolscan LS-2000, I won't miss the money I save on this over the Nikon Coolscan 5000 ED. I can deal with lower quality for my personal film shots. I can pay to get great scans on a frame if I really need it...such as I do for all the shots on test rolls of film.

Other than that, don't forget to get my Cold Storage Collection if you haven't done so already. Proceeds from the sales contribute to my costs incurred whilst developing these presets. Your generosity will keep this site moving forward.

Well, not I am going to get to work in preparing more material for this site, hopefully finally get ahead of the game again. Also, I am in the process of writing an article for X-Equals about sharpening your images in Lightroom. It will go fairly in depth, keep an eye out for it sometime in the next week or so.

Well until the next post,

Michael

20090306

LR/ACR Preset: Foma Fomapan Classic

LR-ACR Preset - Foma Fomapan Classic

Well, Friday seems like a good day for a new preset. Thank goodness it's the weekend now, as I have three days in which to get my current load of presets completed. I'm running low on ready stock and need to get my current batch done. But that's not what you are here for now, is it?

Today I bring you an emulation of another fine film from Foma. Today's release is on their "low-speed" Fomapan 100 Classic. It is similar to Fomapan Creative in many ways, with a slightly different tone profile and a finer grain.


I hope you find the emulation enjoyable. I will be back tomorrow with more content of some sort, most likely not a preset, but something more informative (as I have to get more presets ready to roll).


Until then,

Michael

20090305

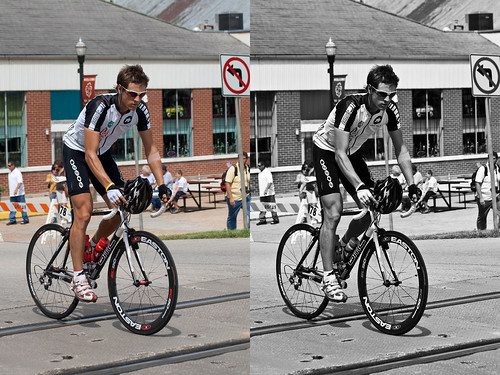
Review: ZaZa Gallery Stretched Canvas


Recently, whilst twittering on Twitter, I met up with a fellow that goes by the moniker @photocanvas who has gotten into the business of producing gallery wraps. When I checked out his site, ZaZa Gallery, I was blown away at the prices I found listed. 8x10 canvas-wraps for $25 and 20x30 for $99. I was curious, but a bit set off by the low price.

In my experience, I have found that while inexpensive is great, there is usually a discernible lowering of quality. With this in mind, I still wanted to give ZaZa Gallery a go, as I have been wanted a canvas wrap for my wall, and I have always been too cheap to get one.

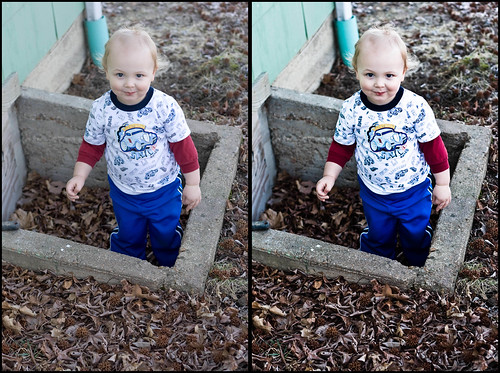
So I chose a picture of my wife and son, chosen so this could double as a Valentine's present. The shot was taken with my Canon XTi and I uprezzed the converted RAW with Genuine Fractals 5 (a step behind, as always). When I was processing the image in Lightroom I hit it with my Kodak Portra 160NC preset from my Cold Storage Collection. I wanted to see how the more subtle colors would come across on canvas, as most prints I have seen tend to be rather saturated. So after I got the image done, I uploaded to ZaZa Gallery.

Within a week I recieved my canvas via FedEx Ground, and upon opening the box was promptly blown away with the quality, especially when I factor in the price.


Immediately I saw that my Kodak-inspired colors were dead-on. I did not ask for any special handling of the image, so it was great to see that Hugh (the real name of @photocanvas) knew what I was wanting from the original image and did nothing to alter the colors of my image. Next, I noticed the wrap itself, where he had perfectly mirrored the border of my image, and stretched the canvas right on that mirrored border. Finished it off with nice, tight corners. I was truly impressed. ZaZA Gallery's production quality is great, and the Epson inks brought out true color on the nice, white canvas.

Speaking of the Epson inks, the printer used produces great, sharp, detailed images. I was expecting to see a lesser DPI utilized for my 11x14 canvas, as I have seen done with other enlargements. It was not so. The level of detail retained was amazing, especially whe I peered deeper into the reflection on my wife's sunglasses...I realized that I was in the portrait myself.

I was surprised to find myself printed in fairly good detail, with indidual twigs on the trees around me still visible. To an extend that is a testimony to modern digital cameras, but again, this is a lot of detail for a heavily textured surface. It was great.

Needless to say I am impressed with the quality of ZaZa Gallery's work, and look forward to utilizing them again when I get ready to order my next canvas wrap. They utilize archival inks and coatings, to ensure a long image life...I can't quite test that, but I'll let you know in 90 years or so.

The only thing I found lacking about their service is a minor pittance. A backing and hanging wire would have been a great addtition, but for what they charge it is no big deal to drive down to my local framing shop to do it myself.

So next time you are looking to get some gallery wraps made, drop by their site and check them out. If you have any questions all their contact info is on the site, or you can simply follow Hugh on Twitter @photocanvas. If you do order, let him know you found him through LifeInDigitalFilm.


While on this topic, I mentioned earlier that I had uprezzed this image utilizing onOne Software's Genuine Fractals 5. Yesterday, Dennis Hayes (of Photo News Today) had a guest spot on X-Equals blog, in which he went in-depth with Genuine Fractals 6. Drop by and give it a read if you like to go big with your images....remember, at 300 dpi 11x14 is as big as it gets at 10 megapixels. Genuine Fractals lets you go big and make new pixels that look real, as if you shot your image with a 20 megapixel camera with no noticeable loss of quality. Check it out over at Brandon Oelling's X-Equals blog.

Well that is all for today, back tomorrow with something else.

Until then,

Michael
20090304

LR/ACR Preset: Fuji 160S

LR/ACR Preset: Fuji 160S

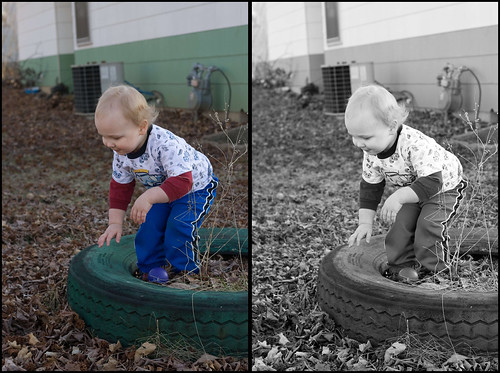
Another day, another Fuji-looking preset. Today I bring you Fuji 160S, the subdued color sibling to yesterday's Fuji 160C. While still quite vibrant, the color is more subtle than 160C, however it still can bring some pop to an image. This film was designer for use in portraiture, and thus it handles skin tones beautifully. A nice film, which I found I quite enjoyed, as I have a liking to the more subtle tones of portrait films.


As it is quite a busy day, I am going to leave it at that. Come back tomorrow, when I will have some honest-to-goodness blog writing done...or if all else fails another preset from the B&W vault.

Until then,

Michael
20090303

LR/ACR Preset: Fuji 160C

LR/ACR Preset:Fuji 160C

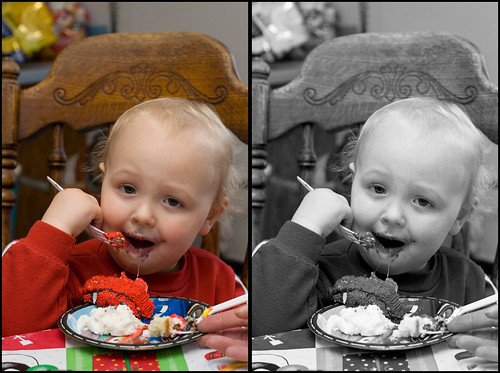
Alright, back on schedule. Releasing one of two quality Fuji presets today, tomorrow another follows. Today I bring you my interpretation of Fuji 160C, one of Fuji's professional line films, this one designed for general use, with a heavy leaning towards strong saturation. The film produces great, saturated colors, but not too far over the top. Great for all kinds of uses, but maybe a bit rich in the orange channel for portraiture. But that is what Fuji 160S is for.

160C features a fine grain and Fuji's "4th color layer" which supposedly allows for richer colors with less grain. Either way it is a great film with a lot of versatility.


Come back tomorrow for the next film preset in my Fuji set, 160S. The subdued portrait film.

Until then,

Michael

20090302

Monday Update: Some weeks are better than others....

In short, my week sucked. I had absolutely no time to work on LifeInDigitalFilm whatsoever, my real job and photo work saw to that. Luckily, I though things might go wrong, so I prepped enough material to get through the week with out posting, to get me through the weekend. That didn't work out as hoped, as I had no content on Saturday, but I still made a post, so my current streak is still intact.

So, if you haven't been by in a while, this week was pretty uneventful here. The only upside was that I got four new presets out the door.

Tuesday : Fuji Fujicolor Press 800
Thursday : Maco PO
Friday : Maco IR
Sunday : Foma Fomapan Classic

Saturday was a wash, as all I got up was an excuse for not posting, however on Wednesday I did get a couple words out as I covered a few topics that I felt I needed to address, read more on that HERE.

I was planning on doing more today, but again I am time limited, but all my current commitments have been met, so I have some time to dedicate to LifeInDigitalFilm in the coming days. The next two days will see some new presets released, and later in the week I will have a review of the canvas print service from Zaza Gallery and a little tutorial piece I have been working on. Hopefully I can find some time to get some details hammered out on my upcoming switch to WordPress and let you know when those changes will arrive.

Also, be sure to check out X-Equals, as Brandon has some great information over there. This week he threw down his review of Alien Skin's Bokeh and gave an introduction to Dripbook, a new spin on online portfolios.

Well, I will be back tomorrow with another new preset for you to play with.

Until then,

Michael

20090301

LR/ACR Preset: Foma Fomapan Creative

LR/ACR Preset: Fomapan Creative

Well, it has been a hectic week for me, but I guess I have avoided not posting. It is Sunday night and I am finally getting a release out. Sorry for the lack of contents yesterday, but I had my nose to the grindstone taking care of business. Now that is done and I am back. It may take a few days for me to get back to early posts, but I will get it back.

Tonight I bring to you another black and white simulation. Tonight's preset is an emulation of Foma's Fomapan Creative, a nominally rated 200 speed film, functional from ISO 100-800 depending on processing. This roll was exposed at ISO 200 and developed in D-76 Stock soulution for 6 minutes at 20C.

This is a really sweet film, with great tone and wonderful grain. I really like it a lot, enough that I am considering utilizing it for a lot of work I normally do with Tri-X. I have not been overly impressed with many of the modern-classic films (those utilizing the traditional cubic silver), but this one relaly got me. I love the tones it produces.


I hope you find this preset enjoyable. I will be back agaoin tomorrow, with my Monday update and some new links for you to follow. Tuesday shall bring another preset, and further in the week I have a few reviews for some software and services, including a great canvas print service, along with more presets.

I hope to have a Wordpress migration in the next month, have some gears moving with some great people right now...I will update further when things firm up a bit more. But good things are coming. I am also working on my own guide to simulating film in Lightroom and ACR, which I will release as an e-book this summer. It is coming along well thus far, and I will update further when I have more information on that as well.

In the mean time, keep using my presets, and let me know what you think of them. Don't forget to get your copy of the Cold Storage Collection to help me keep getting new films to emulate. On average every $10 purchase/donation will pay for 1-2 new emulations. So if you haven't grabbed a copy yet, be sure to do so...it keeps the site alive. AND anyone who purchases a copy of Cold Storage will get a FREE upgrade to the 2nd edition that will be coming this summer..it is my way of thanking all the early supporters. To pull the trigger on the deal, look to the right sidebar for the purchase buttons or click here to read more from the orignal post for CS.

Thanks again for all the support!

Until tomorrow,

Michael