Today we will discuss the methods by which you can create presets for Lightroom 2 and ACR. I am sure many of you already know how to do so, but I am sure some of you don’t. We will cover a basic creation process in both Lightroom and ACR, but first I would like to take a detour and discuss preset “stacking” for a few minutes. Once we understand the stacking of presets, we can make presets that play well together allowing for multiple effects to be combined.
One common complaint about presets is that you can only use one at a time. This is not entirely true, but in general seems to be the norm. Presets (in both LR and ACR) adjust the different sliders in the develop module to create the desired effect for the image created on export. If you apply one preset, then another, most usually you will end up with just the second preset applied. This is due to the fact that you only get one slider for each tool, this isn’t Photoshop and there are no layers. You only have one set of tools, and the last preset applied will always override and previous presets or manual settings. This is the reasoning behind the belief you can only use one preset at a time.
That is not to say that you cannot use well designed presets in unison with one another. When you create a preset in Lightroom, the default dialog setting will save every setting applied to the preset. This creates a preset that will over-ride every single slider in the develop module. Your brand new preset will not work with other presets, it will replace them. This is fine for an import preset you will apply to every photo you import, but is not good for general creative presetting.
When creating you image, make note of what tools you use to generate your effect. I have a text file I print out to make hard copy notes about what I alter in the process of making my presets, when filled out it shows me what sliders I adjusted and those I did not. This allows me to save my presets with only the tools needed for the desired effect. If you do not touch the Basic Tone settings, make a note of that. When it comes time to make the preset, we will exclude the Basic Tone settings from the preset. If your preset only adjusts the Tone Curve, when saving the preset, make sure that only the Tone Curve is selected to be saved in the preset. By creating presets that only adjust what is needed for the effect; you will be able to combine multiple presets to achieve your desired effects. If your preset does not require any given slider to be manipulated, you should not allow your preset to alter those tools when applied.
I will recreate my preset design form as a prettied up PDF file, and release it here on LIDF for anyone else interested in being as anal as I am about my preset design. I wasn’t always this way, as many of my early presets alter every single slider; even if they are not needed…it was bad design and it embarrasses me. I am slowly updating the older preset to fix this oversight, eventually it will be done. IF you are just starting, don’t make my mistakes.
Now that I have that covered/off-my-chest, let us move on with creating a preset. Choose yourself a photo, and go ahead and make a few adjustments. As you make adjustments, make not of what setting you are altering, as these notes will be used to ensure the stacking-compatibility discussed above. I chose a random image from a wedding I shot recently.
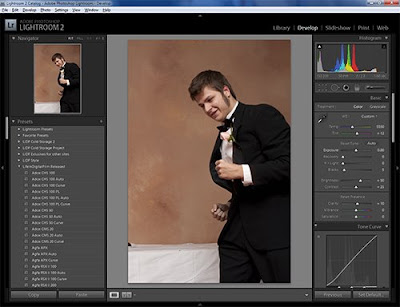
For this tutorial, I am going to make a preset that adjusts the Vibrance, Saturation, Clarity, Tone Curve, Split Toning and applies a strong vignette. Honestly, this preset sucks, it gives the picture a really bad look. However it is suitable for what we are going to do here. Here is a view of my develop module sidebar, showing only what is changed.

I make it a habit to start out my development process with all the tools closed. Only opening the tools I need as needed. As you can see, I did not even mess with HSL or Detail tools, so they are still closed. Once done with the image adjustments, I make my notes on which Items were adjusted in the Develop Module. We are ready to save this preset.
Now head over to the Left Sidebar and go to the Presets Tab. Click on the plus (+) icon on the Presets tab.
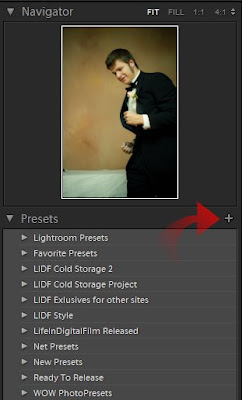
Once you click the plus icon, it will open the New Develop Preset dialog.
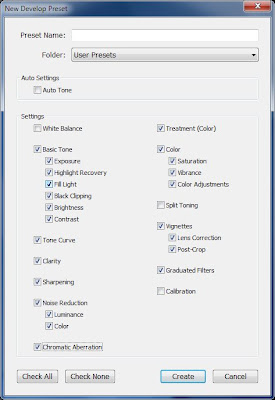
This image shows the dialog box with the normal default settings. You dialog will show the same options used in the last preset saved on your machine. If you click save now, your preset will be saved adjusting every slider in the develop module, not what we want. So, start un-checking the boxes of the tools you do not require. Here is my dialog, adjusted for my preset.
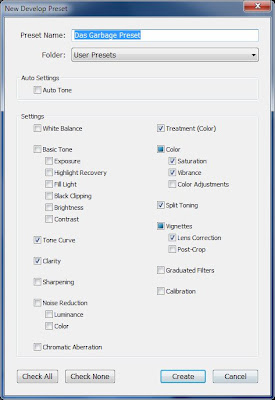
This dialog shows only the tools needed for the presetted effect selected. The Color and Vignette checks became boxes, as I only saved some of the sub-options there in (Vibrance and Saturation in Color; Lens Correction in Vignette). The Color check box’s Color Adjustment selection is used when you make changes to the HSL settings; I felt I should mention that, as it is not overtly clear.
Also, at the top of the preset dialog is a box of options, called Auto Settings:
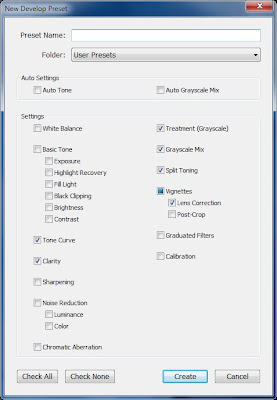
Color images will show only Auto Tone, monochrome images will show Auto Tone and Auto Grayscale Mix. Auto Tone, when selected, caused the preset to automatically adjust the Basic Tone sliders to what Lightroom deem to be the most appropriate settings. Auto Grayscale Mix will allow Lightroom to automatically adjust the Grayscale mixer, to what it deems to be a proper grayscale mix. These tools can be handy, but can create unpredictable results in application. I never use the Auto Grayscale, but I frequently use the Auto Tone option, especially in my film emulation Auto Presets.
Now click the Create button, and your preset will appear in the Preset Folder defined at the top of the dialog.
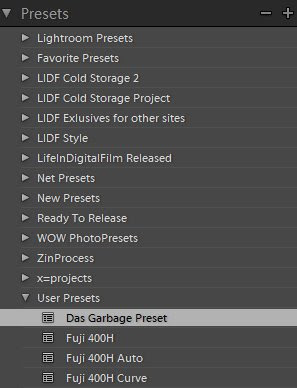
You have made your preset, we will discuss exporting your presets for others to use later in Part 4 of this series.
So, that covers Lightroom. So we will just jump to ACR, and just cover the process to save your preset. We will assume that you already have the image adjusted.
I again have the same image adjustments made to the same image.
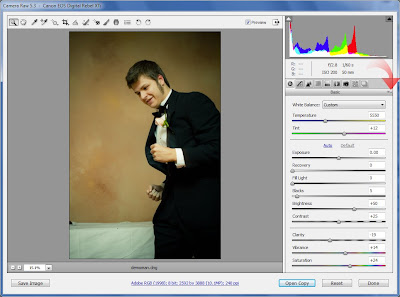
Click on the option icon, depicted by the arrow in the above image to open the File Settings Menu
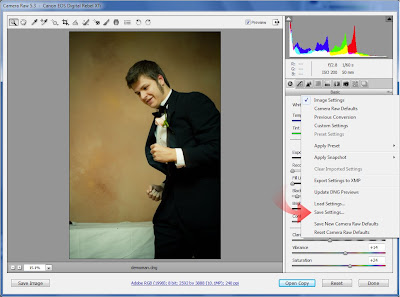
Click on Save Settings... This will open the save setting dialog.
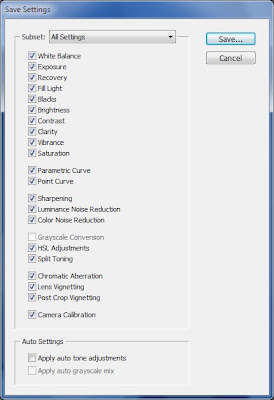
This dialog looks a lot like the New Preset dialog in Lightroom. Again, it selects every adjust made available to you. Follow the preset design rules, and only select the options that you need for the preset. Here is mine again.
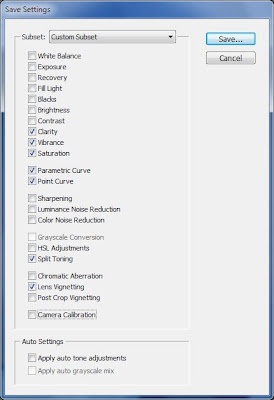
Once everything is properly configured, click Save… This saves your preset, bringing up the save dialog.
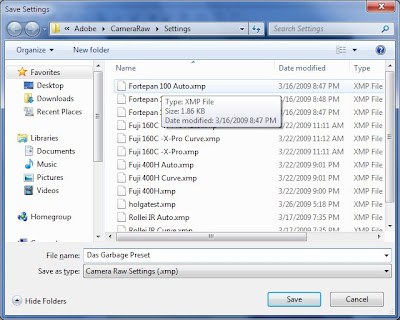
Give it a name, and click Save. You preset is now in ACR’s preset menu, as noted in the following image:
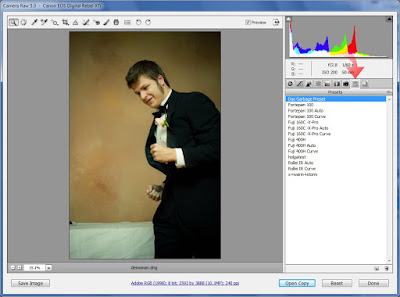
You are done.
I should have a few good posts in a row over the next few days, so check in again soon.
Part 3 will be coming soon. Covering updating and combining presets.
Until then,
Michael


No comments:
Post a Comment