Showing posts with label "Film Preset". Show all posts

20090306

LR/ACR Preset: Foma Fomapan Classic

LR-ACR Preset - Foma Fomapan Classic

Well, Friday seems like a good day for a new preset. Thank goodness it's the weekend now, as I have three days in which to get my current load of presets completed. I'm running low on ready stock and need to get my current batch done. But that's not what you are here for now, is it?

Today I bring you an emulation of another fine film from Foma. Today's release is on their "low-speed" Fomapan 100 Classic. It is similar to Fomapan Creative in many ways, with a slightly different tone profile and a finer grain.


I hope you find the emulation enjoyable. I will be back tomorrow with more content of some sort, most likely not a preset, but something more informative (as I have to get more presets ready to roll).


Until then,

Michael


20090124

LR/ACR Preset: Ilford SFX


LR/ACR Preset: Ilford SFX, originally uploaded by GrayImaging.

Today I complete my run of Ilford films for the time being. Today I bring you Iford's SFX, one of the few remaining IR films. This film was actually discontinued, however Ilford is not making Limited productions of it, one batch a year.

As always, my emulation of IR films is designed to be used on regular raw files. I have not tested this preset with a IR raw file, as much I I would like to, I just don't have any IR RAW files. I have a few IR JPGS, and the results were alright with them, however, I don't preset on JPGS often and I was not overly impressed with the results.


On another note, I will be taking a few days off from the blog, hoping to expedite my migration over to WordPress. There will be no presets during that time, maybe an article or two, but no big releases. When I resume, I plan on releasing two presets a week, with other content on non release days. This really does not change the frequency too much, I have release 33 releases in 13 weeks, which is about 2-3 a week. I plan on new presets coming out on Tuesdays and Fridays (make note: I am in USA). Hopefully I will have my new preset out on this coming Tuesday, but if not, watch for it on Friday.

I hope this year brings much more content to LifeInDigitalFilm, and I really hope the upcoming switch to WordPress improves the quality of the site. I look forward to being here doing this for a while.

Michael

20090115

LR Style Preset: 110 Prints


LR Style Preset: 110 Prints, originally uploaded by GrayImaging.

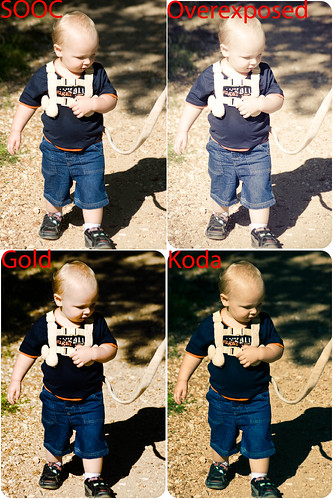
In a departure from my usual film emulation fare, I decided to branch out and make a print emulating preset. I call it my 110 Print Presets. The set contains an overexposed preset, and two film styled presets. One based off Kodak Gold, called 110 Gold in both standard and auto. Also has 110 Koda, which is based off of Kodachrome 25, again in auto and standard.

I know that not just 110 3.5x5's were made with rounded corners...135 format was printed like this as well back in the day. However my family photos that look like this all have 110 negatives in the shoe box with them, so to me the look is distinctly 110.

I will recommend that if you send out for prints using this preset, to look for a photo finisher offering the Kodak Silk paper. Adorama offers this particular finish in 3.5x5 for the complete classic look. Just adjust the post crop midpoint to 50 in the Vignette menu, which eliminates the white border, leaving the rounded corners.

You can get the preset HERE.

Until next time,
Michael

20090112

Lightroom Film Emulation Preset Tips


Tour of Missouri - 5, originally uploaded by GrayImaging.

As I had mentioned yesterday a lot of people seem to think that these presets of mine are expected to produce film like results with one click. Although you can get excellent results from these presets with a single click, you will not properly emulate any film without some additional work. Hopefully this will guide you a bit further into using my presets for emulating the look of a film.

1: Know Lightroom's Limitations

Okay this is right out the barn door, know what Lightroom can and cannot do. You can not emulate grain in any way, shape or form currently. Outside of shooting at a high ISO to get noise, you will have to add grain in Photoshop, Paint Shop Pro, or GIMP. I have tried to simulate the look of grain with noise reduction turned off and sharpening cranked up...it does not work. If you need grain add it in your pixel editor.

Lightroom can manipulate any RGB image, however, it will not be able to utilize all its power on a rasterized image. If you need to edit a non-RAW picture, make sure that it is at it's highest quality. At least a 16-bit uncompressed TIFF or PSD. If it is a scan, get the highest color bit-depth and the highest resolution feasible, the more information Lightroom has to work with, the better. Whenever possible use RAW. I develop these presets assuming that they will be utilized for RAW processing. Apply them before you hop into Photoshop with an image.

Lightroom uses a unique colorspace based of Prophoto RGB. Know this when exporting. There will be color compression. Always proof your exported images. If you are doing pixel manipulations in Photoshop, I feel you should export as a PSD at highest bit-depth in the Pro-Photo colorspace. Or, you can export the file as a DNG with all your edits saved, and open that DNG in Photoshop ACR. (hint: if you use ACR alot you can save the develop settings embedded in the DNG in ACR and utilize any preset in ACR that way. Kind of making ACR versions of any preset. I will be getting to that eventually.)

The more you know about Lightroom, the better you will be able to use my, or anyone else's presets. Read tutorials, grab a book. As NBC says "The More You Know...."

2: Watch those skin tones!

In color slide presets, often you will get horrid skin tone, especially on Caucasian skin. If they appear too red or orange, go to the color mixer and lower the Orange channel saturation until the skin tone looks correct. If you only drop the saturation until the skin looks good, it will improve the photo and alter the color response being simulated only slightly. Beware, doing this with a lot of fall colors in frame, as they will be effected. The less change required the better. If it still does not look right, hit orange luminance next, and last red saturation. Try to avoid messing with red as much as possible, especially since it is a primary color and changes will effect the simulation quite a bit.

3: Dig for artifacts.

Primarily when working with black and white presets, keep an eye out for strange halation effects and odd toning in your subject, essentially "breaking" the image. If you notice either, lower or raise the offending color channel and see if it will alleviate the problem (refer back to the original color image). If that does not fix the problem, adjust the sharpening first (you can always sharpen in Photoshop), and then look at your contrast. Sometimes excessive contrast will cause images to "break".

4: Know what the film should look like.

If you shoot or have shot the film you know what to expect, making it easier to duplicate the look. Presets are made to give you a good starting point, and I develop these to simulate color reaction and tone curve as accurately as possible. However, film reacts differently in the real world, so know what you are looking for. If you never shot a particular film you can always google the film you wish to emulate and search flickr for images made with said film. Compare your conversion to these and make adjustments as needed. This is the best way to simulate film, if you know what you are trying to achieve, its easier to get there...the preset just started you in the direction. Keep in mind, exposure has MASSIVE effect on film, and different exposure will react differently. Two different frames of Tri-X will look different, even of the same subject, as exposure changes. Lightroom can not ever simulate the nuance of chemical reactions.

5: White balance keeps your whites whiter and brights brighter!

Use your selective white balance creatively! The white balance will change everything in an image. Experiment and find what you like, use it to warm and cool color. White balance can completely alter the toning of a monochrome image. Push it around to get what you need. If you are trying to copy the look of another photo, white balance is your best first step.

6: Split toning can cast your colors.

If your sample photo you are emulating has a slight color cast, figure out what shade it is and run down to the split toning in your develop tab and pop that color into both the highlight and shadow tones. Then set each tone to a level of saturation, I usually hit the highlight around 10 and the shadow around 20, then play with the balance until you get what you like. You can also create a duotone monochromatic image like this.

Some of my preset will have the split tone used to get a cast with the first click. Adjust the toning to suit your needs.

7: Watch your contrast and black clipping.

Any image you preset can be improved by adjusting the contrast and black clipping. Each image is different, and needs a unique approach. Even an Auto preset can get it way off. For what its worth, alter any of the Basic sliders until you get what you want. Or develop the image as it is imported until you get an exposure you like, then apply a Curve preset, applying only the color tones and curve.

8: The devil is in the details.

Don't forget to look at the clarity, sharpening and noise reduction for an image. If a picture does not look right, often increasing clarity, adjusting sharpening and cutting noise reduction (especially luminance) can give it a quick make over.

That is it for now, so go and play around. Presets do not make the image, you do. Also, do not feel compelled to have to duplicate a film's look. Often a single preset click can improve an image and you think it looks great...if that's the case leave it as is. You can always say it was inspired by Kodachrome 25 (such as picture above).

Read the readme.txt files included in zip files. I often have hints specifically for that preset. Often the hints are generic and good for any preset, other times the hints apply only to the particular preset.

My presets are to help you out when you want a film look from digital. I can not encourage you enough to go out and shoot film. It causes you to look at photography differently. I carry two film bodies every day, a Minolta 7000 and a Yashica Manual SLR. I shoot them as often as I do my Canon EOS digitals. If you have to go get a five dollar point and shoot film camera, get it and a good quality film and head out for a day. A fixed focus 28 mm point and shoots loaded with Portra VC can take great pictures on a slim budget, and force yoy to only consider your composition.

Hope this helps a bit, more hints in the future.

Until next time,

Michael

Note: All sample photos I post with releases ARE 1-click applications. I do no further editing. Just click the preset, export to jpg and post to flickr.I felt I needed to clarify that, I did not want people thinking that my samples were further processed, they are there to show the presets action.

20090110

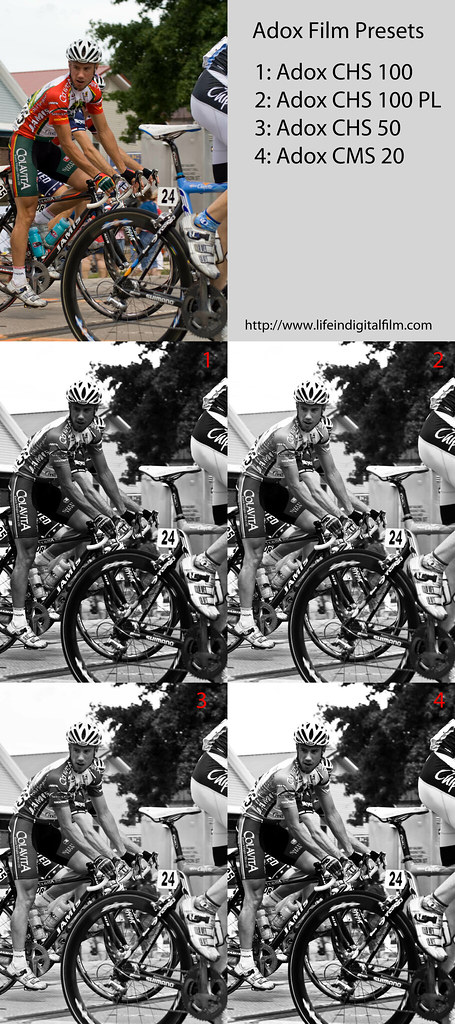
LR/ACR Presets: Adox Films [(CHS 50,100,100PL) (CMS 20)]


[Adobe Camera RAW presets added 01132009]

This afternoon I am releasing 4 different film emulation presets, all for Adox films. Adox uses a traditional 1950's era emulsion, high in silver contents and low in speed. 100 is their highest speed in the CHS line due to the chemistry in the emulsion.

Check out their film:
Adox film on Sale at Freestyle
Adox film website

Now for the downloads:
Adox CHS 50 >>> HERE
Adox CHS 100 >>> HERE
Adox CHS 100 PL >>> HERE
Adox CMS 20 >>> HERE

Enjoy,
Michael


PS:

I am looking for more film samples, and if you shoot film and have access to a MacBeth style color card, next time you have a spare frame, find good light and snap a picture of your color card. Get a good, HQ scan of the image, and email it or a link to me at michael@lifeindigitalfilm.com . The image of the colorchecker is the 1st step in my emulations and if anyone can help thank you. I need images for film I have not emulated and film I have, as I will update them after I get my first release cycle done. Please attach the Manufacturer, Name, ISO and development process (push, pull, c-41 in e-6 xpro) for color film. Add detailed devlopment info for B&W films, such as the devloper used, dev time, and any other step you choose to include. I hope to add different developers to my B&W presets, as currently they are all assuming d-76.


Thank You

20081217

LR/ACR Preset: Fuji Neopan 400


LR Preset: Fuji Neopan 400, originally uploaded by GrayImaging.

[Adobe Camera RAW preset added 01132009]

Wow, this is what, 3 nights in a row that I get a release out. I must be sick....oh wait...I am. Plus I am still sick and it is my birthday. Too nasty to go out and shoot here in mid-Missouri, and all the rest of my photo editing work is too important (i.e. customer's work) to do while hopped up on Nyquil. Sometimes things look really good 45 minutes after taking a dose, not so much the next day. But, I digress.

Tonight's menu features another fine Fuji film. Another of my B&W presets, this is the sister preset to my Fuji Neopan 1600 from two nights ago. Both were processed at the same time, but I split up the release to bring a little color to a rather dreary day yesterday.

So tonight I give the world my version of Fuji Neopan 400.

Get it HERE.

Until Next Time,
Michael

20081211

LR Preset Collection: Kodak B&W Vol. 1

So once again I have had a lapse in new posts. Unfortunately it always gets that way this time of year. Upside, I get almost 2 weeks vacation after Christmas, so I will have more time for my fledgling photography business and more time to give to my blog. I refuse to promise a regular release schedule until I can get past Christmas.

However, although I have no new preset to release tonight, I am officially releasing my Kodak preset you all have been using. I have grouped up 9 of the Kodak presets from here, and 3 Presets from my 1st B&W set. I added my "curve" preset to the 3 re-released presets.

Other than the re-releases, If you have gotten all my downloads here so far then you have all this. But if you are just finding the site now, all my Kodak B&W films I have release to date are in this set.

As I go along, Ilford will get a set like this, along with Fuji, Rollei/Maco, and then a set of other film stocks. But for now Kodak is the set I have most complete so here it is:

Included Film Emulations (3 presets per film stock)

MikeyG!s Kodak BW CN Preset
MikeyG!s Kodak Copy Film Preset
MikeyG!s Kodak HIE Preset
MikeyG!s Kodak Panatomic X Preset
MikeyG!s Kodak Plus-X Preset
MikeyG!s Kodak Portra BW Preset
MikeyG!s Kodak T-Max Preset
MikeyG!s Kodak Technical Pan Preset
MikeyG!s Kodak Tri-X Preset
MikeyG!s Kodak T-Max 100 Preset *
MikeyG!s Kodak T-Max 400 Preset *
MikeyG!s Kodak Tri-X 400 Preset *

*- these are the re-released preset. All others are here on this blog and have sample pictures posted.

Get the file HERE

The collection has also been released by Pierre at PresetsHeaven. I ask you all to check out his site daily, as he produces some great presets and also distributes presets created by other talented individuals.

PS: (12/13/2008; 0703 CDT) I just discovered that I had goofed in my Panatomic X release, I accidentally placed my Plus-X Auto and Curve presets in with the PanX standard preset. This effects both the original PanX release and the Kodak Collection. I will fix the issue later today when I get back home. Sorry for the screw-up.

(12/13/2008; 1103 CDT) The corrected collection zip file is HERE. This link is hosted by LIDF, however please get it from PresetsHeaven and support Pierre.

Until Next Time,

Michael

20081201

LR/ACR Preset: Konica IR


LR Preset: Konica IR, originally uploaded by GrayImaging.

[Adobe Camera RAW presets added 01132009]

Well I promised a preset earlier today so now it is time to deliver. Tonight's develop preset for Lightroom is Konica IR film.

Another dead film, discontinued in 2004, Konica IR was not a true IR film, only reaching barely in to the IR spectrum. However the film was excellent for portraits and landscapes due to it's shimmery highlights.

Get it Here.

Also I have gotten a few film preset requests so far from Flickr and Twitter. Once again if there is anything you want me to try and make for you, feel free to leave the request in the comment field of any of my posts, twittering me @mwgray, or e-mailing me @ [grayimaging]@[gmail].[com] (remove brackets).


Until Next Time,
Michael

20081113

LR/ACR Preset: Kodak HIE


LR Preset: Kodak HIE, originally uploaded by GrayImaging.

[Adobe Camera RAW presets added 01132009]

Sorry for the missed day all...I had to take it off, it was my first day in a very long time in which I developed my own film. Processed a roll of my favorite, Fuji Neopan 100 Acros. But anyways, that was the cause of the delay...photography.

But today I preset to you my humble interpretation of Kodak HIE infrared film. This particular film stock is no longer produced (production ceased in 2007) and the last rolls of stock are selling at quite high prices on eBay. I'm too cheap to pay $40 usd on a roll of film, no matter how spectacular, so this was as close as I could get with out real negatives in my hand to compare to.

Anyways, many people were up in arms of the cancellation of this film, so I guess it was special to many people out there. So have at it and hopefully it may get near-IR results.

Get it HERE.

I will recommend that you adjust the red and magenta channels give or take 20 clicks on the slider to find the best look for the image. I kept the reds conservative to get better overall appearance, but many photos need those channels kicked to the right a notch to get better IR effect.

Well until next time,

Michael

20081110

LR/ACR Preset: Kodak Plus-X


Sample - Kodak Plus-X, originally uploaded by GrayImaging.


Sorry for the time away, but I have been feeling a little under the weather. Good news is that I have some more presets ready, which I will be releasing over the next couple days.

Today I present my interpretation of Kodak Plus-X black and white film. Plus-X is another classic film, it received a revamp back in the 2002, merging the Plus-X family into one emulsion, PX125 (which is still available today). The grain is finer than that of Tri-X and tones are smoother and more subdued than T-max.

You can get it HERE.

When using the preset, any preset by me (or anyone else for that matter) remember to play around with those sliders some. As long as you don't touch the color mixer on my presets you should retain the general tone and/or color of the film. Throw in vignettes, sharpen the hell out of the images, drop the contrast, whatever makes it look right to you.

Try the different versions of each preset. Take the standard preset and tweak it to your needs, when you find a look you like, right click on the preset and update it with your new settings. Work the picture up in color and toss the curve preset on it, it will leave all you basic tone adjustments alone. Or let Lightroom do the work and hit the Auto preset. Experiment. If you have any question regarding the use of my presets just ask in the comments under the applicable preset. I will give you an answer as soon as I get a chance.

Well until next time, my friends

Michael W. Gray

PS make sure you check out the sites to the right, such as PresetsHeaven & TWIP.

20081103

LR/ACR Preset: Kodak Portra BW

[Adobe Camera RAW presets added 01132009]

Presenting my next film. Nothing fancy this time, just another discontinued Kodak film. Portra BW was part of Kodaks original Portra line, and was discontinued with the recent revamp of the Portra line. Portra BW was replace with Kodak BW CN.

Not much to say about this film. Used it once, not overly impressed, but that could have been as much due to my lack of photography skills. But anyways I wanted to rescue it's tones from death.

Get it HERE.

20081102

LR/ACR Preset: Kodak Technical Pan


Greggie & Scottie, originally uploaded by GrayImaging.

[Adobe Camera RAW presets added 01132009]

Presenting final release for Halloween weekend. This one was hard, as it is a film I truly love, cannot get, and was extremely hard to emulate. I got about 10 hours invested in getting this preset as close to the original film as possible, but it is impossible to fully render this classic film with current digital technology.

Kodak Technical Pan is offically an extinct stock. The film was much more sensitive to the red spectrum than other panchromatic films, and was favored by astrophotographers for its ability to pick up this range of color. The film had a very very fine grain, leading it to be highly utilized by fashion photographers, military, and police due to the enhanced resolution that could be gained from such a fine grain.

The overall effect of the film has not been duplicated in the film world, and honestly, is impossible to properly emulate for digital. Given enough megapixels, such as a RAW file from a 50 megapixel medium-format, this preset MIGHT be able to make an image that looked as if it was shot om 135 format Tech Pan. Yes, it was that good.

This preset attempts only to capture the tonality of Tech Pan. Use it low contrast to simulate standard development, showing fine detail. Crank up contrast to get pictorial processing look. Once again, due to the uniqueness of this film, I know of no way to really nail the look of Tech Pan processed in Technidol, but this preset gets close enough to make my heart smile just a little bit.

RIP Kodak Technical Pan 1977-2004

Get it HERE.

20081030

LR/ACR Preset: Kodak BW CN

[Adobe Camera RAW presets added to zip 01132009]

Tonight I am proud to present my first film simulation preset that I am premiering on my blog. Tonight I am giving the world my simulation of Kodak BW CN.

I have attempted to get the tone and scale of the original film as accurate as possible. Obviously we cannot yet simulate grain in Lightroom, and that is the biggest problem I have with the preset (and all my film style presets).

Have fun with it and I will further expand this post in the next day.

Oh yeah, grab it HERE.

Until Next Time,
Michael